Whisper to Your Kubernetes Cluster: Building KubeWhisper, the Voice-Activated AI Assistant
Simpler Kubernetes management, powered by voice and the Realtime OpenAI API.

Remember that one? Staring at your terminal, fingers hovering over the keyboard, trying to remember the exact kubectl command to check your pod status.
Kubernetes is flexible, but managing it with commands can be challenging. But what if I told you there was a way to bypass the command line complexity and interact with your clusters like you would talk to them?
Imagine talking to your Kubernetes environment and getting instant, intelligent responses. That’s the vision behind KubeWhisper, and in this article, I’ll show you how I made that “what if” a reality.
Enough chit-chat — let’s see KubeWhisper in action! Words can only do so much. Watch the video below. It is a short video showing KubeWhisper being used to query information about a Kubernetes cluster using voice commands.
The full implementation, including source code and documentation, is available in the KubeWhisper GitHub repository.
KubeWhisper
So, what is KubeWhisper? In short, it’s a voice controlled assistant to make managing your Kubernetes clusters as easy as talking.
Imagine this: instead of wrestling with complex kubectl commands, you can just ask your cluster what you need or what you want to do.
The core benefit of KubeWhisper is to simplify Kubernetes management through natural language. No memorizing syntax or searching for the right command — just talk and KubeWhisper does the rest. This was my main goal, to talk to Kubernetes.
To enable this, I was interested in using the OpenAI Realtime API as it’s critical for creating interactive conversational experiences with voice.
This technology is key for processing spoken language quickly and returning responses in near real time with no lag.
In short, KubeWhisper uses:
- OpenAI Realtime API for language processing
- Voice-to-Text (VTT) for converting your voice to text
- Text-to-Voice (TTV) for converting responses back to speech
- Kubernetes commands executed behind the scenes
But how does KubeWhisper do this magic? Let’s get into the architecture.
KubeWhisper Architecture
KubeWhisper leverages the OpenAI Realtime API for the heavy lifting. The model we use, gpt-4o-realtime-preview is low-latency and multimodal.
That means it’s fast and we can send voice commands to it and it will respond with a voice. No more voice to text (VTT) and text to voice (TTV) conversions necessary.
That makes the architecture of KubeWhisper a lot simpler.
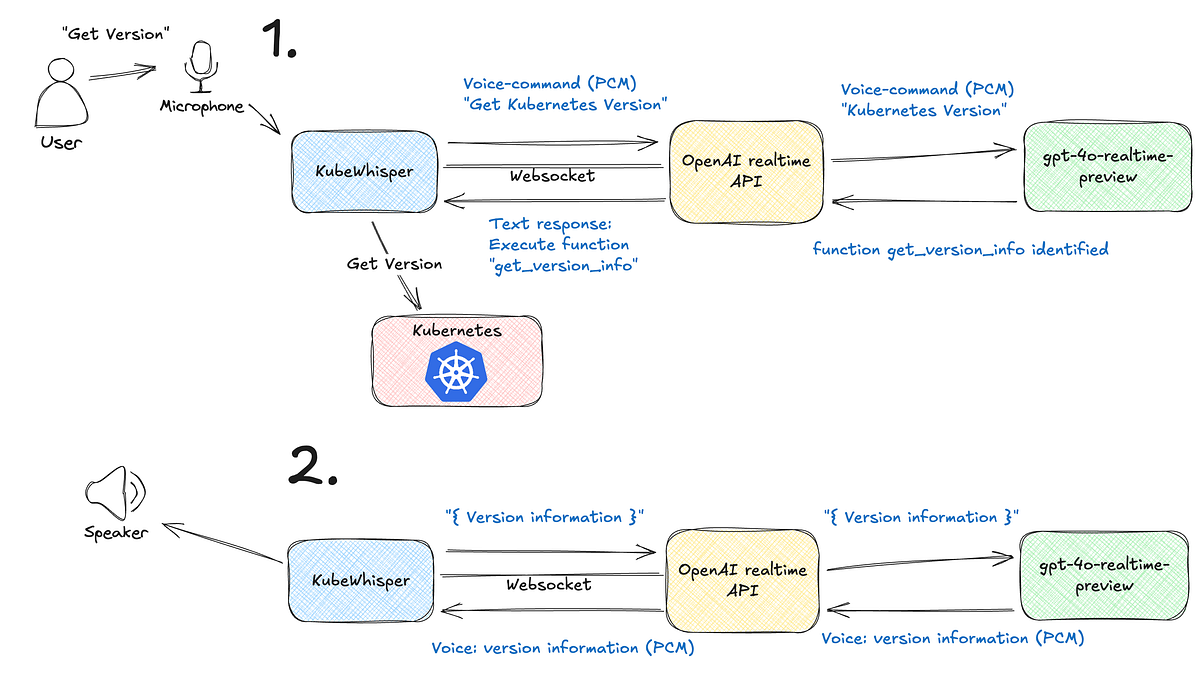
The diagram above shows the key steps of how KubeWhisper interacts with the OpenAI Realtime API and your Kubernetes cluster. The first step shows how it receives the spoken command, and the second step shows how it receives the response. Let’s break it down.
Step 1: Voice command processing & function identification
This step shows how KubeWhisper starts the command execution. It all begins with you, the user, saying “Get Kubernetes Version” into your microphone.
KubeWhisper records your voice and then sends it via WebSocket to the OpenAI Realtime API.
The OpenAI API, in the first step, analyzes the PCM audio stream of your voice command and based on that, determines that you are asking for the Kubernetes version and what function in your KubeWhisper system to use to do that.
Then the OpenAI Realtime API sends back, via the same WebSocket, what function in KubeWhisper to execute, in this case get_version_info.
Step 2: Kubernetes interaction & response delivery
In this step, KubeWhisper receives the function identification information from the OpenAI API and interacts with the Kubernetes cluster.
It executes the function get_version_info to get the information, your Kubernetes cluster’s version.
KubeWhisper then sends that version info via the same WebSocket to the OpenAI API, which converts the text response into voice and sends the resulting PCM audio stream back to KubeWhisper.
And KubeWhisper plays the audio stream back to you via a speaker. You now have the version of your Kubernetes cluster, given back to you in audio.
I know it sounds like a lot of moving parts (and it is!), but here’s the thing: thanks to WebSocket, this all happens in the blink of an eye. Want to see how we built this? Let’s dive into the Python code that makes it all work.
Implementation details
Now, let’s dive deeper into KubeWhisper’s architecture. The diagram below shows the core modules and how they interact to enable the voice controlled experience.

As you can see, KubeWhisper uses different modules to create this experience. At the heart of KubeWhisper is the SimpleAssistant class, which is like the manager of the system.
Let me take you behind the scenes. Remember that diagram we just looked at? It’s actually our roadmap for understanding how KubeWhisper ticks.
Let’s dive into the actual Python code that makes each piece work. I’ll walk you through each component, just like I did when I first built this. We’ll start with that user voice command and follow it all the way through to hearing the response.
Opening the WebSocket and creating the session
The first thing KubeWhisper does when starting is opening a WebSocket to the OpenAI Realtime API and initializing the Session. This is the responsibility of the WebSocketManager.
It uses this WebSocket url wss://api.openai.com/v1/realtime?model=gpt-4o-realtime-preview and adds your OpenAI API key in the header.
async def connect(self):
    headers = {
        "Authorization": f"Bearer {self.openai_api_key}",
        "OpenAI-Beta": "realtime=v1",
    }

    self.websocket = await websockets.connect(
        self.realtime_api_url,
        additional_headers=headers,
        close_timeout=120,
        ping_interval=30,
        ping_timeout=10,
    )
    log_info("Connected to the server.")
    return self.websocket

async def initialize_session(self, session_config):
    session_update = {"type": "session.update", "session": session_config}
    log_ws_event("Outgoing", session_update)
    await self.send_message(session_update)
Once it establishes the WebSocket connection, we need to set up the session configuration.
Session configuration
This is where we tell the OpenAI API exactly how we want our assistant to behave. Let’s peek at the SessionConfig class.
class SessionConfig:
    def __init__(self, tools):
        self.config = {
            "modalities": ["text", "audio"],
            "instructions": Config.SESSION_INSTRUCTIONS,
            "voice": "coral",
            "input_audio_format": "pcm16",
            "output_audio_format": "pcm16",
            "turn_detection": {
                "type": "server_vad",
                "threshold": Config.SILENCE_THRESHOLD,
                "prefix_padding_ms": Config.PREFIX_PADDING_MS,
                "silence_duration_ms": Config.SILENCE_DURATION_MS,
            },
            "tools": tools,
        }
Let me break this down for you. We’re essentially creating a blueprint for how our assistant should work.
- We tell it to handle both text and audio with
modalities - We give it a voice (I chose “coral” because it sounds natural)
- We set up the audio format (PCM16 is just a fancy way of saying “high-quality digital audio”)
- We configure when it should detect that you’ve finished speaking by setting turn detection type to
server_vad - And most importantly, we give it access to our Kubernetes tools via the
toolsarray
Kubernetes tools
Speaking of tools, this is where the magic really happens. Remember how we want to talk to our Kubernetes cluster? Here’s where we define what commands our assistant can actually execute.
tools = [
    {
        "type": "function",
        "name": "get_version_info",
        "description": "Returns version information for both Kubernetes API server and nodes.",
        "parameters": {
            "type": "object",
            "properties": {},
            "required": [],
        },
    },
    # More tools here...
]
The OpenAI API interprets this tools array as a structured list of callable functions, each associated with a natural language description.
Each tool is like giving our assistant a new superpower. When you say “What version of Kubernetes am I running?”, the assistant knows to use the get_version_info function.
AsyncMicrophone
But how do we actually handle your voice input? That’s where the AsyncMicrophone class comes in. Think of it as your assistant's ears:
class AsyncMicrophone:
    def __init__(self):
        self._pyaudio = pyaudio.PyAudio()
        self._stream = self._pyaudio.open(
            format=AudioConfig.FORMAT,
            channels=AudioConfig.CHANNELS,
            rate=AudioConfig.SAMPLE_RATE,
            input=True,
            frames_per_buffer=AudioConfig.CHUNK_SIZE,
            stream_callback=self._audio_callback,
        )
This class does something clever. Using PyAudio, it continuously listens to your microphone without wasting resources. It only processes audio when you’re actually speaking. It’s like having a really attentive listener who knows exactly when to pay attention.
SimpleAssistant
The real orchestrator of all these pieces is the SimpleAssistant class. Despite its name, it's doing some heavy lifting behind the scenes:
class SimpleAssistant:
    def __init__(self, openai_api_key, realtime_api_url):
        self.mic = AsyncMicrophone()
        self.ws_manager = WebSocketManager(openai_api_key, realtime_api_url)
        self.event_handler = EventHandler(self.mic, self.ws_manager, function_map)
Think of SimpleAssistant as the conductor of an orchestra. It makes sure:
- Your microphone is listening at the right time
- Your voice commands get sent to OpenAI
- The right Kubernetes commands get executed
- You get your response, both as text and speech
EventHandler
The really cool part is how it handles events. When you speak, an entire chain of events kicks off. The EventHandler class manages this flow:
async def handle_event(self, event):
    event_type = event.get("type")
    handlers = {
        "response.created": self.handle_response_created,
        "response.text.delta": lambda: self.handle_text_delta(event.get("delta", "")),
        "response.audio.delta": lambda: self.handle_audio_delta(event["delta"]),
        # More handlers...
    }
Every time something happens — whether it’s you speaking, the assistant recognizing a command, or Kubernetes sending back results — the EventHandler makes sure everything flows smoothly.
Let me show you how all these pieces work together. Let’s say you ask “How many pods are running?”:
- Your voice gets picked up by
AsyncMicrophone - The WebSocket sends it to OpenAI
- OpenAI recognizes you want pod information
- The
EventHandlercalls the right Kubernetes function - The results come back through the same pipeline
- You hear the response through your speakers
It’s like a game of high-tech telephone, but one that actually works perfectly!
Security
I can almost hear you wondering: “Wait a minute… am I just letting an AI loose on my Kubernetes cluster? That sounds… risky.”
And you’re absolutely right to think about security. But here’s the thing — KubeWhisper isn’t some AI wildcard that can do whatever it wants. It’s more like having a very specific remote control with only certain buttons.
Let me show you exactly what I mean. Remember our tools array? That's our security boundary right there:
tools = [
    {
        "type": "function",
        "name": "get_version_info",
        "description": "Returns version information for both Kubernetes API server and nodes.",
        "parameters": {
            "type": "object",
            "properties": {},
            "required": [],
        },
    },
    # More tools here...
]
Even if someone asks “Hey, delete all my pods!” (please don’t), the assistant literally can’t do it. It’s like trying to press a button that doesn’t exist on your remote. KubeWhisper can only perform the actions specified in the tools array, no exceptions.
And here’s another important detail — when the assistant uses one of our allowed functions, it’s using your Kubernetes credentials. The same ones you’ve set up with kubectl. So all the regular Kubernetes RBAC (Role-Based Access Control) rules still apply.
Think of it this way: if you can’t do something with your current Kubernetes permissions, neither can KubeWhisper. It’s not a security bypass — it’s just a different way to interact with the permissions you already have.
Pretty neat security model, right? You get all the convenience of voice control without having to worry about giving away the keys to your cluster.
Let’s talk about real world usage (and costs)
We need to talk about money. Because while KubeWhisper is amazing, it’s not free, and I want you to know what you’re getting into.
The OpenAI Realtime API charges for both text and audio processing. There are different pricing tiers (which you can find on OpenAI’s pricing page), but what you really need to know is that audio processing is the expensive part.
During development and testing, I burned through $10-$20 before I got smart about it. Here are some cost-saving options to limit the costs.
- Change to Push-to-Talk: Change the session initialization, set
turn_detectiontonull - Short & Sweet commands: Keep commands concise and to the point.
- Start Small: Use the cheaper “mini” model for development. Change the WebSocket url to
wss://api.openai.com/v1/realtime?model=gpt-4o-mini-realtime-preview - Text-First: Do as much development as possible using text.
- Stop Repeating: If the AI gets stuck, stop it immediately.
I’m already working on a version that runs completely on your own hardware. No more worrying about API costs or internet connectivity. Head over to the “Next Up: Looking Ahead” section where I share what I’ve learned so far about local models.
Current commands and adding your own
Let me show you what KubeWhisper can do already before we make new commands. I’ve built these based on my daily needs, and I bet you’ll find them useful too.
Here are all the current commands:
- Get Basic Cluster Info
get_number_of_nodes- "Hey, how many nodes do we have?"get_number_of_pods- "Count all my pods"get_number_of_namespaces- "How many namespaces are there?"get_cluster_name- "Which cluster am I in?"
2. Cluster Management
get_cluster_status- "How's the cluster doing?"get_version_info- "What version of Kubernetes am I running?"get_kubernetes_latest_version_information- "Is there a new version of Kubernetes?"get_available_clusters- "Show me all my clusters"switch_cluster- "Switch to the production cluster"
3. Monitoring and Debugging
get_last_events- "What's happening in the cluster?"analyze_deployment_logs- "Check the frontend deployment for errors"
You can say these commands in natural language. For example, “Are there any errors in the frontend deployment?” will trigger analyze_deployment_logs with the right parameters.
Now, let’s talk about adding a new command. I’ll walk you through creating a new one that I use all the time, getting recent pod logs.
First, we just add a new function into the kubernetes_tools.py file.
async def get_recent_pod_logs(pod_name: str, namespace: str = "default"):
    """Get the logs from a pod for the last hour."""
    try:
        # Load kube config
        config.load_kube_config()
        v1 = client.CoreV1Api()

        # Calculate timestamp for one hour ago
        one_hour_ago = datetime.datetime.now(datetime.timezone.utc) - datetime.timedelta(hours=1)

        # Get logs
        logs = v1.read_namespaced_pod_log(
            name=pod_name,
            namespace=namespace,
            since_seconds=3600,  # Last hour
            timestamps=True
        )

        return {
            "logs": logs,
            "pod": pod_name,
            "namespace": namespace,
            "time_range": f"Last hour (since {one_hour_ago.isoformat()})"
        }
    except Exception as e:
        return {"error": f"Failed to get logs: {str(e)}"}
To enable OpenAI to see this function, we must also add the following to our tools array. Here we describe the function which tells OpenAI when to trigger it.
{
    "type": "function",
    "name": "get_recent_pod_logs",
    "description": "Get the logs from a specified pod for the last hour",
    "parameters": {
        "type": "object",
        "properties": {
            "pod_name": {
                "type": "string",
                "description": "Name of the pod"
            },
            "namespace": {
                "type": "string",
                "description": "Namespace of the pod",
                "default": "default"
            }
        },
        "required": ["pod_name"]
    }
}
That’s it! Now you can say things like “Show me the logs from the Nginx pod in the front-end name space for the last hour” and KubeWhisper will handle it.
Best practices for adding commands
- Keep function names descriptive but concise
- Always include error handling
- Add clear parameter descriptions
- Make optional parameters truly optional with sensible defaults
- Test with various voice inputs to ensure the AI can match them to your function
Setting up your environment
Want the simplest setup possible? I’ve got you covered. Let me show you how uv makes this easy.
Here’s what you need:
- Python 3.12 or higher
- A working Kubernetes cluster with kubectl configured
- An OpenAI API key
- A decent microphone (your future self will thank you)
Installation can be done in just three steps:
- Install uv (if you haven’t already):
curl -LsSf https://astral.sh/uv/install.sh | sh2. Clone and run:
git clone https://github.com/PatrickKalkman/kube-whisper.git
cd kubewhisper
export OPENAI_API_KEY='your-api-key-here'  # Don't forget this!
uv run kubewhisper- That’s it! No virtual environments to manage, no dependency headaches. uv handles everything.
Hitting snags?
Here is the only issue I’ve seen:
- No audio device? Install the audio libraries:
# Ubuntu/Debian:
sudo apt-get install portaudio19-dev python3-pyaudio
# macOS:
brew install portaudio
Try it yourself by following the steps above or go directly to the GitHub repository.
Next up: Looking ahead
Here’s the thing — while the OpenAI Realtime API is exceptional, I know the costs won’t work for everyone. That’s why I’m looking into alternatives for a future version of KubeWhisper.
I’m looking into:
- Text-to-speech models that you can run locally like Kokoro-Onyx or Whisper
- Speech-to-text models you can run locally like RealtimeSTT or F5-STT
- Open-source alternatives to GPT for command processing, like DeepSeek V3
- Hybrid approaches that balance cost and performance, for example, performing the TTS and/or STT locally, but use an online LLM.
But that’s a post for another time. I’m in the research phase, testing different approaches and measuring the results. Will one of these new techs make KubeWhisper free for everyone? Stay tuned to find out.
Want to help? I’d love to hear about your experiences and requirements for a local alternative.

This story is published on Generative AI. Connect with us on LinkedIn and follow Zeniteq to stay in the loop with the latest AI stories.
Subscribe to our newsletter and YouTube channel to stay updated with the latest news and updates on generative AI. Let’s shape the future of AI together!


