Unleash Your AI Agent: Automate Time Tracking With LangGraph and Meta Llama 3
A Deep Dive into Building and Optimizing AI Tools for Everyday Tasks

As a freelancer, the accuracy of my invoicing is crucial. Achieving this requires accurately recording my work hours. I aim to log these hours daily, capturing my activities while they are still fresh in my mind.
Yet, despite my best intentions, the daily whirlwind of tasks often leads to oversights. This can result in the need to painstakingly reconstruct my day, a process that is not only time-consuming but also frustrating.
Fascinated by artificial intelligence's potential to simplify complex tasks, I created an AI-driven solution for automating hour registration. This article describes my endeavor to streamline my daily routine and ensure no critical detail slips through the cracks.
The aim is to free up valuable time and mental energy, allowing me to focus on what truly matters: work.
You can find the source code of the final agent in this public GitHub repository.
The registration process
Before we delve into the details of constructing the AI Agent, let’s establish a solid understanding of how I aim to automate registering hours.
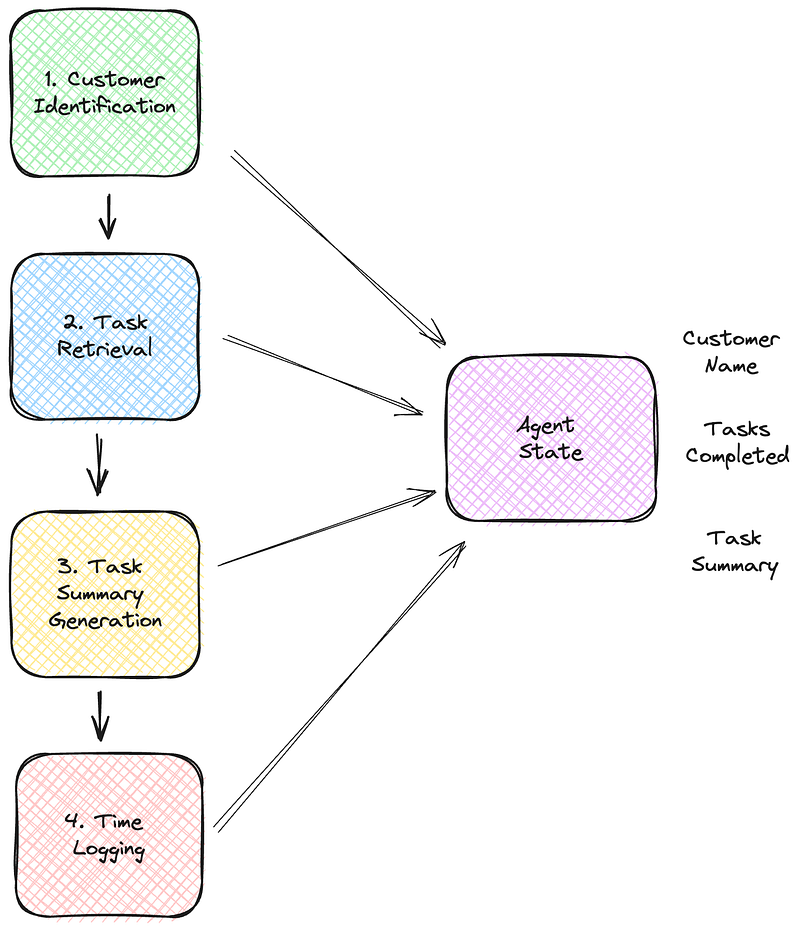
Below is the solution's context diagram. It consists of four modules, each implementing a part of the functionality. I will describe each component’s role and how they collectively form the system to streamline my daily time-tracking efforts.

1. Customer identification
This module starts by pinpointing the customer for the day’s hour logs. Given that my work schedule aligns specific days with specific clients, the agent checks the current weekday and selects the client accordingly.
This mapping is hardcoded into Python to keep our initial setup straightforward. The output is one critical detail: the customer’s name, which we need to be able to continue the following stages of automation.
2. Task retrieval
Following customer identification, the second module leverages the obtained customer name to fetch today’s completed tasks.
My daily organization tool is Todoist, where I create my to-dos. This module filters and extracts the tasks I’ve marked completed for the identified customer by interfacing with the Todoist API.
The output is a collection of descriptions for each completed task, setting the stage for the subsequent registration module.
3. Task summary generation using LLM
The third module synthesizes the individual task descriptions into a unified summary. Using the capabilities of a large language model, specifically the Meta Llama 3 8B variant, it generates a comprehensive narrative of the day’s accomplishments.
The result is a brief text string that encapsulates the essence of the completed tasks and is ready for the last step, time logging.
4. Time logging
The final module is responsible for logging the work hours. For the sake of simplicity, it standardizes the time entry to eight hours per day. Since my accounting application lacks an API, this module employs Selenium WebDriver to automate the web interface interactions.
It inputs the cohesive task summary and the designated hours into the system, effectively finalizing the day’s time tracking.
After that, we record the hours, and we can proceed to examine how we will implement the process. The first step is selecting an AI agent framework.
Which AI Agent framework?

The market is bustling with AI frameworks, each offering unique capabilities and new ones continually emerging. Initially, I experimented with Crew AI, which gained significant attention on social media.
However, I faced challenges integrating standard Python functions into the Agent using this framework. Despite Crew AI’s documentation suggesting support for local LLM usage, the system consistently required an OpenAI API key, a hurdle I could not pass. I may get back to Crew AI, but I have continued my search for another framework for now.
My quest for a more adaptable solution led me to LangGraph, a robust library designed for building stateful, multi-actor applications on top of LangChain.
Initial tests were promising; integrating standard Python functions proved straightforward. My familiarity with LangChain also laid a strong foundation for effectively harnessing LangGraph.
Translating the process to LangGraph
LangGraph is a library designed to build stateful, multi-actor applications. It can be thought of as a new way to run agents with LangChain.
In LangGraph, you create nodes that represent distinct steps within your workflow. Each node typically encapsulates a specific task or function. You then use edges to connect these nodes, forming a directed graph that outlines the application's flow.
The edges dictate the path of execution from one node to another, enabling the creation of complex workflows that can handle a variety of processes and data transformations. This structure allows for dynamic interaction between different application parts, as dictated by the designed flow in the graph.
So, to translate our functional context diagram, we have to convert each module to a Python function. Communication between these functions or nodes goes through a state object.
Each node is passed the state and can add to it if needed. A node can store something in the state by simply returning a value from the node function.
Understanding the AgentState in LangGraph
In LangGraph, the state object manages and preserves the context across different interactions and steps in a multi-actor application.
To illustrate, look at the AgentState class from the hour registration project below, which integrates with the Todoist API to manage tasks. Each information that flows between the modules is contained in the class.
class AgentState(TypedDict):
    # The customer name to search for in the Todoist API
    customer_name: str
    # The descriptions of the tasks that have been completed
    task_descriptions: List[str]
    # The combined description of each task description created by the llm
    registration_description: str
Later, we will look at integrating this state object into LangGraph. First, we will look at the nodes that make up our time-tracking agent.
1. Customer identification
The first node is the customer_name_node. As you can see below, a node is a regular Python function.
If you look closely, you see that the function receives a state object but does not use it, and it returns the selected customer via return {“customer_name”: customer_name}. This last statement stores the chosen customer name in the state.
I like the ability to integrate normal Python functions in LangGraph. The function itself is not special; it checks which day of the week it is and, based on that, returns the customer’s name. Note that to protect the privacy of my clients, I stored their names in environment variables.
import datetime
import os
from loguru import logger
def customer_name_node(state):
CUSTOMER1 = os.getenv("CUSTOMER1")
CUSTOMER2 = os.getenv("CUSTOMER2")
weekday = datetime.datetime.now().weekday()
customer_name = CUSTOMER1 if weekday < 3 else CUSTOMER2
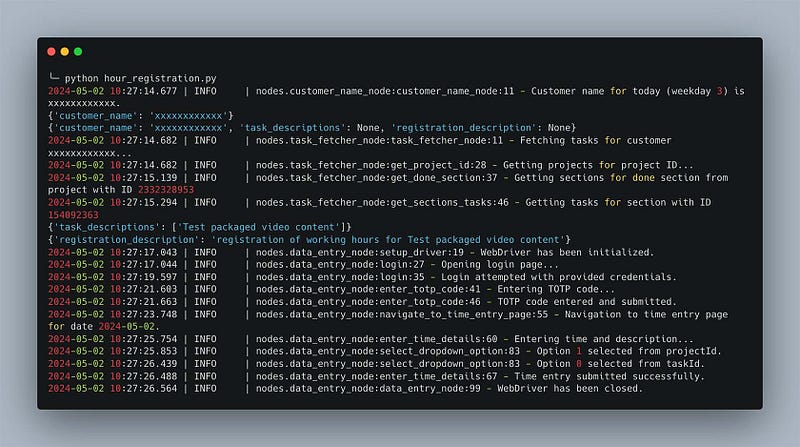
logger.info(f"Customer name for today (weekday {weekday}) is {customer_name}.")
return {"customer_name": customer_name}2. Task retrieval
The second node, task_fetcher_node, connects to the Todoist API and retrieves the tasks I completed for that customer today. Below, it uses the state to retrieve the customer's name via customer_name = state["customer_name"].
Once the task_fetcher_node has executed its function, it stores a list of task descriptions in the state. The function itself, along with its helper functions, is available for reference on GitHub. The node uses the Todoist PyPI package.
def task_fetcher_node(state):
    api = initialize_todoist_api()
    customer_name = state["customer_name"]
    project_id = get_project_id(api, project_name)
    done_section_id = get_done_section(api, project_id)
    tasks = get_sections_tasks(api, done_section_id)
    task_descriptions = [task.content for task in tasks]
    return {"task_descriptions": task_descriptions}
3. Task summary generation
The third node uses a remote LLM to combine the descriptions of each task into a single cohesive description that can be used for registering.
I use the meta’s LLAMA 8B model via Groq. If you don’t know Croq, you should check it out! Groq is a generative AI solutions company and the creator of the LPU™ Inference Engine. Which is a very fast interference engine running on their own custom hardware.
The great news is that they offer an API (which is currently free) that lets you interact with four different LLMS. You can sign up and get an API key from their playground. Currently, they offer the following models via their API:
- Gemma 7B (8K Context Length)
- Llama 3 8B (8K Context Length)
- Llama 3 70B (8K Context Length)
- Mixtral 8x7B SMoE (32K Context Length)
I chose the Llama 3 8B model, which is more than enough to generate the combined task description.
Below, you see the time_registration_description_node_llm node. It uses the langchain groq PyPI package to interact with the Groq API. You see the familiar passing of the state and returning the generated description by the LLM.
You may be interested in a couple of things. First, you can see how the prompt is constructed to instruct the LLM to generate the task description and return the result as JSON.
Secondly there is the construction of the generator task_combination_generator = task_combination_prompt | GROQ_LLM | JsonOutputParser()
This uses what LangChain calls the LangChain Expression Language (LCEL). LCEL makes building complex chains from basic components easy and supports out-of-the-box functionality such as streaming, parallelism, and logging.
In our project, we combine the prompt, the model, and the JSON output parser.
from langchain.prompts import PromptTemplate
from langchain_groq import ChatGroq
from langchain_core.output_parsers import JsonOutputParser

MODEL_NAME = "Llama3-8b-8192"
REGISTRATION_KEY = "registration_description"

def time_registration_description_node_llm(state):
    GROQ_LLM = ChatGroq(model=MODEL_NAME)

    task_descriptions = state.get("task_descriptions")
    if task_descriptions is None:
        raise ValueError("Missing task descriptions in the state.")

    task_combination_prompt = PromptTemplate(
        template="""\
        system
        You are an expert at writing task descriptions for the registration of working hours in accounting.
        Multiple task descriptions are given to you, and you are asked to combine them into a cohesive description
        string. Return only the generated description using JSON with a single key called 'registration_description'.
        Do not return any other string.

        user
        TASK_DESCRIPTIONS: {task_descriptions}

        assistant""",
        input_variables=["task_descriptions"],
    )

    task_combination_generator = task_combination_prompt | GROQ_LLM | JsonOutputParser()

    description_data = task_combination_generator.invoke({"task_descriptions": task_descriptions})
    registration_description = description_data.get(REGISTRATION_KEY)
    if registration_description is None:
        raise ValueError("Failed to generate the registration description.")

    return {REGISTRATION_KEY: registration_description}
4. Time logging
The last node is the data_entry_node, which is responsible for registering the combined description generated by the LLM in my accounting web application. As described before, my accounting service does not offer an API. Therefore, the node uses the Selenium web driver to automate entering the time registration.
An important feature of this is the web application’s implementation of two-factor authentication using TOTP. I have successfully automated the entry of TOTP codes using the Pyotp package from PyPi. For this to work effectively, access to the TOTP secret, created during the initial setup of two-factor authentication, is essential.
def data_entry_node(state):
    driver = setup_driver()
    try:
        customer = state["customer_name"]
        description = state["registration_description"]
        login(driver)
        enter_totp_code(driver)
        navigate_to_time_entry_page(driver)
        enter_time_details(driver, customer, description)
    except Exception as e:
        logger.exception(f"An error occurred during data entry process. {e}")
    finally:
        driver.quit()
        logger.info("WebDriver has been closed.")
I only shown the top function; if you are interested in the rest of the helper functions, look at the complete source code of the node in GitHub.
With all the nodes implemented, we are ready to combine them in LangGraph.
Building the LangGraph graph

Below, we first create the StateGraph instance and pass it our type that holds our state called AgentState. Then, we add each of the nodes to the graph. The function add_node expects:
key: A string representing the name of the node. This must be unique.action: The action to take when this node is called. This should either be a function or a runnable.
workflow = StateGraph(AgentState)
workflow.add_node("customer_name_node", customer_name_node)
workflow.add_node("task_fetcher_node", task_fetcher_node)
workflow.add_node("time_registration_description_node_llm", time_registration_description_node_llm)
workflow.add_node("data_entry_node", data_entry_node)
With the nodes added, we can continue connecting them using edges. We first set the entry point of the graph to the customer_name_node. Then, we connect each node and end by connecting the data_entry_node to the END string. We signal to LangGraph that this is the end of our graph.
workflow.set_entry_point("customer_name_node")
workflow.add_edge("customer_name_node", "task_fetcher_node")
workflow.add_edge("task_fetcher_node", "time_registration_description_node_llm")
workflow.add_edge("time_registration_description_node_llm", "data_entry_node")
workflow.add_edge("data_entry_node", END)
Once we have created the graph, we will compile it using the compile method. During the compile method, LangGraph validates the graph; for example, if you forget to connect a node or close the graph, it will tell you during compilation.
Finally, we start the graph via the stream method, passing it an empty input.
app = workflow.compile()

for s in app.stream({}):
    print(list(s.values())[0])
I use the stream method instead of invoke because you can then print out the values returned from each node, which is helpful for tracing. I also use the loguru PyPi logging package to add additional logging into the node for traceability, as you can see below.
Running the agent
The complete source code for this agent is available on GitHub. Below, you’ll find step-by-step instructions for configuring and running the agent on your local machine. Remember that running the complete program might not be straightforward due to the specific environment settings required, some of which involve creating accounts to access necessary APIs.
Environment setup
To operate, the agent relies on several environment variables, which should be securely stored in a .env file. To protect sensitive information, this file is and should not be included in the source control! The program utilizes the dotenv PyPi package to manage these environment variables, which loads the settings into the environment from the .env file when the agent starts.
Here are the key environment variables you’ll need to define:
CUSTOMER1andCUSTOMER2: These variables represent the names of the customers.CUSTOMER1is used for Monday, Tuesday, and Wednesday, whileCUSTOMER2applies to the remainder of the week.TODOIST_API_KEY: This key allows the agent to interact with your Todoist account. You can generate it yourself on the integrations page of your Todoist account.GROQ_API_KEY: This is necessary for accessing Groq's services, which can be obtained by creating an account on Groq and navigating to their playground.LOGIN_URL,BASE_TIME_ENTRY_URL,EMAIL,PASSWORD,TOTP_SECRET: These settings are specific to MoneyMonk, software tailored for Dutch sole proprietors (ZZPs). They are crucial for the software's functionality, particularly for login and time entry features.
Installing dependencies
The program uses a variety of PyPi packages. These can be installed via pip or conda, depending on your preference. Run the following commands in your terminal to set up your environment:
For pip users:
pip install -r requirements.txtFor conda users:
conda env create -f environment.ymlRunning the agent
Once you have configured your environment and installed all dependencies, you can run the agent by executing the main script:
python hour_registration.pyAdditional tips
- Review
.envExample: Check the repository for an example.env.examplefile to ensure you have correctly set up all required keys and settings. - Verify API Access: Before running the full agent, verify that your API keys are active and have the correct permissions set on external platforms.
- Security Practices: Keep your
.envfile secure and never share it publicly. Consider using tools or services to manage secrets, especially in production.
What’s next?
My exploration of LangGraph and AI agents is just beginning, and I’m excited about the path ahead.
Sure, the program I’ve developed could probably be done with just a simple Python function — no fancy AI agents needed. But there’s something really rewarding about diving into new frameworks like this. They help me streamline my day-to-day tasks and push my boundaries as a developer.
Right now, the agent isn’t perfect. It’s still a bit shaky and needs more robust error handling — like not crashing when I haven’t logged any daily tasks. But I live by the mantra:
First, make it work, then make it right, and finally, optimize it.
I’m looking forward to tackling these challenges one step at a time.
One feature I’m particularly keen to explore is LangGraph’s conditional edges, which let you navigate nodes dynamically based on specific conditions. I see a lot of potential here to make my daily workflow more efficient and smarter.
As I refine and enhance this AI-driven time-tracking system, I am eager to hear from others on similar journeys or who are curious about starting.
Do you have thoughts, questions, or insights about using AI in your daily workflows? Please share them in the comments below — I look forward to learning from your experiences and discussing new possibilities.
Let’s explore these exciting technologies together and see where they can take us.
Happy learning and coding!

This story is published under Generative AI Publication.
Connect with us on Substack, LinkedIn, and Zeniteq to stay in the loop with the latest AI stories. Let’s shape the future of AI together!


