Top 5 Automated Security Tools for Node.js
Enhance Your Code and Containers with Ease

In today’s fast-paced development environment, keeping up with the latest components and dependencies can be challenging for even the most experienced developers.
The speed of change means that security vulnerabilities can be introduced at any stage of the development process, putting your Node.js applications at risk.
Fixing these vulnerabilities manually can be time-consuming and labor-intensive, and knowing where to start can be challenging.
But there’s good news! Thanks to the rise of automated security tools, developers can quickly and easily identify and fix vulnerabilities in their Node.js applications.
By using these tools, you can ensure your code's and containers' security without sacrificing development speed or agility.
This article will explore the top five automated security tools for Node.js development, including Snyk and Trivy.
We’ll explain why security is more important than ever in today’s development landscape and how automated tools can help you stay ahead of the ever-changing threat.
And even if you’re not a Node.js developer, many of these tools are compatible with other programming languages and environments, making them a valuable addition to any development toolkit.
So let’s dive in and discover how these powerful tools can help you enhance the security of your Node.js applications with ease!
1. Snyk
Snyk is widely regarded as one of the leading open-source vulnerability scanners, providing developers with a scalable and intuitive approach to finding and fixing application vulnerabilities.
To use Snyk, you can follow these steps:
- Install Snyk: If you haven’t already, you can install Snyk on your machine using the following command:
npm install -g snyk2. Authenticate with Snyk: Before using Snyk, you need to authenticate with the Snyk service. To do this, run the following command and follow the prompts:
snyk auth3. Run Snyk test: Once you are in your application directory, run the following command to test your application for vulnerabilities:
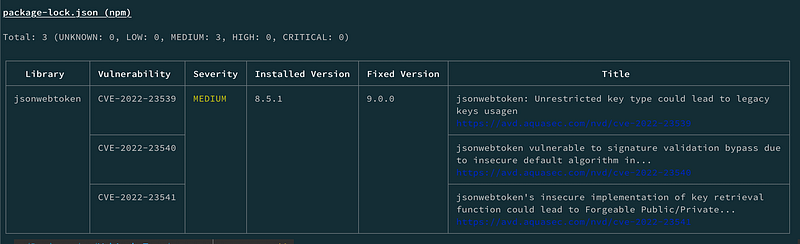
snyk testFor example, if I run snyk test in the previous source code of my latest WebAuthnTest article, I get the following result.

It detects vulnerabilities in the dependencies of the server part of the project. Snyk identifies a vulnerability in the jsonwebtoken npm package. In this case, Snyk provides information on how to fix the vulnerability.
To fix this vulnerability, I have to update the version of the JSON web token package in the project from version 8.4.0 to 9.0.0. To do this, we can update the version of the jsonwebtoken package in the package.json file and then run the npm install.
If we rerun the snyk test, we see that all issues are resolved.

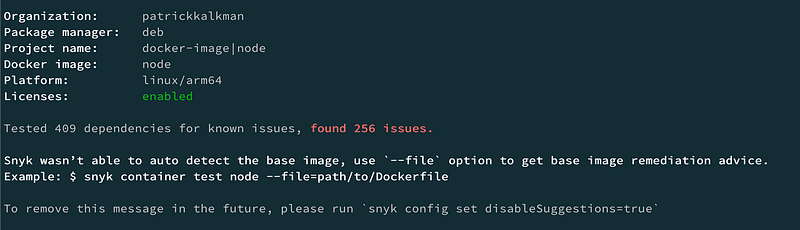
Another handy option is to scan Docker images for vulnerabilities. By adding the container option, you can also review a container.
snyk container test nodeHere we scan the latest official Docker Node.js container. See below the result. It reports a lot of issues.
You can integrate Snyk into your build pipeline to streamline the vulnerability testing process.
Rather than manually running the snyk test or snyk container test, you can automate the testing by including snyk test as the last task in your build process.
This will ensure that Snyk is run automatically every time you build your project, allowing you to catch vulnerabilities early in the development process.
Project monitoring
In addition to running vulnerability tests manually, you can also use Snyk Monitor to automate the monitoring of your project’s dependencies for vulnerabilities.
When you run the snyk monitor command, Snyk creates a project that includes all the current dependencies.
Snyk Monitor continuously monitors your project's dependencies for vulnerabilities and alerts you by email whenever a new vulnerability is discovered.
This lets you stay up-to-date with the latest security patches and quickly remediate potential issues.
2. Trivy

Trivy is a fully open-source vulnerability scanner. Unlike similar tools with open-source and commercial versions, Trivy is entirely open-source, making it free to use and customize as needed.
Trivy is designed to quickly detect vulnerabilities in operating systems and application dependencies within container images.
Along with Snyk, Trivy is a popular tool for identifying vulnerabilities in container images, offering easy integration with popular development and CI/CD tools.
To install and use Trivy, you can follow these steps:
- Install Trivy: Depending on your operating system, you can install Trivy using a package manager, a precompiled binary, or from source. I use brew to install trivy.
brew install trivy2. Run Trivy: You can run Trivy to scan a folder for vulnerabilities. To do this, use the following command:
trivy fs .For example, if I run trivy fs . in the project folder of the source code of my latest previous article, I get the following result.
It detects vulnerabilities in the dependencies of the server part of the project. Trivy, like snyk, identifies a vulnerability in the jsonwebtoken npm package. In this case, Trivy provides information on how to fix the vulnerability.
To fix this vulnerability, I have to update the version of the jsonwebtoken package in the project from 8.4.0 to 9.0.0. To do this, we can update the version of the jsonwebtoken package in the package.json file and then run npm install.
If we rerun the trivy test, we see that all issues are resolved.
Trivy can also scan container images. For example, we examine the official Node.js Docker image using the following command.
trivy image nodeIt is also possible to run Trivy as part of your build pipeline. A separate GitHub action is available to run Trivy via as part of your GitHub pipeline.
3. Grype

Grype is an open-source tool for scanning container images and local filesystems for vulnerabilities. It was developed by Anchore, a company that specializes in container security.
With Grype, you can quickly identify known vulnerabilities in the operating system and application packages within your container images or local filesystems. Grype supports various package formats and can generate reports in different formats to help you quickly identify and remediate vulnerabilities.
As an open-source tool, Grype is free to use and can be easily customized to meet the needs of your specific environment. Overall, Grype is a powerful and flexible tool for identifying and remediating vulnerabilities in your software supply chain.
To install and use Grype, follow these steps:
- Install Grype: Depending on your operating system, you can install Grype using a package manager, a precompiled binary, or from source. I use brew to install Grype.
brew tap anchore/grype
brew install grype
2. Run Grype: You can run Grype on a single project or a container image.
grype .For example, if I run grype . in the project folder of the source code of my latest previous article, I get the following result.

It detects vulnerabilities in the dependencies of the server part of the project. Grype identifies vulnerabilities in jsonwebtoken, cookie, and events npm packages.
To fix the jsonwebtoken vulnerability, I have to update the version of the JSON web token package in the project from 8.4.0 to 9.0.0. To do this, we can update the version of the jsonwebtoken package in the package.json file and then run the npm install.
If we rerun grype, we see that the jsonwebtoken issue is resolved.

As with the previous tools, Grype can also scan Docker images. The following command scans the official Node.js Docker image for vulnerabilities.
grype node4. NPM

NPM (Node Package Manager) is a popular package manager for Node.js that allows developers to install and manage third-party packages for their projects. NPM has built-in features for vulnerability scanning that can help identify security issues in the packages used by your Node.js projects.
One vital vulnerability scanning feature of NPM is the npm audit command. You can use this command to check your project’s dependencies. The command searches for known vulnerabilities and guide remediating any issues.
When you run npm audit, NPM will use the vulnerability database from the National Vulnerability Database (NVD) to identify any security issues in the packages used by your project.
In addition to the npm audit command, NPM also provides a Security Dashboard that provides an overview of the security status of your projects.
The Security Dashboard displays information on the packages used by your projects, including any vulnerabilities that have been identified and the severity of those vulnerabilities. The Security Dashboard can track the security status of your projects over time and ensure that you are using the most secure packages available.
Overall, NPM provides a robust set of vulnerability scanning features that can help ensure that the packages you use in your Node.js projects are secure. The npm audit command and Security Dashboard are powerful tools that can be used in conjunction with other security measures and best practices to help maintain the security and integrity of your projects.
To use Npm, follow these steps:
- Install NPM: If you haven’t already, you must install NPM on your machine. NPM is typically installed automatically when you install Node.js, so if you have Node.js installed, you should already have NPM.
- Check your project for vulnerabilities: To check your project for vulnerabilities, navigate to your project directory in the command line and run the following command:
npm auditFor example, if I run npm auditin the project folder of the source code of my latest previous article, I get the following result.
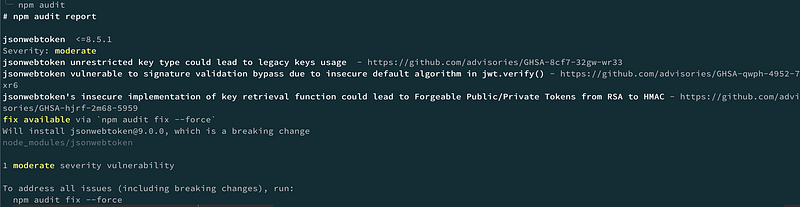
It detects vulnerabilities in the dependencies of the server part of the project. Npm identifies a vulnerability in thejsonwebtoken npm package.
Npm also suggests a command to fix the vulnerability npm audit fix — force.
5. OWASP Dependency-Check

OWASP Dependency-Check is an open-source command-line tool that can identify known vulnerabilities in a project's direct and transitive dependencies.
It supports various package formats, including Node.js packages, and checks your project’s dependencies against the National Vulnerability Database (NVD) and other vulnerability sources.
OWASP Dependency-Check is developed and maintained by the Open Web Application Security Project (OWASP), a non-profit organization that aims to improve software security.
One of the key benefits of using OWASP Dependency-Check is that it checks not only the direct dependencies of your project but also their transitive dependencies. This means that if one of your direct dependencies has a vulnerability in one of its dependencies, OWASP Dependency-Check will detect it.
To use Dependency-Check, follow these steps:
- Install Java: OWASP Dependency-Check requires Java to run, so ensure you have Java installed on your system. You can download the latest version of Java from the official website.
brew install OpenJDK2. Download and install OWASP Dependency-Check: You can download the latest version of OWASP Dependency-Check from the official website. Once downloaded, extract the files to a directory of your choice.
brew update && brew install dependency-check3. Configure OWASP Dependency-Check: Before running OWASP Dependency-Check, you must configure it by setting the path to your project’s dependencies. This can be done through a configuration file or by specifying the path at the command line.
4. Run OWASP Dependency-Check: To run OWASP Dependency-Check, navigate to the directory where you extracted the files and run the command ./dependency-check.sh (on Linux/Mac) or dependency-check.bat (on Windows).
dependency-check --project "WebAuthnTest Server" --scan ./5. View the report: OWASP Dependency-Check generates extensive information in various formats, including HTML, XML, and CSV. You can view the report in your browser or by opening the appropriate file.
The command, as described above, generate an HTML report, as seen below.
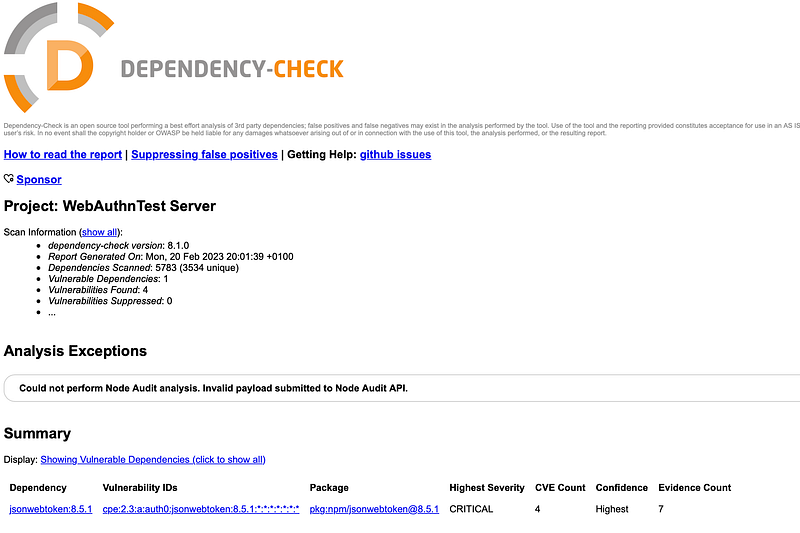
As with all the previous tools, it is possible to integrate dependency check into your build and release pipeline.
Conclusion
Node.js offers a powerful platform for creating scalable and efficient applications.
But, with the increasing sophistication of cyber attacks, it’s more important than ever to ensure the security of your Node.js code and containers.
By integrating one of the top five automated security tools for Node.js development — Snyk, Trivy, Grype, NPM audit, or OWASP Dependency-Check — you can enhance the security of your development pipeline, identify vulnerabilities early on, and prevent attacks before they occur.
These tools are easy to use, flexible, and can be integrated into your existing workflows. By taking advantage of automated security, you can focus on developing great applications without worrying about security risks.
So, start using these tools today and protect your Node.js applications with confidence!


