Securing Kubernetes With OPA Gatekeeper
Ensuring Compliance and Security Across Your Kubernetes Cluster with the Open Policy Agent Gatekeeper

In a prior discussion, we delved into the function of admission controllers and their capacity to intercept and process requests, thereby preserving the operational integrity and security of the cluster.

This article will explore utilizing the Open Policy Agent (OPA) to fortify your cluster's operational integrity and security.
While OPA is not exclusively designed for Kubernetes, its integration enables it to function as a Gatekeeper. OPA works in conjunction with Kubernetes admission controllers.
When using OPA Gatekeeper, it configures the admission control hooks that, upon activation, call out to OPA to enforce the defined policies.
Like admission controllers, OPA is an element of the ‘Securing Microservices’ module within the official Certified Kubernetes Security Specialist (CKS) curriculum.
The insights I discover in these articles share are part of my learning journey as I prepare for the CKS examination.
Understanding OPA: A Unified Approach to Policy Enforcement
The Open Policy Agent (OPA), pronounced ‘oh-pah,’ is a versatile, open-source policy engine designed to centralize and unify policy enforcement across your entire technology stack.
Unlike solutions tailored to specific environments, OPA’s breadth of application extends far beyond Kubernetes, catering to many components within your infrastructure.
OPA enables centralized management of policies, addressing authorization needs across diverse elements of your technology ecosystem. This means OPA can govern access and permissions in Kubernetes and other platforms and services.
Whether managing authorization for a SQL database, regulating access to an Amazon S3 bucket, or implementing security controls on a microservice, OPA provides a singular, cohesive framework for all these authorization needs.
This consolidation into a single service streamlines policy enforcement, making it more efficient and less prone to errors.
At its core, OPA offers a high-level declarative language, empowering you to codify policies traditionally implemented in disparate, siloed systems.
This language, known as Rego (pronounced ‘ray-go’), is specially crafted to express policies that govern complex and hierarchical data structures, making it highly effective for many policy enforcement scenarios.
OPA’s versatility shines across various domains, from microservices and Kubernetes to CI/CD pipelines, ensuring only secure and compliant code changes are deployed.
It also plays a crucial role in managing API gateways and safeguarding cloud environments, where it can enforce policies such as mandatory human reviews before any critical resource updates or deletions.
Focusing on OPA Gatekeeper for Kubernetes, this article delves into leveraging OPA’s robust framework to implement and manage Kubernetes-specific policies, demonstrating how OPA’s general-purpose nature is harnessed to enhance security and compliance within containerized environments.
What is OPA Gatekeeper?
One of the most popular integrations of OPA is admission control on Kubernetes using OPA Gatekeeper.
OPA Gatekeeper is a specialized project providing first-class integration between OPA and Kubernetes.
OPA Gatekeeper adds the following on top of plain OPA:
- An extensible, parameterized policy library.
- Native Kubernetes Custom Resource Definitions (CRDs) are used to instantiate the policy library (aka “constraints”).
- Native Kubernetes CRDs extend the policy library (“constraint templates”).
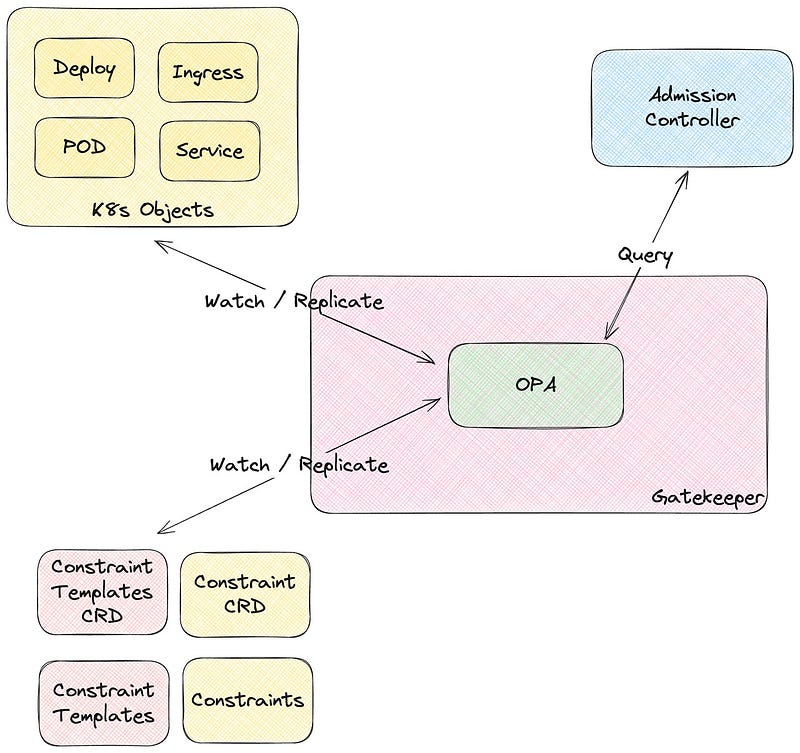
This means you can write and activate policies using standard yaml and integrate rego into the yaml.
At the center of the GateKeeper are two new components: the constraint template and the constraint itself. ConstraintTemplates define how to validate some Kubernetes objects in Gatekeeper’s Kubernetes admission controller.
ContraintTemplates are made of two main elements:
- Rego code that defines a policy violation
- The schema of the accompanying
Constraintobject represents an instantiation of aConstraintTemplate.
In the following sections, to make it more practical, we will create and describe two examples of using constraints.
Example 1: Enforcing a “Required Contact Label” policy for all namespaces
Imagine your organization mandates a policy whereby every namespace within your Kubernetes cluster must be tagged with a contact label. This label should detail the name of the person responsible for managing the resources within the namespace.
To automate compliance with this policy, you implement it using OPA Gatekeeper. The implementation process involves the following steps:
1. Install OPA Gatekeeper
If you still need to install OPA Gatekeeper, install it using the following command. Check the GateKeeper website for the latest version.
kubectl apply -f https://raw.githubusercontent.com/open-policy-agent/gatekeeper/v3.15.0/deploy/gatekeeper.yaml2. Create a ConstraintTemplate
A ConstraintTemplate is precisely what its name implies: a template for enforcing constraints. It is composed of two primary components:
- CRD Definition: The first component is the
crdsection, which defines a new Custom Resource Definition (CRD) namedK8sRequiredLabels. When you deploy the ConstraintTemplate, OPA Gatekeeper automatically creates theK8sRequiredLabelsCRD. - Targets Section: The second component is the
targetssection. This part specifies the enforcement logic using the Rego language. Within the Rego code, there's a function namedviolation. This function begins by extracting labels frominput.review.object.metadata, whereinput.reviewrepresents the incoming review object, similar to what is seen with admission controller webhooks. In this context,object.metadatarefers to the metadata of the namespace object being evaluated.
The following line, prefixed with required, fetches the labels as defined in the actual constraint (which we will create subsequently). It then compares the provided labels against the required ones by subtracting the former from the latter and counting the remainder. If the count is greater than zero, the constraint has not been met, resulting in a violation.
Below, you see the ConstraintTemplate definition used to ensure a specific label is set. Note that the actual label that must be available is not hardcoded in the ContraintTemplate. This is something we will define in the Contraint itself.
apiVersion: templates.gatekeeper.sh/v1beta1
kind: ConstraintTemplate
metadata:
  name: k8srequiredlabels
spec:
  crd:
    spec:
      names:
        kind: K8sRequiredLabels
      validation:
        openAPIV3Schema:
          properties:
            labels:
              type: array
              items:
                type: string
  targets:
    - target: admission.k8s.gatekeeper.sh
      rego: |
        package k8srequiredlabels

        violation[{"msg": msg, "details": {"missing_labels": missing}}] {
          provided := {label | input.review.object.metadata.labels[label]}
          required := {label | label := input.parameters.labels[_]}
          missing := required - provided
          count(missing) > 0
          msg := sprintf("you must provide labels: %v", [missing])
        }
Deploy the ConstraintTemplate using the command: kubectl create -f k8srequiredlabels.yaml.
3. Creating a Constraint
Once the ConstraintTemplate has been established, we can define our constraint, ns-must-have-contact.
Exploring the YAML configuration of this constraint, you’ll notice it is of the type K8sRequiredLabels, corresponding to the CRD defined in our ConstraintTemplate.
Within the spec section of the constraint, the match field is crucial. It determines the resources to which the constraint applies. The match field is versatile, supporting various criteria such as kinds, namespaces, and labelSelectors.
For more details on all available matchers, go to the official documentation.
In this specific constraint, we employ kinds to target all namespaces. Additionally, we define a parameter, labels, requiring the presence of a contact label on the selected resources.
Below is the YAML definition for the ns-must-have-contact constraint:
apiVersion: constraints.gatekeeper.sh/v1beta1
kind: K8sRequiredLabels
metadata:
  name: ns-must-have-contact
spec:
  match:
    kinds:
      - apiGroups: [""]
        kinds: ["Namespace"]
  parameters:
    labels: ["contact"]
This definition ensures that all namespaces must include the contact label, aligning with the criteria established in our ConstraintTemplate.
Example 2: Enforcing a “Minimum Number of Replicas” policy for deployments
To ensure the reliability and availability of services, your organization might enforce a policy that all Deployment resources within your Kubernetes cluster maintain a minimum number of replicas.
This policy enforcement can be automated with OPA Gatekeeper, again using a custom ConstraintTemplate.
Creating a ConstraintTemplate for minimum replica count
The ConstraintTemplate named k8sminreplicacount is the foundation for enforcing our minimum replicas policy. It comprises two key components:
- CRD Definition: This part of the template outlines a new Custom Resource Definition (CRD) called
K8sMinReplicaCount. The creation of the ConstraintTemplate triggers the automatic establishment of this CRD by OPA Gatekeeper. - Enforcement Logic: The
targetssection embeds the logic that governs policy enforcement, articulated through the Rego language. Central to this logic is a function namedviolation, which performs the following operations:
- It first determines the number of replicas specified by the
spec.replicasfield in the Deployment (provided). - It then compares this number against the minimum required replicas defined in the constraint’s parameters (
required). - A violation is recorded if the number of replicas (provided) falls short of the required minimum (required). The function calculates the shortfall (
missing) and generates a message indicating the additional replicas needed to comply with the policy.
Below is the definition of the k8sminreplicacount ConstraintTemplate:
apiVersion: templates.gatekeeper.sh/v1beta1
kind: ConstraintTemplate
metadata:
  name: k8sminreplicacount
spec:
  crd:
    spec:
      names:
        kind: K8sMinReplicaCount
      validation:
        # Schema for the `parameters` field
        openAPIV3Schema:
          properties:
            min:
              type: integer
  targets:
    - target: admission.k8s.gatekeeper.sh
      rego: |
        package k8sminreplicacount

        violation[{"msg": msg, "details": {"missing_replicas": missing}}] {
          provided := input.review.object.spec.replicas
          required := input.parameters.min
          missing := required - provided
          missing > 0
          msg := sprintf("you must provide %v more replicas", [missing])
        }
Creating a Constraint for minimum replica enforcement
Following establishing the k8sminreplicacount ConstraintTemplate, the next step involves defining a specific constraint to enforce our policy across deployments. This is achieved by creating a constraint object that utilizes the K8sMinReplicaCount CRD, activating the policy enforcement logic defined in the ConstraintTemplate.
The constraint, named deployment-must-have-min-replicas, targets Deployment resources within the "apps" API group, ensuring they adhere to the minimum replica requirement specified.
Here's a detailed breakdown of the constraint's configuration:
- API Version and Kind: Indicates that the object is a constraint (
K8sMinReplicaCount) managed by Gatekeeper, under theconstraints.gatekeeper.sh/v1beta1API version. - Metadata: Names the constraint
deployment-must-have-min-replicas, facilitating easy identification and management. - Spec -> Match Criteria: Specifies that the constraint applies exclusively to Deployment resources (
kinds: ["Deployment"]) in theappsAPI group. This selective application ensures targeted policy enforcement without unintended impacts on other resources. - Spec -> Parameters: Dictates the minimum number of replicas (
min: 2) required for deployments. This parameter is pivotal to the enforcement logic, setting the baseline for compliance.
Here is the YAML definition for the constraint:
apiVersion: constraints.gatekeeper.sh/v1beta1
kind: K8sMinReplicaCount
metadata:
  name: deployment-must-have-min-replicas
spec:
  match:
    kinds:
      - apiGroups: ["apps"]
        kinds: ["Deployment"]
  parameters:
    min: 2
Monitoring Constraint status with OPA Gatekeeper
After deploying a constraint using OPA Gatekeeper, monitoring its status becomes crucial for ensuring compliance across your Kubernetes resources.
Like querying the status of any Kubernetes resource, kubectl describe offers a straightforward method to inspect the enforcement and impact of your constraints.
Viewing Constraint enforcement and compliance
Utilizing kubectl describe, you can observe not only the impact of the constraint on new resources but also its evaluation against existing resources within your cluster.
It's important to note that while Gatekeeper will not modify or delete already deployed resources that violate a constraint, it provides visibility into compliance through status messages.
This feature is handy for identifying and rectifying configurations that do not meet your organization's policies.
For instance, to check the status of the “Required Contact Label” policy across all namespaces, you would use the following command:
kubectl describe K8sRequiredLabels ns-must-have-contactThis command yields detailed information about the constraint’s enforcement, including any violations:
Total Violations:  8
  Violations:
    Enforcement Action:  deny
    Group:
    Kind:                Namespace
    Message:             you must provide labels: {"contact"}
    Name:                gatekeeper-system
    Version:             v1
    Enforcement Action:  deny
    Group:
    Kind:                Namespace
    Message:             you must provide labels: {"contact"}
    Name:                engineering
    Version:             v1
    Enforcement Action:  deny
    Group:
    Kind:                Namespace
    Message:             you must provide labels: {"contact"}
    Name:                kube-public
    Version:             v1
The output highlights each instance where a namespace fails to comply with the constraint — showing the required action (in this case, deny), the resource type (Namespace), and a message detailing the specific non-compliance issue.
It is a powerful tool for administrators to quickly identify and address configuration drifts or non-compliance within their clusters.
Preparing for the CKS Exam with OPA Gatekeeper
As I gear up for the Certified Kubernetes Security (CKS) exam, I’m strategizing on the types of OPA Gatekeeper questions I might encounter.
While I haven’t taken the exam yet, I’m not expecting it to demand the creation of a ConstraintTemplate from scratch. That seems a bit too involved for the exam’s scope.
Instead, I’m preparing for what I anticipate to be a more common scenario: being presented with an existing ConstraintTemplate and tasked with deploying and configuring a corresponding Constraint based on it.
This process involves closely examining the ConstraintTemplate to understand its required parameters and then accurately incorporating them into the Constraint definition.
Steps for implementing a Constraint based on a ConstraintTemplate:
- Review the ConstraintTemplate: Start by understanding the structure and requirements of the provided ConstraintTemplate. Pay close attention to the
parameterssection, defining the inputs needed for your Constraint to function correctly. - Define the Constraint: Using the insights gleaned from the ConstraintTemplate, craft a Constraint that adheres to the specified parameters.
- Deploy the Constraint to the Cluster: Once the Constraint is defined, the final step is to deploy it within your Kubernetes cluster. This involves applying the Constraint configuration through
kubectlor another Kubernetes management tool, effectively activating the policy enforcement.
Conclusion
In conclusion, the journey through the intricacies of OPA Gatekeeper has provided a comprehensive overview of its capabilities and application within a Kubernetes environment.
As we’ve seen, OPA Gatekeeper is a critical tool for policy enforcement, extending its utility beyond Kubernetes to various technology stack components.
The preparation for the CKS exam, coupled with a practical exploration of OPA Gatekeeper, underlines the importance of hands-on experience.
By creating and deploying ConstraintTemplates and Constraints, we’ve highlighted translating policies into enforceable rules that align with organizational standards.
Happy studying!


