Scaling Video Encoding With Node.js and Kubernetes
Using Kubernetes native scaling vs. a custom scaling service

Our Kubernetes cluster is a powerhouse for managing video content, including the vital process of video encoding. Imagine taking an ultra-high-definition movie and breaking it into a range of smaller, more manageable files — each with its unique resolution and bitrate.
That’s exactly what video encoding does. It’s a CPU-intensive task that requires our cluster to work at full throttle, like a marathon runner pushing their limits. But by scaling the encoders within the cluster, we can ensure it can handle the demands of the encoding process efficiently, delivering top-quality video to our users.
This article delves into the exciting world of automatic scaling for video encoders in a Kubernetes cluster. Discover how we tackled the challenges and succeeded in our journey toward efficient resource management.
The source code from this article is available in this GitHub repository.
What Exactly Is Video Encoding?
Have you ever tried to watch a video on your phone only to have it constantly buffer or freeze? That’s where video encoding comes in.
It’s the process of taking a single, high-quality video file and breaking it down into a variety of smaller files, each optimized for different platforms and internet connections. This ensures that the video can be played smoothly on various devices, from your phone to your smart TV.
It’s like having a team of skilled engineers working behind the scenes, ensuring the video is tailored to fit your device and connection. So, the next time you sit down to watch a video, take a moment to appreciate the magic of video encoding!
To ensure smooth video playback on Android and Apple devices, it is important to follow the official specifications for each platform. These specifications outline the necessary video stream requirements to ensure optimal performance on the respective devices.
One such specification is Apple's HTTP Live Streaming (HLS) specification, which outlines the video file requirements for delivering content smoothly on all Apple devices. See the following chart for a section of that specification:
According to the HLS specification, you must create nine versions of the master video file to ensure smooth playback on all Apple devices. A similar specification exists for playing videos on Android devices.
How much time is necessary?
Video encoding is a resource-intensive task involving significant amounts of time and CPU power. Real-time encoding refers to the process of encoding all necessary video streams concurrently within the length of the video.
For example, according to Apple’s specifications, a full-length movie requires the delivery of nine different video files. To perform this task in real-time, the encoder must be able to generate these nine streams within the duration of the movie.
Our Video Encoding Platform Architecture
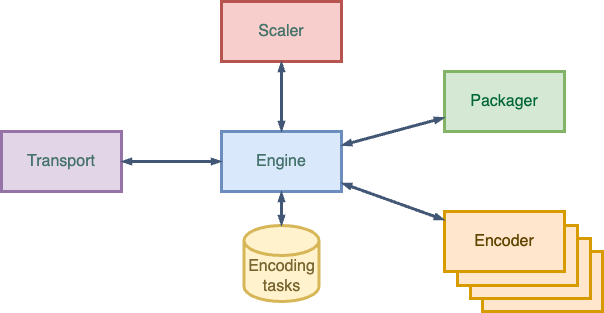
Our video encoding platform’s architecture is designed to ensure optimal efficiency and performance. Its architecture comprises four main services that work in tandem and communicate through the HTTP protocol, all running in a Kubernetes cluster.

The Transport component is responsible for seamlessly moving incoming files to their designated locations and signaling the platform engine of new content availability.
The Engine, the heart of the system, manages the overall state of the platform, utilizing a MongoDb database to store and manage encoding tasks.
Multiple encoders work concurrently to process these tasks, ensuring fast and efficient encoding.
Finally, the Packager component converts the encoded content into popular streaming formats such as Dash and HLS, enabling seamless delivery to end users.
This robust and efficient architecture guarantees that our platform can easily handle even the most demanding video encoding tasks.
Creating encoding tasks
A separate service, not depicted in the diagram, generates encoding tasks. This service creates the necessary encoding tasks based on the configuration. For instance, it would generate nine encoding tasks based on Apple’s specification.”
The Encoder
This article will delve into the intricacies of encoders and their scaling in a Kubernetes cluster. Specifically, we will discuss the deployment of encoders as single-container pods, utilizing a Node.js service that continuously polls the engine for available encoding tasks.
Below you will see the processEncodingTasks function from the encoder service that is called once every ten seconds.
The first call to thesearchTasks method sends an HTTP request to the Task endpoint of the Engine. The engine checks the database as such a task exists. If it exists, it changes the status and returns the task information to the encoder.
The encoder utilizes the information received to initiate the appropriate encoding process. These encoder instructions include details such as the codec to be employed and the desired bitrate.
Encoding
Encoding is performed using FFmpeg, and we utilize the fluent-ffmpeg npm package for easy interaction. The source code below illustrates how we initiate an encoding process with FFmpeg.
It utilizes the information provided by the Engine as parameters, allowing for encoding based on the specific task requirements.
Scaling Encoders
Before implementing autoscaling, we manually adjusted the number of replicas in the deployment according to the number of encoding tasks in the queue. When multiple tasks were available, we would increase the number of replicas. When all the tasks were completed, we would decrease the number of replicas. We performed these scaling operations manually using the kubectl command line tool.
kubectl scale deploy/encoder --replicas=8Since we were not continuously monitoring the number of available encoding tasks, we needed a way to automate the scaling of the encoders.
But before discussing automatic scaling, it is important to understand the various scaling options available in Kubernetes.
Kubernetes Scaling
As stated before, scaling in Kubernetes means increasing the number of replicas of an application or service running on a Kubernetes cluster. In our case, scaling the number of encoder pods.
Specifying a pod's CPU and memory requirements is important in adding it to a Kubernetes cluster. The scheduler is responsible for finding a node with sufficient resources to host the new pod. The pod will remain pending if a node with the necessary capacity is unavailable. It is important to monitor the resource capacity of your cluster to ensure the smooth deployment of all your pods.
So, in our system, we have two levels of scaling: horizontal scaling of the number of encoder pods based on the number of available encoder tasks and vertical scaling of the number of nodes based on resource availability.
We are using Azure Kubernetes Service (AKS). Azure Kubernetes Service (AKS) is a managed Kubernetes service provided by Microsoft Azure. One of its key features is the ability to automatically scale the number of nodes, which is useful when Kubernetes cannot schedule a new encoder pod.
The other type of scaling, which increases the number of pods, needed a custom solution. To implement this, we had the following two options:
Scaling Options
Scaling a Kubernetes deployment can be done in two ways: using a custom metric or a custom application that communicates with the Kubernetes API. Before I started, I preferred scaling using a custom Kubernetes metric because it was more in line with the existing scaling options of the cluster.
Scale automatically using a custom metric
To automatically scale your Kubernetes cluster based on a custom metric, you need to set up a metric server and a horizontal pod autoscaler.
In my case, the custom metric I needed to track was the number of encoding tasks in the queue. I exposed this metric by implementing an additional REST endpoint in the engine that returns the number of encoding tasks.
There are two options for selecting a metric server: the Prometheus and Kubernetes Metrics Server. The latter is a scalable and efficient source of container resource metrics for Kubernetes’s built-in autoscaling pipelines. The first is an open-source monitoring and alerting system often used as a metric server for Kubernetes clusters.
Since we were already using Prometheus for monitoring, I decided to use it as the horizontal pod autoscaler (HPA) metric server.
I was excited to start configuring the autoscaler, but things didn’t go as smoothly as I had hoped. Despite finding plenty of examples online, I encountered a roadblock when the autoscaler couldn’t access the custom metric I had exposed to Prometheus.
I spent a few frustrating days trying to figure out the issue but ultimately decided to pivot and explore an alternative: implementing a custom service for scaling. It wasn’t the path I had originally intended to take, but sometimes a detour can lead to a better destination.
Scale using a custom NodeJs application
When you implement a custom application to scale a Kubernetes deployment, you must communicate with the Kubernetes API to increase or decrease the number of replicas based on your scaling logic. As my implementation was successful, I will describe the details of the implementation in the next paragraphs.
Implementing the Scaler via a Custom NodeJs Application
We implemented an autoscaler service in Node.js to solve the manual scaling problem. This service runs as a single-container pod in the Kubernetes cluster and continuously monitors the number of encoding tasks in the queue. Based on the task volume, it scales the number of replicas in the encoder deployment up or down as needed. The diagram below illustrates the updated architecture with the Scaler included.
Interacting with the Kubernetes API
To interact with the Kubernetes API, I used an npm package for NodeJs called kubernetes-client. With this package, you can directly interact with Kubernetes. In our case, I used it to increase or decrease the number of replicas of the encoder deployment.
The following function changes the number of encoders in the cluster using the Kubernetes client library. It first retrieves the current configuration of the encoder deployment on line 17, then updates the number of replicas specified in the deployment configuration, and writes the updated configuration back to the Kubernetes cluster.
To interact with the Kubernetes API, your application must have the appropriate permissions. These permissions can be granted using a Kubernetes service account. Our Scaler pod uses this service account and automatically obtains the necessary permissions associated with it, allowing it to interact with the encoder deployment and manage the number of replicas as needed.
Creating a service account
To interact with the Kubernetes API, your application must have the appropriate permissions. These permissions can be granted using a Kubernetes service account.
Our Scaler pod uses this service account and automatically obtains the necessary permissions associated with it, allowing it to interact with the encoder deployment and manage the number of replicas as needed.
The service account is linked with a specific role that provides the required permissions to interact with the encoder deployment.
To create the encoder-scaler-sa service account, we execute the following statement in your terminal:
kubectl create serviceaccount encoder-scaler-saNext, we need to create a role encoder-scale-role that permits us to interact with the encoder deployment. This role should be able to read and update the deployment.
kubectl create role encoder-scaler-role --verb=get,update \
  --resource=deployments --resource-name=encoder
And finally, we create the encoder-role-binding role binding, which connects the service account encoder-scaler-sa to the encoder-scaler-role role.
kubectl create rolebinding encoder-role-binding --role=encoder-scale-role \
   --serviceaccount=default:encoder-scaler-sa
By specifying the service account in the configuration of the encoder scaler deployment, the encoder scaler is granted the necessary permissions to interact with the encoder deployment through the Kubernetes API. This is illustrated in line 17 of the example below, where the service account is defined within the deployment specification.
Creating the queue-based scaling algorithm
Now that we can increase and decrease the number of encoders and retrieve the number of queued encoder tasks, we can develop a scaling algorithm.
The algorithm we have implemented is a straightforward one that returns 0, 4, or 6 encoders depending on the number of encoding tasks. As previously discussed, the number returned by this method is passed directly to the function that sets the number of replicas for the encoder deployment.
This enables us to adjust the number of encoders based on the workload by automatically scaling up or down as necessary.
This simple solution works very well for us, and we may add more complex scaling rules in the future.
Conclusion and Further Improvements
This article discussed the importance of encoders and how to scale them in a Kubernetes cluster. We attempted using native Kubernetes scaling but found a custom solution to be more efficient for us.
Our approach utilizes a Node.js service that continuously monitors the volume of encoding tasks and adjusts the number of replicas in the encoder deployment accordingly.
One improvement we are currently exploring is dividing the encoding tasks into smaller subtasks. This would involve breaking down the source video content into segments of five minutes, encoding each segment individually, and then concatenating the segments to form the final encoded stream.
This approach would enable us to distribute the encoding workload among multiple encoders, even with a single title, resulting in faster and more efficient encoding. Something for a coming article.
Unfortunately, the actual source code of our solution is proprietary and not publicly available. However, a prototype that demonstrates the basic principles of our encoding approach can be found in this GitHub repository.
This prototype is an example of how our solution functions and should provide a general understanding of the concepts used in our implementation.
Let me know if you have any questions or remarks.


