Say Goodbye to Passwords
Implementing passwordless login with WebAuthn using Node.js and Vue

We’ve all been there: struggling to remember yet another password for a new online service or worrying about the security of our personal information after a data breach.
The traditional username and password authentication model has been around for decades, but it’s becoming increasingly clear that it’s no longer enough to keep us secure online.
Enter WebAuthn — a new, standards-based authentication method that has the potential to revolutionize the way we log in to websites and online services.
In this article, we’ll explore what WebAuthn is, how it works, and why it’s a game-changer for the future of online security and user experience.
We will also provide a practical example of implementing passwordless login with Node.js and Vue, demonstrating how to use this WebAuthn technology in real-world applications.
Want to dive directly into the source code? Check out this GitHub repository.
What is WebAuthn, and why does it matter?
Unlock the power of secure, web-based authentication with WebAuthn — a cutting-edge standard developed in collaboration with the biggest names in tech.
The W3C and FIDO Alliance joined forces with tech titans like Google, Microsoft, Mozilla, and Yubico to bring you this game-changing solution.
As part of the FIDO2 specifications, WebAuthn uses the Client-to-Authenticator Protocol (CTAP) to connect your client device with a trusted security key.
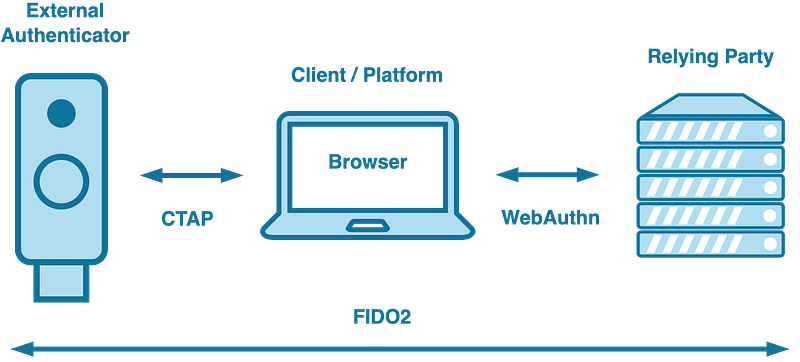
You connect your security key and client device with CTAP (Client-to-Authenticator Protocol). This protocol ensures smooth communication between the two.
But that’s not all — WebAuthn defines the communication protocol between your client device and a server for secure authentication on the web. Together, CTAP and WebAuthn make up the FIDO2 solution.
Just like ssh
Like when you log into a remote server using ssh, WebAuthn uses a public-private key pair for authentication.
In ssh, the server has your public key, and you have a private key stored on your local device. When you try to log in, your device uses the private key to encrypt a message and sends it to the server. The server then uses its corresponding public key to decrypt the message and confirm that it was indeed encrypted with the private key that corresponds to its public key.
In WebAuthn, the server also has a public key, and the client device has a private key stored in a hardware security key, biometric device, or other secure platforms. When the user tries to log in, the client device uses the private key to encrypt a message sent to the server along with a public key. The server then uses the public key to verify the message's authenticity and confirm the user’s identity.
Why does it matter?
With the average person juggling over a hundred online passwords, password fatigue has become a major issue. Unfortunately, this also leaves individuals vulnerable to password breaches — with a staggering number of data breaches happening yearly.
That’s where WebAuthn comes in — a more secure and user-friendly alternative to passwords, reducing the risk of account takeovers and improving the overall security of online services.
With WebAuthn, users can authenticate to websites and applications using a hardware security key, biometrics (e.g., fingerprint), or a device that supports the standard, eliminating the need for password-based authentication and reducing the risk of password-related security incidents.
Let’s explore the WebAuthn API to understand its features and capabilities better.
The WebAuthn API
The WebAuthn API contains several functions and objects to perform authentication relates tasks. We need the API to perform two main tasks, registration and authentication. The complete API is documented by the W3C.
Registration
To register with WebAuthn, we start by creating a credentials object. The process only requires a username. The credentials.create method takes a publicKeyCredentialsOptions object with required and optional fields.
const credential = await navigator.credentials.create({
    publicKey: publicKeyCredentialCreationOptions
});
The publicKeyCredentialCreationOptions object is typically created on the server and contains the following parameters.
const publicKeyCredentialCreationOptions = {
    rp: {
        name: "SimpleTechture",
        id: "simpletechture.nl",
    },
    challenge: Uint8Array.from(
    randomStringFromServer, c => c.charCodeAt(0)),
    user: {
        id: Uint8Array.from(
            "UZSL54T9AFC", c => c.charCodeAt(0)),
        name: "[email protected]",
        displayName: "Patrick",
    },
    pubKeyCredParams: [{alg: -7, type: "public-key"}],
    authenticatorSelection: {
        authenticatorAttachment: "cross-platform",
    },
    timeout: 60000,
    attestation: "direct"
};
We will see later that we create an endpoint that returns this object.
rp — This refers to identifying the relying party or the website you want to log in to. It consists of an ID (which must be a valid domain string) and a name.
challenge — This is a randomly generated string of data by the relying party to prevent replay attacks. The server must validate this challenge when received from the client and maintain its value during the operation.
user — This field holds the identification information for the user’s account and includes required fields such as ‘name’, ‘displayName’, and ‘id’.
pubKeyCredParams — This is an array of objects describing the server's accepted public key types. Each object has ‘alg’ and ‘type’ fields. The ‘alg’ field specifies the signature algorithm that can be used, while the ‘type’ field defines the valid credential types (currently only “public-key” is allowed, but this may change in the future). The ‘alg’ field can take any of the values specified in the CBOR Object Signing and Encryption.
authenticatorSelection — This optional object allows the relying party to limit the allowed authenticator devices by specifying the ‘authenticatorAttachment’ field with values “cross-platform” or “platform”. Cross-platform’ refers to external authenticators such as U2F devices, while Platform refers to integrated authenticators like Windows Hello or fingerprint scanners.
timeout — The time (in milliseconds) the user has to respond to a prompt for registration before an error is returned.
attestation — What type of attestation data is required by the relying party? The default is ‘none’, meaning no preference for attestation data. Other options include ‘indirect’, ‘direct’, or ‘enterprise’.
Registration dialog
The moment you call the navigator.credentials.create method with the publicKeyCredentialCreationOptions the browser will show you the authentication dialog, which shows the possible authentication options for your platform and browser.
Finish registration
The object that is returned from navigator.credentials.create is sent back to the server for validation, verification, and storage in a database.
Signing in
Once a user has successfully registered, we can let the user sign in. The first thing we have to do is request an assertion challenge from the backend.
The browser requests the assertion challenge by sending the username to the login endpoint at the backend. The login endpoint looks up the username in the database, retrieves the id and the authentication information, and returns the following response.
{
 "challenge": "u_5ntSMaR5STaQF1Lm6BE5mb-ioCDWmPVKjQg_m7l-I",
 "allowCredentials": [{
  "type": "public-key",
  "id": "SoygCgGrf8uqMP_rq1ipqQ",
  "transports": ["usb", "nfc", "ble", "internal"]
 }],
 "userVerification": "preferred",
 "rpId": "localhost",
 "timeout": 60000
}
Let’s look at each of the fields of the object.
challenge — As with registration, this is a randomly generated string of data by the relying party to prevent replay attacks. The server must validate this challenge when received from the client and maintain its value during the operation.
allowCredentials — This array tells the browser which credentials the server would like the user to authenticate with. The id is the value that was generated and saved during registration. The server can optionally indicate what transports it prefers.
userVerification — This member specifies the Relying Party’s requirements regarding user verification for the get operation.
rpId — This member specifies the RP ID claimed by the Relying Party. The client MUST verify that the Relying Party’s origin matches the scope of this RP ID. The authenticator MUST verify that this RP ID exactly equals the rpId of the credential to be used for the authentication ceremony.
timeout — Like during registration, this optionally indicates the time (in milliseconds) that the user has to respond to a prompt for authentication
Passing the response to the WebAuthn API
The response is then passed as an argument to navigator.credentials.get, which shows the authentication dialog of the browser.
const credential = await navigator.credentials.get({ publicKey });When the user authenticates, the credentials object shown below is generated. It looks a lot like the object we received during the registration. This object includes a signature and does not include the public key. After the get returns this object, we send it to the server. The server handles the request and validates it.
{
 "rawId": "SoygCgGrf8uqMP_rq1ipqQ",
 "response": {
  "authenticatorData": "SZYN5YgOjGh0NBcPZHZgW4_krrmihjLHmVzzuoMdl2MFAAAABg",
  "signature": "MEUCIGVbyNqSMK4Fdw6hFnO_g1FdOs7KmcBKp5VWoEs8XUNyAiEAqiFpe353J0MIMtiy0_NgPiOfbzSaBDjsktZDUa0R-6c",
  "userHandle": "qiKRsKsfsIBSl7fgWoFF6ZKoR50K5j9pQsUiMm9UfZs",
  "clientDataJSON": "eyJ0eXBlIjoid2ViYXV0aG4uZ2V0IiwiY2hhbGxlbmdlIjoidV81bnRTTWFSNVNUYVFGMUxtNkJFNW1iLWlvQ0RXbVBWS2pRZ19tN2wtSSIsIm9yaWdpbiI6Imh0dHA6Ly9sb2NhbGhvc3Q6ODA4MCIsImNyb3NzT3JpZ2luIjpmYWxzZX0"
 },
 "authenticatorAttachment": null,
 "getClientExtensionResults": {},
 "id": "SoygCgGrf8uqMP_rq1ipqQ",
 "type": "public-key"
}
Let’s look at each of the fields.
id — The identifier for the credential that was used to generate the authentication assertion.
rawId — The identifier again, but in binary form. In the example above, we converted it to a base64 string so that we can send it to the server.
authenticatorData — The authenticator data is similar to the authData received during registration, with the notable exception that the public key is not included here.
clientDataJSON — As during registration, the clientDataJSON is a collection of the data passed from the browser to the authenticator. It is one of the items used during authentication as the source bytes to generate the signature.
signature — The signature generated by the private key associated with this credential. On the server, the public key will be used to verify that this signature is valid.
userHandle — This field is optionally provided by the authenticator and represents the user id supplied during registration. It can be used to relate this assertion to the user on the server.
Validating the authentication data
The server must validate the authentication data. It verifies the signature using the public key stored in the database during registration. We will see this in the actual implementation.
Join me in exploring an application that puts WebAuthn into practice.
Implementing WebAuthn using Node.js and Vue
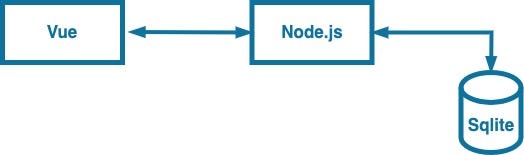
I’ve created an application that showcases the power of WebAuthn. The front end is made with Vue3, and Node.js powers the backend. The backend uses Fastify as web framework. The application stores User and WebAuthn information in a Sqlite database.
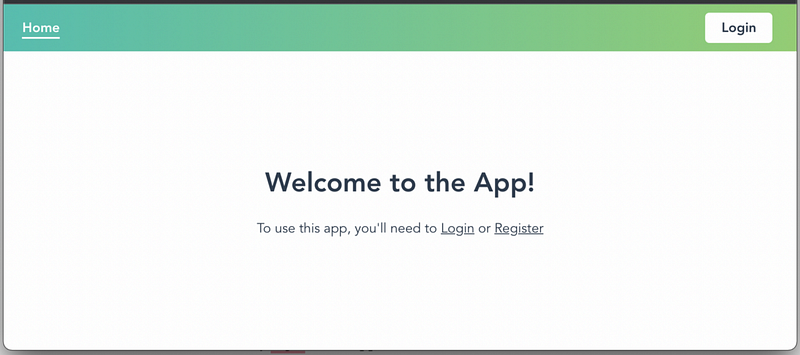
The application’s user interface is simple, featuring two essential functions: registering a new user and logging in. Upon successful authentication, the application shows a list of customer cards showcasing the app’s ability to access protected information once authenticated.
Registering a new user account
When registering for a new account, only a name and email address are required. Passwords are not used in this application.
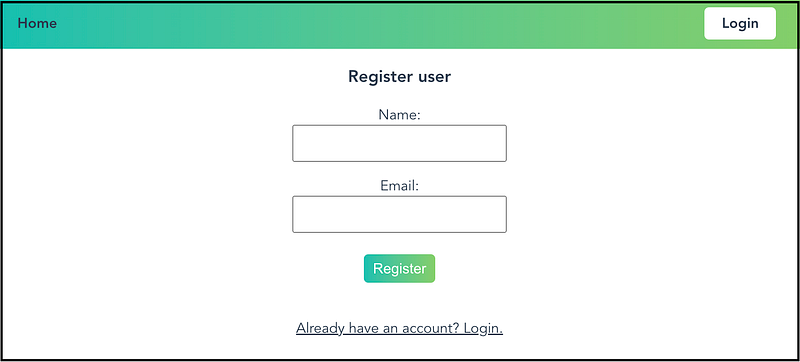
To register, simply enter your name and email address and press the “Register” button. The front end will then send a POST request to /api/user/register with the entered name and email address included in the request body.
Below, you see the implementation of the register function that is attached to the register button. By dispatching a message to the Vuex store the POST request is sent to the backend.
async register() {
await this.$store.dispatch('startRegistration', {username: this.email, name: this.name });
const credentialInfo = await navigator.credentials.create({ publicKey: {...this.challenge}});
const encodedCredentialInfo = utils.encodeCredentialInfoRequest(credentialInfo);
await this.$store.dispatch('completeRegistration', encodedCredentialInfo);
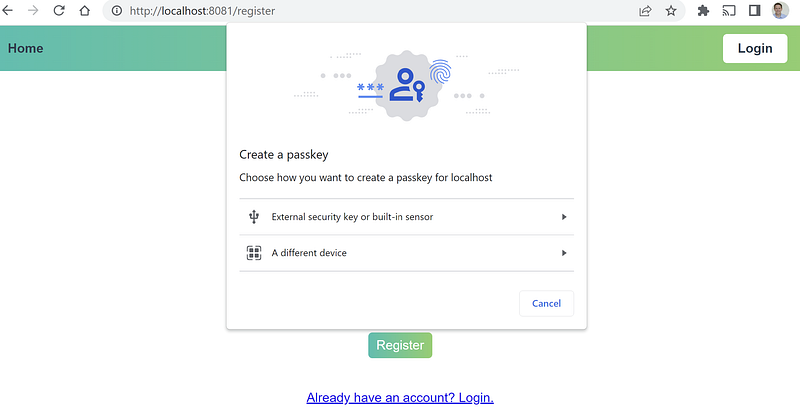
}The back-end creates and returns the publicKeyCredentialCreationOptions object using the name and email. The front-end then passes this object as an argument to the WebAuthn API via the navigator.credentials.create function.
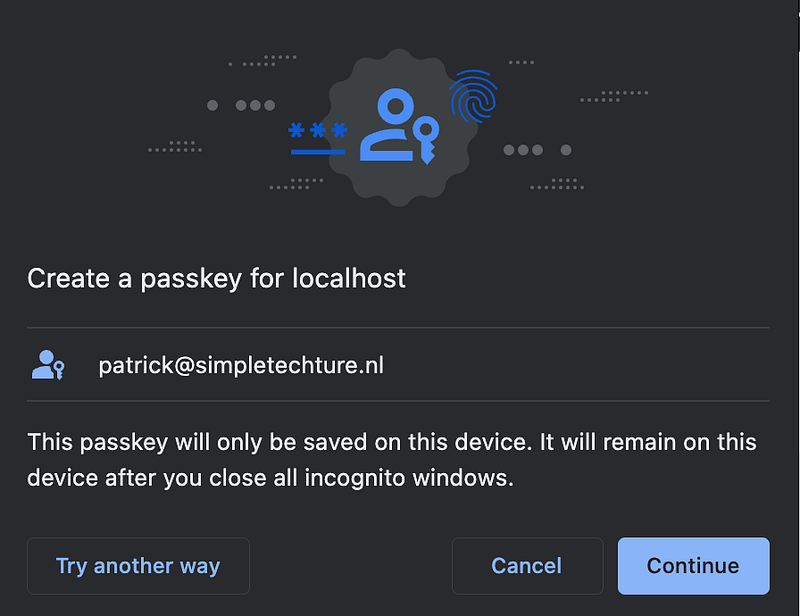
When the navigator.credentials.create function is executed, it displays the WebAuthn registration dialog. The type of dialog depends on the operating system and browser being used. On a Windows laptop, it displays the following dialog.
By selecting “External security key or built-in sensor,” the user can register using Windows Hello or a fingerprint scanner.
The following code presents a back-end function that generates the publicKeyCredentialCreationOptions object. To ensure uniqueness, the function first checks if the desired username already exists in the database.
If the username does not exist, the user is saved in the database, the credentials request is created and returned to the front end.
userController.startRegistration = async (req, reply) => {
  const { username, name } = req.body;

  const userFromDb = await database.getUser(username);
  if (userFromDb && userFromDb.registered) {
    reply.badRequest(`Username ${userFromDb.username} already exists`);
    return;
  }

  const id = utils.randomBase64URLBuffer();
  await database.addUser(username, name, false, null, null, id);

  const makeCredChallenge = utils.generateServerMakeCredRequest(username, name, id);
  makeCredChallenge.status = "ok";

  req.session.username = username;
  req.session.challenge = makeCredChallenge.challenge;
  req.session.username = username;

  reply.send(makeCredChallenge);
};
After the user completes the registration process using an external security key or internal sensor, we send a PUT request to the back-end to finalize the registration.
The controller function then validates the type, challenge, and origin, creates and configures the user’s public key, and finally updates the user record with the information from the registration, including the public key, id, and format used.
userController.finishRegistration = async (req, reply) => {
  const { id, rawId, response, type } = req.body;

  let result;

  if (type !== "public-key") {
    reply.badRequest({
      status: "error",
      message: "Registration failed! type is not public-key",
    });
    return;
  }

  const clientData = JSON.parse(base64url.decode(response.clientDataJSON));
  if (clientData.challenge !== req.session.challenge) {
    reply.badRequest({
      status: "error",
      message: "Registration failed! Challenges do not match",
    });
    return;
  }

  if (clientData.origin !== "http://localhost:8081") {
    reply.badRequest({
      status: "error",
      message: "Registration failed! Origins do not match",
    });
    return;
  }

  if (response.attestationObject !== undefined) {
    log.info(
      "Handling create credential request, storing information in database for: " +
        req.session.username
    );

    // This is a create credential request
    result = utils.verifyAuthenticatorAttestationResponse(response);

    if (result.verified) {
      await database.updateUser(req.session.username, true, result.authrInfo.fmt,
        result.authrInfo.publicKey, result.authrInfo.credID);
    }
  } else {
    reply.badRequest("Cannot determine the type of response");
    return;
  }

  if (result.verified) {
    req.session.loggedIn = true;
    reply.send("Registration successfull");
    return;
  } else {
    reply.badRequest("Cannot authenticate signature");
    return;
  }
};
When the registration process completes without any errors, the user is successfully registered and can log in to the application without a password.
Logging in using a registered account
Once a user has successfully registered an account, they can log in to the application. The login screen consists of a single text box for entering their email and a login button, as depicted below.

Once the user entered their email adres and press the login button the front-end send the email to the back-end. The back end searches if user exists in the database and if the registration was complete.
The back end retrieves information about the authenticator used during the registration process from the database. It then sends this information to the generateServerGetAssertion function to generate an assertion that the front end can validate. The generated assertion is returned to the front end, as shown below.
loginController.login = async (_req, reply) => {
  const { username } = _req.body;

  const user = await database.getUser(username)
  if (!user || !user.registered) {
    reply.badRequest(`User ${username} does not exist or is not registered`);
    return;
  }

  const authenticator = { fmt: user.fmt, publicKey: user.publicKey, credID: user.credID };
  const getAssertion = utils.generateServerGetAssertion(
    [authenticator]
  );
  getAssertion.status = "ok";

  _req.session.challenge = getAssertion.challenge;
  _req.session.username = username;

  reply.send(getAssertion);
};
The LoginUser.vue page in the front-end calls the navigator.credentials.get method and passes the challenge returned from the back-end as an argument.
The browser displays the WebAuthn authentication dialog, which is set to the authentication method used during registration. Once the user successfully authenticates, the browser sends the encoded or signed credential information back to the back-end for validation.
const credentialInfo = await navigator.credentials.get({publicKey: {...this.assertChallenge}});
const encodedCredentialInfo = utils.encodeCredentialInfoRequest(credentialInfo);
await this.$store.dispatch('verifyLogin', encodedCredentialInfo);
The final step of the process is the loginVerify function in the back end, which receives the signed credential information for validation. See the controller method below.
The controller function first validates the request’s type, challenge, and origin. It then retrieves the user from the database using their id and passes the information to the verifyAuthenticatorAssertionResponse method.
This method performs the crucial task of verifying the signature. If the verification is successful, the function generates a JSON Web Token (JWT) and returns it to the front end for use in subsequent requests.
loginController.loginVerify = async (_req, reply) => {
const { id, response, type } = _req.body;
let result;
if (type !== "public-key") {
reply.badRequest({
status: "error",
message: "Registration failed! type is not public-key",
});
return;
}
const clientData = JSON.parse(base64url.decode(response.clientDataJSON));
if (clientData.challenge !== _req.session.challenge) {
reply.badRequest({
status: "error",
message: "Registration failed! Challenges do not match",
});
return;
}
if (clientData.origin !== "http://localhost:8081") {
reply.badRequest({
status: "error",
message: "Registration failed! Origins do not match",
});
return;
}
let user;
if (response.authenticatorData !== undefined) {
let user = await database.getUserByCredId(id)
if (!user || !user.registered) {
reply.badRequest(`User ${username} does not exist or is not registered`);
return;
}
result = utils.verifyAuthenticatorAssertionResponse(
id,
response,
[{ fmt: user.fmt, publicKey: user.publicKey, credID: user.credID }],
);
} else {
reply.badRequest("Cannot determine the type of response");
return;
}
if (result.verified) {
const token = jwt.sign(id, config.jwt.secret);
_req.session.loggedIn = true;
reply.send({verification: true, token, message: "Login successfull", status: "ok"});
} else {
reply.badRequest({verification: false, message: "Cannot authenticate signature", status: "error"});
}
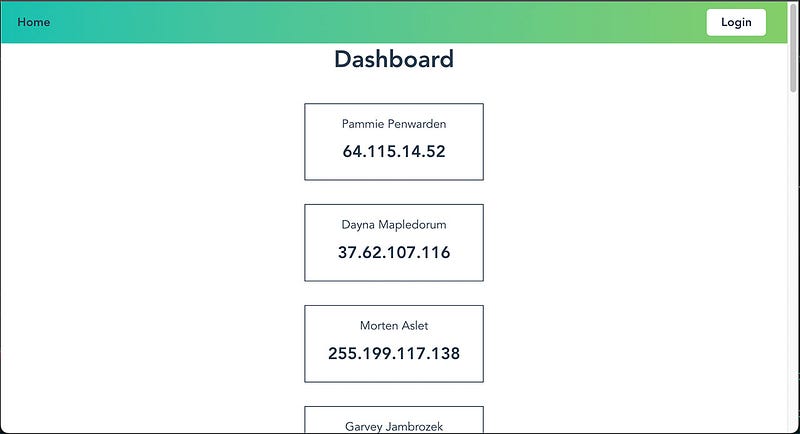
};Upon receiving a successful response from the back-end, the front-end routes the user to the dashboard page.
The dashboard page displays a list of non-existing customers to demonstrate the viewing of a secure list. The back-end function uses the JSON Web Token (JWT) to verify that the user is authenticated. See the page below.
With the implementation of WebAuthn using Node.js and Vue described, all that remains is to provide instructions on how to install and launch the application, so you can start exploring and experimenting with it on your own.
Starting and installing the application
To get started, clone the WebAuthnTest GitHub repository. Next, navigate to the server folder and run npm install. Repeat this step in the client folder.
To launch the application, first start the server by navigating to the server folder and executing npm run. In another terminal, navigate to the client folder and run npm run serve. The web app will then be accessible at http://localhost:8081/.
Conclusion
WebAuthn is a new standard for secure, passwordless online authentication that offers a convenient and secure way for users to log in without a password.
Implementing WebAuthn with Vue and Node.js provides a solid foundation for secure login systems. With numerous benefits, including the elimination of passwords, support for biometric authentication, and better protection against phishing, WebAuthn offers a more secure and user-friendly authentication experience.
WebAuthn is supported by a growing number of browsers, including Google Chrome, Mozilla Firefox, Microsoft Edge (Chromium-based), and Apple Safari. WebAuthn is also supported on some mobile platforms, including Google Android 7 or later and Apple iOS 13.3 or later.
As the adoption of WebAuthn increases among websites and services, it is likely to become the standard for passwordless online authentication. With its positive impact on security and usability, the future of WebAuthn is exciting and holds potential for further advancements.
I hope you enjoyed the article and will consider implementing WebAuthn in your applications. As always let me know if you have any remarks or questions!


