Python’s Hidden Gems
Six lesser-known Python libraries worth exploring

So, last month I was working on a new Python project. As with almost all projects, I needed to add logging. I used the standard Python logging, but nothing showed up. Ugh! The day just continued, and my frustration reached new heights.
Turns out I forgot to add a handler, so my logging wasn’t showing up. I stared at my screen and exclaimed, “There has to be a better way to do this!”
As if the programming gods had heard my plea, a voice from the neighboring cubicle chimed in, “Hey, have you ever tried Loguru?” My eyebrows shot up in surprise, and I turned to face my colleague with curiosity. I hadn’t even heard of this library before, which intrigued me.
After implementing Loguru, I couldn’t believe how much more straightforward and more efficient my logging process had become. It was a game-changer.
This fortunate encounter got me thinking: how many lesser-known Python libraries are lurking in the shadows, waiting to be discovered and make our lives as developers easier?
That’s when I decided to embark on a quest to uncover Python’s hidden gems. Now, dear reader, I’m eager to share my findings with you.
Join me as we delve into lesser-known libraries, including Loguru, Typer, Arrow, Rich, Pydantic, and Streamlit. These hidden gems could become your new secret weapons in the ever-evolving landscape of Python development.
All the examples can be found in this GitHub repository.
Loguru
Loguru is a powerful, user-friendly logging utility that simplifies and enhances Python logging. It’s a more attractive option than the built-in logging module.
Developed by Delgan, it was first released on July 20, 2018. Loguru has an intuitive and straightforward API, which makes it easy for developers to implement logging in their applications. There’s no need to deal with complex configurations or handlers.
The library comes with various built-in features, such as:
- Automatic log rotation
- Exception handling
- Filtering
These features make Loguru a popular choice among Python developers.
To install Loguru execute the following pip install
pip install loguruThe example below highlights several key features of the Loguru library. Log messages are displayed while the program runs by importing the logger from Loguru and invoking the .info() or .error() methods. This eliminates the need for configuring handlers or other complex settings.
The logger.add() method in the example enables logging to the application.log file and configures file rotation, ensuring efficient log management.
from loguru import logger

def divide(a, b):
    try:
        result = a / b
        logger.info(f"Division successful: {a} / {b} = {result}")
        return result
    except ZeroDivisionError:
        logger.error(f"Attempted to divide by zero: {a} / {b}")
        return None

def main():
    logger.add("application.log", rotation="10 MB")

    numbers = [(10, 5), (4, 2), (9, 0), (7, 3)]

    for num1, num2 in numbers:
        divide(num1, num2)

if __name__ == "__main__":
    main()
The example shows the following logging in the terminal.

Typer
You may have experienced this before: you begin with a basic command-line script, gradually incorporating new features and options.
As the script grows more complex, you wish you had used a library from the start to make things more manageable. Integrating one at this point seems daunting, as it demands additional time and effort.
That’s where Typer comes in, simplifying the building and maintaining command-line applications.
Typer is a Python library that makes it easy to build command-line applications. It’s built on top of the popular Click library and designed to work well with Python’s built-in typing system.
Some of its key features include:
- Simple syntax: Typer allows you to create command-line applications with minimal code and effort.
- Type hints: Typer can automatically generate help messages and validate input using Python's type hints.
- Tab completion: Typer supports auto-completion for your command-line application, making it easier for users to interact with your app.
- Nested commands: You can create sub-commands and group them to build more complex applications.
- Extensibility: Typer is easily extensible and can be customized to suit your needs.
Overall, Typer provides a user-friendly way to create powerful command-line applications in Python.
The example demonstrates a simple command-line application using Typer that converts text between different letter cases: lowercase, uppercase, and title case.
In the example, we first import Typer and create an instance of typer.Typer(). We then define a convert function that accepts text and case arguments. The text argument is the input text to be converted, and the case option determines the target letter case for the conversion. We use the @app.command() decorator to register the convert function as a command in our Typer application.
import typer

app = typer.Typer()

@app.command(help="Convert text between different letter cases.")
def convert(
    text: str = typer.Argument(..., help="The text you want to convert."),
    case: str = typer.Option(
        "lower", help="The target letter case: lower, upper, or title."
    ),
):
    if case == "lower":
        result = text.lower()
    elif case == "upper":
        result = text.upper()
    elif case == "title":
        result = text.title()
    else:
        typer.echo(f"Invalid case option: {case}")
        raise typer.Exit(code=1)

    typer.echo(result)

if __name__ == "__main__":
    app()
Now, when you run python text_converter.py --help, it will display the available options and their descriptions:

Arrow
Arrow is a powerful and user-friendly Python library for working with dates, times, and timestamps. Created by Chris Smith, Arrow was first released on April 14, 2013.
The library simplifies the complexities of date and time manipulation in Python, offering a more intuitive approach than the built-in datetime module.
Arrow’s GitHub repository can be found at https://github.com/arrow-py/arrow, where you can explore the source code and documentation and engage with its community of contributors.
Arrow provides several advantages over the built-in datetime module in Python regarding date and time manipulation. Some of these benefits include:
- Ease of use: Arrow’s syntax is more intuitive and user-friendly than the built-in datetime module, making it easier for developers to work with dates and times.
- Timezone support: Arrow simplifies timezone conversions and handling. It uses the IANA Time Zone Database (the tz database or zoneinfo) for accurate timezone information and automatically accounts for daylight-saving time changes.
- Parsing and formatting: Arrow offers robust functionality for parsing and formatting dates and times. It can handle many date and time string formats, making it more flexible and powerful than the built-in datetime module.
- Date and time arithmetic: Arrow simplifies date and time arithmetic, allowing developers to add or subtract time intervals easily.
- Human-readable durations: Arrow can generate human-readable time durations, making it easier for users to understand the difference between two dates or times.
- Localization: Arrow supports localization, which enables developers to present dates and times in various languages and formats.
- Fluent interface: Arrow’s fluent interface allows developers to chain multiple operations, making the code readable and maintainable.
Overall, Arrow provides a more convenient and feature-rich alternative to the built-in datetime module in Python, making it an excellent choice for developers working with dates and times.
This example demonstrates the use of the Arrow library to calculate and display the difference between two dates in a human-readable format.
import arrow

def date_difference(date1: str, date2: str) -> str:
    arrow_date1 = arrow.get(date1, "YYYY-MM-DD")
    arrow_date2 = arrow.get(date2, "YYYY-MM-DD")

    human_readable_diff = arrow_date2.humanize(
        arrow_date1, granularity=["year", "month", "day"]
    )

    return human_readable_diff

if __name__ == "__main__":
    date1 = "2021-01-01"
    date2 = "2023-04-25"
    result = date_difference(date1, date2)
    print(f"The difference between {date1} and {date2} is {result}.")
When the example is run, it outputs: “The difference between 2021–01–01 and 2023–04–25 is 2 years, 3 months, and 22 days.”
The difference between 2021-01-01 and 2023-04-25 is in 2 years 3 months and 22 days.Rich
In our quest to discover hidden gems within the Python ecosystem, let’s now turn our attention to the Rich library. This lesser-known yet powerful library aims to elevate your terminal experience by providing a modern, visually appealing, and user-friendly interface for command-line applications.
Rich enables you to display text in various styles, create tables, render syntax-highlighted code, and even display images, all within the terminal.
In this section, we’ll dive into the key features of Rich, explore its potential use cases, and learn how it can transform how you interact with your Python applications in the terminal.
Some of its key features include:
- Text styling: Rich allows you to easily apply various styles to your text, such as bold, italic, underline, and strikethrough. You can also choose various colors to make your terminal output visually appealing.
- Syntax highlighting: Rich supports syntax highlighting for multiple programming languages, including Python, JavaScript, HTML, and more. This feature is particularly useful when displaying code snippets in your terminal application.
- Tables: With Rich, you can create well-structured and visually appealing tables in your terminal. The library provides options for customizing borders, column widths, and alignment, among other settings.
- Progress bars: Rich offers a built-in feature that can be easily integrated into your terminal applications, providing users with real-time progress updates for various tasks.
- Markdown support: Rich has built-in support for rendering Markdown content in the terminal, allowing you to display formatted text, headings, lists, and more.
- Emoji support: The library includes support for displaying emojis within your terminal, adding an extra level of expressiveness to your application’s output.
- Images: Rich even supports displaying images in compatible terminals, such as iTerm2 on macOS or in the terminal within Visual Studio Code.
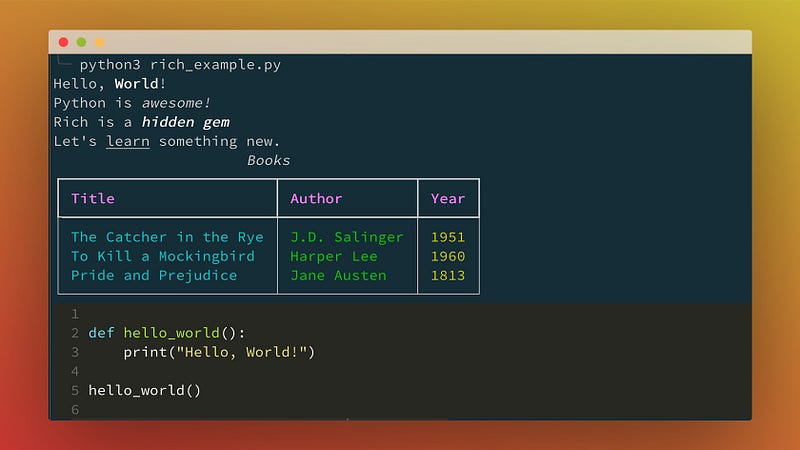
Now let's look at an example in which we will use Rich to style text, format code, and show a table.
The source code utilizes the Rich library to enhance terminal output with various visual elements. It starts by importing necessary modules, then demonstrates text styling with bold, italic, and underlined effects.
Next, it creates a formatted table with custom column styles and adds rows with data. Finally, it displays a syntax-highlighted Python code snippet using the built-in Syntax module, resulting in a visually appealing and informative terminal output.
from rich.console import Console
from rich.table import Table
from rich.syntax import Syntax

console = Console()

# Text styling
console.print("Hello, [bold]World[/bold]!")
console.print("Python is [italic]awesome![/italic]")
console.print("Rich is a [italic][bold]hidden gem[/bold][/italic]")
console.print("Let's [underline]learn[/underline] something new.")

# Table
table = Table(title="Books", show_header=True, header_style="bold magenta")
table.add_column("Title", style="cyan")
table.add_column("Author", style="green")
table.add_column("Year", style="yellow")

table.add_row("The Catcher in the Rye", "J.D. Salinger", "1951")
table.add_row("To Kill a Mockingbird", "Harper Lee", "1960")
table.add_row("Pride and Prejudice", "Jane Austen", "1813")

console.print(table)

# Syntax highlighting
code = """
def hello_world():
    print("Hello, World!")

hello_world()
"""

syntax = Syntax(code, "python", theme="monokai", line_numbers=True)
console.print(syntax)
This will yield the subsequent output, displaying various text markups, an organized table, and properly formatted source code.
Pydantic
Pydantic is a popular Python library that facilitates data validation and parsing using Python-type annotations. It helps you define data models with typed attributes. It enforces data consistency by automatically validating the input data against the defined types, ensuring it meets the expected structure and constraints.
Some key features of Pydantic include:
- Type enforcement: Pydantic validates input data against the types specified in your data model, raising errors if the input does not match the expected type.
- Data parsing: Pydantic automatically parses input data, converting it into the appropriate types defined in your data model, making it easy to work with structured data.
- JSON support: Pydantic models can be easily serialized to and deserialized from JSON, simplifying the process of working with JSON data in Python.
- Custom validators: You can define custom validation functions for specific attributes in your data model, allowing you to enforce complex business rules or constraints.
- Editor support: Pydantic provides seamless integration with popular Python editors and IDEs, such as PyCharm and Visual Studio Code, enabling features like autocompletion, type checking, and error highlighting.
Pydantic is commonly used in web development, data processing pipelines, and configuration management, where it helps to ensure data integrity and simplify data handling.
The library is particularly popular in the FastAPI web framework. It plays a crucial role in request and response validation, making building robust and well-documented APIs easier
Here’s a simple example demonstrating using Pydantic for data validation and parsing. In this example, we’ll create a data model to represent a Person and validate input data using Pydantic.
When you run this example, it will first validate the valid_input dictionary against the Person model, successfully creating a Person instance.
Then, it will attempt to validate the invalid_input dictionary, which contains an incorrect data type for the age attribute.
In this case, a ValidationError will be raised, displaying an error message indicating the invalid input.
from pydantic import BaseModel, ValidationError

class Person(BaseModel):
    name: str
    age: int
    email: str

# Valid input
valid_input = {"name": "John Doe", "age": 30, "email": "[email protected]"}

try:
    person = Person(**valid_input)
    print(person)
except ValidationError as e:
    print(e)

# Invalid input
invalid_input = {
    "name": "John Doe",
    "age": "thirty",  # Invalid data type
    "email": "[email protected]",
}

try:
    person = Person(**invalid_input)
    print(person)
except ValidationError as e:
    print(e)
Running the example will generate the following output.

Streamlit
Our last library of the six is Streamlit, a powerful and user-friendly framework for creating interactive web applications with Python.
Streamlit empowers developers to swiftly prototype, build, and deploy data-driven applications, making it an ideal choice for data scientists, machine learning engineers, and developers looking to share their insights or models in a visually engaging manner.
With its intuitive API and built-in components, Streamlit lets you focus on writing Python code. At the same time, it takes care of the frontend complexities, allowing you to transform your analyses, models, or visualizations into dynamic and interactive web applications with minimal effort.
Some of its key features include:
- Ease of use: Streamlit’s intuitive API and minimal setup requirements make it easy to create and deploy web applications with just a few lines of Python code.
- Built-in components: Streamlit provides a wide array of built-in components, such as sliders, checkboxes, and dropdowns, that can be seamlessly integrated into your application for user interaction.
- Data visualization: Streamlit supports a variety of popular visualization libraries, like Matplotlib, Plotly, and Altair, allowing you to create visually appealing and informative graphics within your application.
- Machine learning integration: Streamlit is well-suited for integrating machine learning models into web applications, making it easier to showcase and share your work with others.
- Live reloading: Streamlit automatically updates your application in real time as you modify your Python code, providing a smooth development experience.
- Customization: Streamlit supports custom CSS and HTML, allowing you to tailor the appearance and layout of your application to your specific needs.
- Deployment: Streamlit applications can be easily deployed on various platforms, such as Streamlit Sharing, Heroku, or AWS, enabling you to share your work with a wide audience.
- Caching: Streamlit offers built-in caching functionality, which helps improve the performance of your application by caching the results of time-consuming computations or data fetching.
These features make Streamlit an appealing choice for creating interactive web applications, particularly in data science and machine learning, where it simplifies sharing insights, visualizations, and models with others.
The following example demonstrates the ease and simplicity of creating interactive web applications using Streamlit.
import streamlit as st
import matplotlib.pyplot as plt

# Application title
st.title("Streamlit Bar Chart Example")

# User input form
st.sidebar.header("User Input")
num_bars = st.sidebar.slider("Number of bars", min_value=1, max_value=10, value=5, step=1)
bar_values = [st.sidebar.number_input(f"Value for bar {i+1}", value=i+1) for i in range(num_bars)]

# Create a bar chart
def create_bar_chart(values):
    fig, ax = plt.subplots()
    ax.bar(range(len(values)), values)
    ax.set_xlabel("Bar index")
    ax.set_ylabel("Bar value")
    ax.set_title("Bar chart")
    return fig

# Display the bar chart
if st.button("Generate Bar Chart"):
    chart = create_bar_chart(bar_values)
    st.pyplot(chart)
You run the example using the command streamlit run streamlit_example.py. It will open a new browser window displaying the Streamlit application. The application has a sidebar where users can adjust the number of bars and their respective values. After clicking the “Generate Bar Chart” button, the application will display a bar chart based on the user’s input.

Conclusion
The Python ecosystem is brimming with hidden gems waiting to be discovered and leveraged in your projects.
This article explores six lesser-known yet powerful libraries: Loguru, Typer, Arrow, Rich, Pydantic, and Streamlit.
Each library offers unique and practical solutions to common challenges developers face, enhancing productivity and simplifying various aspects of the development process.
Integrating these hidden gems into your Python projects can unlock new potential, streamline your workflow, and elevate your work. All examples from this article can be found in the accompanying GitHub repository.
If you’ve used or discovered any lesser-known Python libraries that have made a difference in your projects, don’t hesitate to share them by leaving a response.
I’d love to hear about your experiences and uncover more hidden gems in the Python ecosystem.
Happy coding!


