Mini Video Encoder implementation part 1
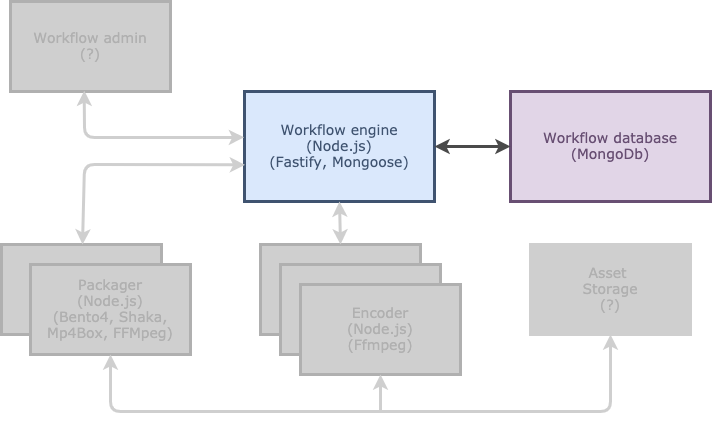
Using Node.js, Fastify, Mongoose, and MongoDB for a real project, the Workflow engine and Workflow database of the Mini Video Encoder.

Mini Video Encoder part 1, the engine
In this article, I use Docker, Node.js, Fastify, MongoDB, and Mongoose to implement the Workflow engine and Workflow database of the Mini Video Encoder. The Workflow engine is the heart of Mini Video Encoder (MVE); it is responsible for managing all video encoding related tasks. MVE is the new side project that I started this year to let me explore new exciting technologies. If you are interested why I started this project including its details, I invite you to read this article:

Mini Video Encoder platform
This article focusses on the Workflow engine and Workflow database of the Mini Video Encoder platform.
Source code structure
The source code of the Mini Video Encoder platform can be found on Github. The project contains six folders, and each folder contains the source code for that specific service.
Each folder contains a Dockerfile for building the Docker image for that specific service. The docker-compose.yml file in the root is used to start all the Docker containers.
MongoDB inside a Docker container
The Workflow engine store's the state of the encoding platform in a MongoDB database. MongoDB runs inside a Docker container, and the database itself is mounted on the file system of the host. All the information regarding the Workflow database can be found in the Workflow Database folder.
Creating database users
I use Docker Compose to start all the services of the MVE platform during development. Docker Compose makes it easy to install and start MVE. The Workflow database and users are created at the startup of the container if they don’t exist.
I am using the latest official MongoDB Docker image, which at this time is Mongo:4.0.14. The MongoDB Docker image supports creating a root user via environment variables during startup.
The MONGO_INITDB_USERNAME and MONGO_INITDB_ROOT_PASSWORD environment variables create a new user and password. The Dockerfile creates this user in the admin authentication database with the root role, a superuser role. The MONGO_INITDB_DATABASE environment variable specifies the name of the database that is used when executing the javascript creation scripts in the /docker-entrypoint-initdb.d/ folder.
I use the javascript file init-mongo.js to create the user that the Workflow engine uses to connect to the database. Docker Compose maps the init-mongo.js file using volumes in the Docker container. MongoDB executes the script during startup and creates the mve-workflowengine user.
Validate created users
After starting the MongoDB server with docker-compose up. Both the user mveroot and mve-workflowengine are created. The mveroot user has superuser access to all the databases of the MongoDB server and the mve-workflowengine user has read/write access to the workflow-db database.
You can validate if you can access the database by using a MongoDB GUI. I use the community edition of MongoDB Compass. You can use the following connection string to connect to the workflow-db database with the mve-workflowengine user.mongodb://mve-workflowengine:mve-workflowengine-password@localhost:27017/?authSource=workflow-db&readPreference=primary&authMechanism=DEFAULT&appname=MongoDB%20Compass%20Community&ssl=false
Workflow Engine REST API

The Workflow engine is a Node.js app that provides a REST API using Fastify. Fastify is a fast and low overhead web framework for Node.js. The services of the MVE platform connect to the Workflow engine using its REST API.
I use the Fastify plugin fastify-register-routes to register routes. Fastify-register-routes let me define the routes in separate route files and read them with a single statement.
Every file that contains Route of Routes in the routes folder is automatically registered. This helps me in keeping the project organized and maintainable. See below the file jobRoutes.js that defines all the Job-related routes.
In jobRoutes.js, I define an array that contains all the routes on the api/job endpoint. Below a single route with comments that explain each field of the route.
In jobController.js, I implement the getJobs() method that contains the logic to retrieve all the workflow jobs from the database. But before I can explain getJobs() inside the jobController, we have to dive a bit into how we are going to interact with the MongoDB database.
Mongoose vs mongodb driver
When you want to interact with MongoDB from Node.js, you have two options: use the mongodb driver or use Mongoose. Naturally, the choice depends on your use case; Mongoose is built on top of the mongodb driver to help you model your data and thereby writing less code. The mongodb driver, on the other hand, is simpler to pick up and provides the best performance.
For MVE, I use Mongoose because database performance is not an issue at this moment and I find validation important.
Mongoose
You start with Mongoose by describing the schema of your model using the Schema() command.
In the schema, you define the properties of your document. For each property, you define the type and whether it is required. This enables Mongoose to perform validation when inserting a new document. The { timestamps: true } is an option of Mongoose and automatically adds and fillscreatedAt and updateAt properties to the document. I create two indexes, one on the status field and another on the name field.
Combining Fastify and Mongoose in the Controller
With the route and schema defined we can now create the JobController. The JobController is referenced by the JobRoutes and performs the database operations using the Job schema.
Adding a new Job
The addJob() method on the JobController is responsible for storing a new Job in the database.
In row two, I create a Job directly from the body of the request. I don’t validate the incoming request as Mongoose performs the validation during the save(). If one of the required fields is missing, the API returns a BadRequest that indicates which field is missing.
The getJob() method of the JobController uses the findById()method of Mongoose to search for a job. Searching by id is possible because MongoDB adds a unique id field called _id to each inserted document.
I always try to handle errors by returning the correct HTTP response codes. If findById() does not find a job, I return an HTTP 404 status code by calling reply.notFound() on row eight.
Updating a job
The updateJob() method of the JobController uses the findByIdAndUpdate() of Mongoose to search, update and return the updated Job in a single statement.
By default, findByIdAndUpdate() returns the document as it was before the update. By sending the option { new: true } it returns the updated job instead. In row four, I use the spread operator to create a copy of the object.
If you are interested in the implementation of the two remaining methods deleteJob() and getJobs() view the jobController.js on Github.
Dockerize WorkflowEngine and WorkflowDatabase
Before continuing with implementing the Workflow engine and Workflow database I want to make sure that they both run inside Docker containers and can communicate with each other. This means extending the docker-compose.yml file with the Workflow engine and adding a Dockerfile for the Workflow engine project.
Dockerfile for the Workflow Engine
Using my checklist for running Node.js application in production, I created the following Dockerfile for the Workflow engine.
With this Dockerfile you can build the docker image with docker build -t workflowengine:0.6.0 . We now have two Docker images that can be started using Docker Compose.
Extending the docker-compose file
I already showed a docker-compose.yml file for the Workflow database. I add the Workflow engine so that both can be started using Docker Compose.
Docker Compose creates 2 services,workflowdb on row 3 and workflowengine on row 17. I set the environment variable STORAGE_HOST with the correct connection string so that the Workflow Engine is able to connect to the database. I use the name of the service workflowdb to indicate the host. This way I don’t have to find the IP-address of the MongoDB server inside the Docker container.
- STORAGE_HOST=mongodb://mve-workflowengine:mve-workflowengine-password@workflowdb:27017/workflow-db?authMechanism=DEFAULT&authSource=workflow-db
Both services connect to the network mve-network to make sure that they can communicate with each other.
I had some trouble reaching the Fastify server from the host once it was running inside the Docker container. It seems that default Fastify listens on the 127.0.0.1 address, this does not work inside a Docker container. After changing it to 0.0.0.0 I was able to access it from the host.
What to do next?
Ok, where do we stand? We have both the Workflow engine and Workflow database running inside Docker and they are able to communicate with each other. We can insert, update or, delete video encoding jobs using the REST API. Both containers can be started using Docker Compose.
Next, I will extend the Workflow engine with additional endpoints for managing encoding tasks, add authentication, and start working on the Video encoder.


