How To Implement Two-Factor Authentication Using Node.js and Vue 3
With time-based one-time password (TOTP)

Last week, our product owner asked what it would take to add two-factor authentication to our system. We use Azure Active Directory, which means configuring an extra policy via the Azure portal. This was all we needed to do to enable two-factor authentication.
Triggered by the question of the product owner, I thought it was also time to add two-factor authentication to my side project. I wanted to use a common way of adding two-factor authentication, a Time-based One-Time Password.
This article describes how I used Node.js and Vue.js to implement two-factor authentication in my side project.
You can find the complete source code of the back-end and the front-end in this GitHub repository.
Two-factor Authentication
Two-factor or multi-factor authentication (MFA) is becoming a de facto standard for IT systems. You likely already use several MFA accounts, for example, from Google, GitHub, or Apple. If not, you should enable it!
Multi-factor authentication is a process where a user has to provide many forms of identification during a sign-in event. This could be a cell phone code or a fingerprint scan.
By asking a user for extra identification, you increase the security of your system. It becomes more difficult for an attacker to get or duplicate this other identification.
The difference between two-factor and multi-factor is that two-factor always uses two forms of identification. Multi-factor authentication could involve two or three. In this article, we will implement two-factor authentication.
Time-based One-Time Password (TOTP)
Time-based One-Time Password (TOTP) is a common way of two-factor authentication. It uses an algorithm that generates a token based on the current time. A recent study showed that TOTP is one of the most user-friendly two-factor authentication techniques. The image below shows the process of TOTP.
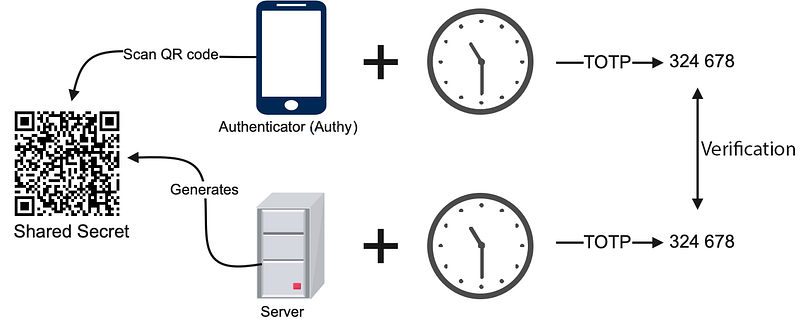
It starts with the server generating a random secret of 32 characters. The front-end converts this secret to a QR code and displays it on a webpage. The user uses an authenticator app such as Authy or Google Authenticator to add an account by scanning the QR code. In response, the server stores the user’s secret.
After the user logs in, the website shows a field where the user must enter the token generated by the Authenticator app. The authenticator app uses the stored secret and the current time to create a token. After sending it to the server, the server generates the token using the kept secret and the present time. It then verifies if the token from the user and the generated token match.
My Side Project
My side project consists of a Node.js back-end and a Vue 3 front-end. The project is closed source but the demo application with this article implements the same solution.
Back-end REST API
The back-end contains a REST API implemented using Node.js and Fastify. The REST API contains two controllers, a user, and a customer controller. The user controller is publically accessible and responsible for registering and authentication users. The customer controller is protected and contains an action to retrieve a list of customers.
Front-end Vue web application
The front-end consists of five different screens. It uses the Vuex state management library to globally store the data of the application. The promise-based HTTP client Axios is used to communicate with the back-end.
Before we dive into the implementation of two-factor authentication let’s first look at how I implemented the first layer of authentication.
Standard authentication using JWT
I implemented the first layer of authentication using an email and password. When a user logs in and is authenticated successfully, the user controller generates a JSON web token (JWT). The back-end returns the JWT to the front-end. The front-end should include the JWT token in the header of each subsequent HTTP request.
We back-end stores the user data into a file-based JSON database called LocallyDB.
The backend hashes the passwords before storing them using bcryptjs. On line three, the login action retrieves the user from the database. Then on line 5, if the user exists, it uses bcrypt.compareSync to compare the hash with the given password.
If successful, the login action creates a JWT by signing the user object with a configured secret. It then returns a new user object that includes the generated JWT token.
Adding Two-factor authentication, the back-end
After a user is authenticated, they can enable two-factor authentication. It consists of two separate steps, each implemented using a different controller action.
Step 1, generating the secret and QR code
The first step does two things. First, it creates the shared TOTP secret, and secondly, it generates a QR code from the secret. The backend returns both the QR code and the secret to the front-end.
We use speakeasy to generate the shared secret, as you can see on line 4. It returns a secret object with the following four properties: secret.ascii, secret.hex, secret.base32, and secret.otpauth_url. Each property contains the same value but in a different form.
The last property secret.otpauth_url is used to generate the QR code. The QRcode library generates the QR code on line 5. It uses a base64 encoded string containing the QR code’s png image. The backend returns the QR code and the secret object to the front-end.
See below an example.
Step 2, validating the token and enabling two-factor authentication
Maybe you ask why there is a step 2? Is step 1 not enough to enable two-factor authentication? You are right.
We use step 2 to ensure that the authenticator app and back-end use the same secret. In step 2, we let the user enter the token generated by the authenticator app and validate it with the token generated by the back-end. If both are the same, we enable two-factor authentication and store the secret with the user information in the database. This way, we know for sure that the two-factor authentication works.
Below you see the implementation of step 2. In row 9, we use the speakeasy library to verify the generated token from the authenticator app. We didn’t store the generated secret from step 1 in the back-end. The front-end provides the generated secret, as you can see in row 7.
Log in using two-factor authentication
When the user wants to log in and two-factor authentication is enabled, the user must enter the TOTP token after verifying the username and password. The front-end shows a field to enter the token and calls the validate token API method on the back-end.
First, the validateToken method validates the JWT token and extracts the email address. Then we use this email address to retrieve the user from the database. This includes the TOTP secret.
Then the given token and the secret are given to the verify method of speakeasy to validate the token. We return the result of the validation to the front-end.
Let’s now look at how these steps are called from the front end.
Adding two-factor authentication, the front-end
The Vue 3 front end consists of the following five Vue components. We will look at each component to see how they are implemented.
- Home
- Login
- Register
- Enable two-factor authentication
- A dashboard that shows the protected data
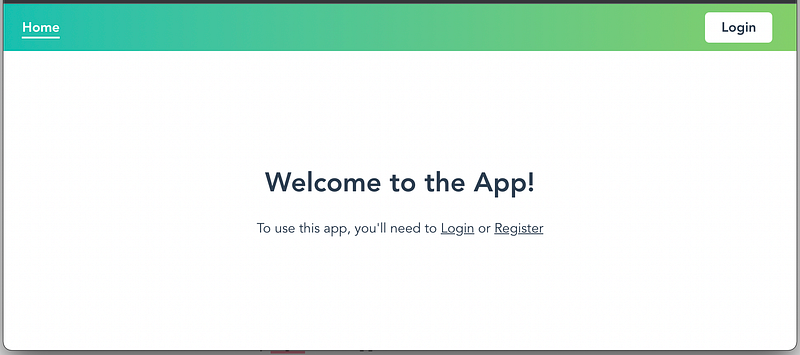
Home
This is the home screen of the application. It shows a navigation bar with a login button. A message in the center of the screen contains two links, one for the login screen and another for the register new user screen.
Login user
On this screen, the user can log in to the website and then access the protected dashboard.

If the application successfully authenticated the user and the user has two-factor authentication enabled, then the screen shows a field to enter the TOTP token. See below.

The login component handles both the standard login and the token validation. It contains two forms, one for the normal login and another for entering the TOTP token. See below. The view template shows the login form or the validate token form dependent on the showTwoFactorPanel boolean field.
The login form executes the login method and the validate token form executes the validateToken method when the buttons are pressed. Both methods dispatch a message to the Vuex store. The Vuex store then calls the method with communicates with the back-end. Below you see the validateToken method that is part of the LoginUser.vue component.
You see on line two that it dispatches the validateToken message to the Vuex store. We save the result of the API call in the store. Then the validateToken method reads the result from the store in line 7. If the token is correct, the application navigates to the dashboard.
If we look at implementing the validateToken method in the store, we use Axios to call the back-end. The validation token API call is committed to the store using the SET_TWOFACTOR_LOGIN mutation.
Dashboard
Once the user is authentication, the application show the dashboard. The dashboard is a protected resource that shows a list of customers.

The dashboard component uses the Vuex store to retrieve and store the customers. After the customers are returned from the back end, they are assigned to the customer's array of the component. Each customer is rendered using the CustomerCard component. See below the Vue Dashboard component.
Register user
On the RegisterUser screen, the user can create a new account to access the protected resource on the website.

TwoFactorRegistration
After the user logs in, he or she can enable two-factor authentication by pressing the TwoFactor button on the navigation bar. The screen shows a QR code that can be scanned by an authentication app such as Authy.
When you press the 2-Factor button, the front-end instructs the backend to generate the TOTP secret. The backend converts the secret into a QR code, and the QR code is sent back to the front-end as an image.

The TwoFactorRegistration component contains a Vue template for showing the QR code. This is the image field on line 4. The image tag is bound to the qr field of the component. The qr field is filled with the png image string that the back-end returns.
Remarks About the Implementation
Although this article and demo project shows a complete implementation of two-factor authentication using a Time-based One-Time Password, there are some things to notice before you should use this for a production application.
The solution stores the TOTP secret unencrypted in the same place as the user’s credentials. This is not a good practice. You should encrypt the TOTP secret and keep the key on a different server.
The back-end does not validate all incoming request parameters. It would be best to validate all incoming parameters in a real production environment before using them in the back-end.
Conclusion
This article describes an implementation of two-factor authentication using a Node.js server and a Vue.js client. The solution uses a Time-based One-Time Password to create the second layer of authentication.
The Node.js backend uses Fastify to create a REST API with easyspeak as the library that does the two-factor authentication. The front-end uses Axios to communicate with the backend. It stores the application’s global state using the Vuex state management library.
I hope this shows that implementing two-factor authentication is doable and can be easily extended. You need to take special care to ensure that you store the TOTP secrets in a separate location. It would help if you did not hold the secrets and user credentials in the same place.
You can find the implementation of the client and the server on GitHub.
Thanks for reading, and remember never to stop learning!


