How To Deploy Your TensorFlow Model in a Production Environment
Use TensorFlow Serving, Python, Traefik, FastAPI, and Docker to create a stable prediction engine

If you have been following along, you know that I have been busy building a deep learning model. With this model, a cassava farmer can detect diseases on their crop. The farmer takes a picture of the cassava plant that they suspect has a condition. The application then shows the type of disease so that the farmer can take the appropriate measures.
To get an application on a farmer’s phone, we have to convert this TensorFlow model to an actual application. I am going to divide the application into four different services. These services are going to run in Docker containers. The reason for choosing Docker should be clear: Docker containers are the standard unit of deployment for any server-based application.
I will explain the rationale behind the four services and how they interact in this article. The picture below shows the final architecture:

The source code and Dockerfile of each service are available on GitHub. At the end of the article, I will tell you how to get the services running on your local workstation.
But first, we will discuss the details of the services and how to transform them into Docker containers.
Model Service
Google has developed a special module for serving TensorFlow models in a production environment called TensorFlow Serving. So, our model service is going to use TensorFlow Serving.

During training, we save our models in h5 format. This format contains the model and weights in a single file. However, we can’t use h5 with TensorFlow Serving. We have to convert it to the SavedModel format.
You can convert an h5 file to a SavedModel format by using the following Python script:
In row 4, we construct the export path for the SavedModel. With the 1 in the path, we version this model.
Once we have our model in the SavedModel format, we can start serving it using TensorFlow Serving.
We will be using the TensorFlow Serving Docker container that the TensorFlow team created for us. Note that there are multiple versions of this container (one that uses the GPU, another for the CPU). We will be using the latest CPU version.
We use the CPU instead of the GPU version because the GPU version requires a special Docker plugin. This makes the container dependent on the Docker installation, which is unwanted.
Dockerfile for creating the model service
Instead of directly using the TensorFlow Serving Docker image, we create a Docker image that includes our model. The Dockerfile creates the image for the model service.
While using the TensorFlow Serving image, I noticed that it does not correctly handle the default signal handlers.
This means that when you try to stop your running container using ctrl-c, it won’t. What happens is that Docker will wait for ten seconds (default timeout) for an app to respond. If your app does not answer within that time, it’ll stop the container.
What you can do is add tini to your Docker image. That’s what I did in rows 3-6 of the Dockerfile. Tini then makes sure that it correctly handles the default signal handlers, such as SIGTERM, so you don’t have to wait ten seconds.
Script for creating the Docker image
I always use a small helper script to build Docker images. This script creates and tags the image:
I also created a PowerShell script that does the same to run on Windows:
API Service
I created the API service because I did not want the web or mobile application to directly talk to the model service. This is for two reasons:
- The input and output of the model service are specific to TensorFlow and the model. I don’t want the web or mobile application to have knowledge of these formats.
- The REST interface that TensorFlow Serving provides does not support all TensorFlow data structures. For example,
DT_HALFis not supported. The gRPC interface does support all data structures, but I did want to use HTTP REST from the web or mobile application.
The API service exposes a REST interface. This REST interface has a single method that accepts an image (jpg or png) and sends it to the model service via gRPC. The model service then generates and returns the prediction to the API service. The API service converts the prediction to JSON and returns it to the caller.

I implemented the Prediction service using Python and FastAPI. FastAPI is a modern, high-performance web framework for building APIs with Python.
The following implements the predict function. It gets triggered by FastAPI when you execute an HTTP POST on the /predict/image endpoint. The image that you want to predict should be included in the body of the HTTP message.
If we look at the source code, we see that we first check if the provided image is correct. Then, in row 10, we convert the image to a format that the prediction function accepts. In row 11, we send the image to the model service via gRPC.
read_convert_image reads the image and converts it to a four-dimensional array of 1x150x150x3. It also normalizes the image by dividing each pixel value by 255.
The predict function connects to the model service using gRPC.
Communication with TensorFlow models via TensorFlow Serving requires gRPC and TensorFlow-specific protobuffs. The tensorflow-serving-apis package on PyPI provides these interfaces but requires tensorflow. The TensorFlow Python package is around 700MB in size.
Using min-tfs-client
Instead of using TensorFlow to connect to TensorFlow Serving, we use TensorServingClient from min-tfs-client. This package does not include TensorFlow as a dependency, which reduces the overall package size to less than 1MB.
The name of the input dictionary in row 7 and the output key are model-specific. We take the category that has the highest prediction and map it to the appropriate cassava leaf disease. This is then returned as JSON through the REST API.
Dockerfile for creating the API service
We use python:3.8-slim-buster as the base image for the API service. I tried using Alpine but could not get all the required packages installed.
We create a non-root user in row 5 and install the required packages in row 17. This results in an image of around 300MB, which I think is still a bit large.
UI Service

The UI service consists of a web page created using Angular. The web page allows a user to upload an image and get the predicted cassava leaf disease, as you can see below:
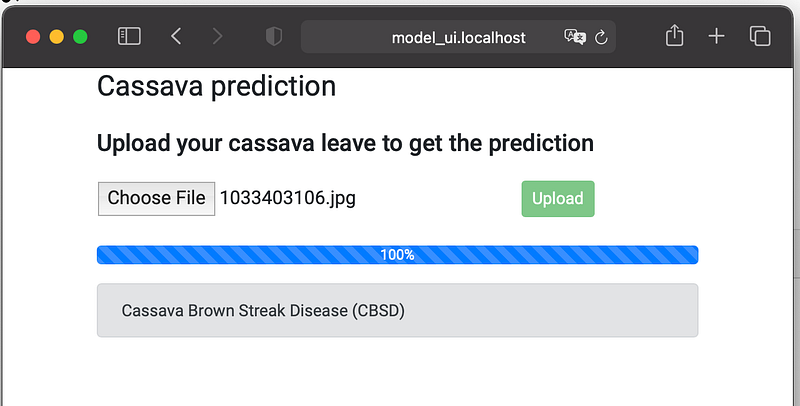
We created an Angular component that defines the upload component. The upload component uses an Angular service that uses HttpClient to perform the POST request to our API service. You can see the Angular upload-service in the source code below:
Dockerfile for creating the UI service
I used the official NGINX Docker image to serve the Angular application. The following Dockerfile creates a Docker image with NGINX and the Angular application.
It copies the local dist folder to the NGINX HTML folder. The dist folder is created by compiling the Angular app with the ng build --prod command.
Reverse Proxy Docker Container
The last Docker container is the container that provides a reverse proxy. The reverse proxy is implemented by Traefik Proxy. Traefik Proxy is an open source reverse proxy and load balancer that makes deploying microservices easy.

The configuration of Traefik is dynamic. After you start Traefik, it connects to Docker and listens for container events. When a container starts or stops, Traefik automatically reconfigures itself. We’re using Traefik 2.4.
In our case, Traefik helps with the communication between our services. Instead of communicating with IP addresses and ports, we can use domain names and URLs to connect and communicate.
For example, the upload-file.service in the Angular application uses http://api.service.localhost instead of http://127.0.0.1:8000 to communicate with the API service. Traefik routes the request to port 8000 of the Docker container of the API service.
Traefik has a lot of other useful functions that we won’t use in this project. For example, you can configure Traefik to use an ACME provider (like Let’s Encrypt) for automatic certificate generation.
Starting All Containers Using Docker Compose
We will use Docker Compose to configure and start all the containers. I will discuss the configuration of each service.
Let's start with Traefik.
Traefik
We usetraefik:v2.4, which is the latest version at the time of writing. By setting api.insecure to true, we can access the Traefik API on port 8080. The volume configuration in row 14 connects Traefik to Docker. This way, Traefik receives all the Docker requests.
Model service
TensorFlow Serving needs the name of the model during startup. That is why we set the environment variable MODEL_NAME. The model service is connected to the pred-network. We can only access the model service via other containers, hence the absence of a port mapping.
API service
The API service is the first service that provides additional information to Traefik. You supply this information using labels. First, in row 9, we enable Traefik. Secondly, on the next row, we set the hostname of this service.
This means that Traefik will create a router that redirects incoming traffic for api.service.localhost to the IP address of this service’s container on port 8000. Port 8000 is specified using expose in row 7.
The API service will communicate with the model service via gRPC. This will work, as we connected both the model service and the API service to the same network.
UI service
The UI service uses Traefik in the same way as the API service does. Traefik will create a router that redirects incoming traffic for ui.service.localhost to the IP address of this service’s container on port 80. We configured this in row 10.
The UI service will deliver the Angular application to the browser. The Angular application will then use the URL http://api.service.localhost to connect to the API service. Traefik will route the request to port 8000 of the API service container.
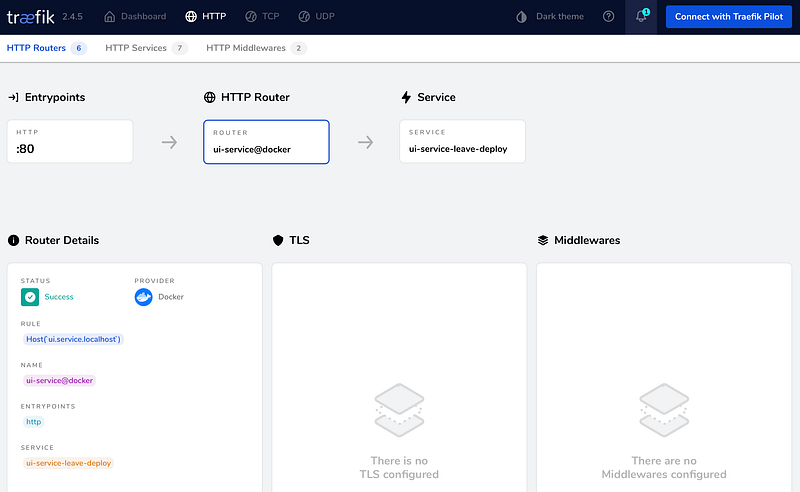
Traefik UI
When all the services are running, you can use the Traefik dashboard to validate if everything is configured correctly. You can get an overview of all the routers and drill down in each router.
Running It Locally
Before you can run Docker Compose, you have to build the individual Docker images of each service. I have added a shell and PowerShell script to each service folder that can build the image of that service.
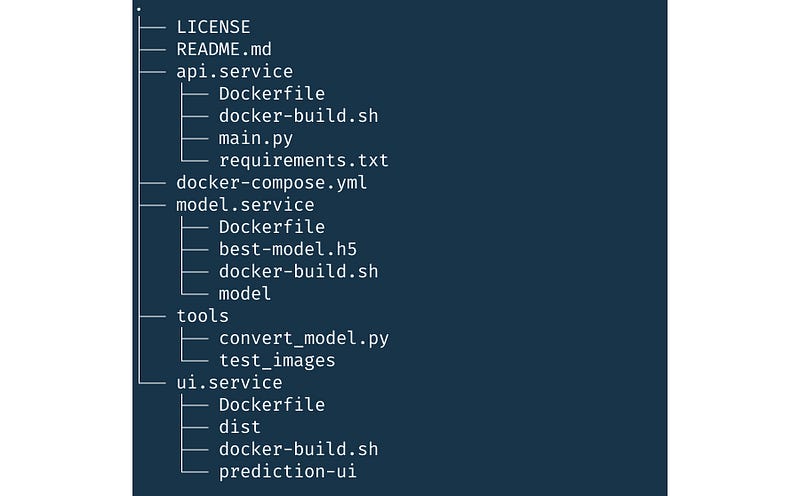
In each service folder, execute the ./docker-build.sh or ./docker-build.ps1 script to build the Docker image of that service.
One exception is the ui.service. Before you can build the Docker image for this service, you have to build the application. Before you can build the application, you have to install the required packages. First, install Angular by executing npm install -g @angular/cli.
Then install all the dependencies of the project by calling npm install. Finally, execute ng build — prod to build the application. Then you can call the ./docker-build.sh to build the Docker image of the ui.service.
Once you build all three Docker images, you can start the application in the foreground with the following command:docker-compose up
If you want to run it in the background you add the -d flag:docker-compose up -d
This will start all the containers, including the reverse proxy. If you then use a browser and go to http://ui.service.localhost/, you will see the user interface that will let you upload an image and get a prediction.
Conclusion
This article concludes a three-part series. It started by entering a Kaggle competition. The goal of the competition was to create a model that could classify diseases on cassava leaves. In the first article, we created a model that was 88.9% accurate.
In the second article, the goal was to improve the model’s accuracy. We used five different optimization techniques from the Kaggle community. With a combination of these techniques, we increased the accuracy to 89.35%
In this last article, we saw how we could use the model in a production environment. We used TensorFlow Serving to serve our model and access it via gRPC. We created a REST API to get a prediction using REST. To make it easy to create a prediction, we added an Angular UI that uses this REST API.
All the services run inside Docker containers. We chose Docker because it is the standard unit of deployment for any server-based application. We deployed the application using Docker Compose. With some modifications, the YAML configuration of Docker Compose can be used for a real production environment, such as Docker Swarm or Kubernetes.
Thank you for reading and remember to never stop learning!


