How To Create an Event Driven Architecture (EDA) in Python
Build scalable and flexible systems using Python

Dave, an IT professional in a bustling city, felt ravenous and had a long day at work. It was time for dinner, and he stopped by his favorite supermarket to grab some ingredients.
Despite his knack for planning in his professional life, when it came to dinner, he often found himself unsure of what to make, leading to impulsive and sometimes unhealthy choices.
A bright and welcoming screen lit up as Dave entered the supermarket, displaying, “Welcome, Dave.” Dave couldn’t help but smile, knowing that there was more to the screen than met the eye.
Most people didn’t realize that the event-driven architecture, a concept he was familiar with, powered this personalized interaction.
Wandering through the aisles, he picked up the last can of milk on the shelf. Within moments, an employee appeared to replenish the stock, ensuring no shortage for other shoppers.
This real-time response was an excellent demonstration of event-driven architecture at work, where each action or event triggered an appropriate response.
As Dave explored the pasta aisle, he picked up a box of his favorite pasta and noticed a jar of appealing tomato sauce with fresh basil nearby. Satisfied with these selections, he continued walking towards the exit, looking forward to preparing a comforting meal after his long day.
As Dave approached the exit, his phone buzzed with a notification. It read, “Hi Dave, didn’t you forget something? Normally, you add parmesan to your pasta.” With a grin, he returned to the cheese aisle and grabbed his favorite brand of parmesan. The supermarket’s system, designed using Python and the principles of event-driven architecture, had come to his rescue.
Feeling a growing sense of pride, Dave headed for the exit, marveling at how smoothly the supermarket’s IT system worked. He knew there was more to it than simple coincidence, but he relished witnessing his hard work pay off.
Once outside, Dave checked his phone and saw that the cost of his groceries had already been deducted from his bank account. As he turned the corner, he saw a big milk truck parked near the loading docks of the supermarket, ready to offload a fresh shipment of milk.
As he walked home, dinner ingredients in hand, he couldn’t help but feel like a proud IT professional. Little did the other shoppers know Dave had played a significant role in designing the Python-based, event-driven system that made their shopping experience seamless and enjoyable.
Regardless of your perspective on this fictional scenario — finding it either disconcerting or remarkably convenient — it is close to reality.
The tale of Dave’s supermarket escapade effectively illustrates the capabilities and advantages of event-driven architectures, vividly demonstrating their numerous benefits and practical uses.
This article will explore the technical components that make the example function effectively. Following that, we will demonstrate how to implement an event-driven architecture using Python by providing a hands-on example.
The entire source code for the supermarket’s Event-Driven Architecture simulation is accessible in this GitHub repository.
If your system has an up-to-date Docker version, initiating the simulation is straightforward. Navigate to the main folder of the repository and execute the command docker compose up. This will bring the application to life, initiating all the necessary services and message bus.
Table of contents
· What is happening behind the scene of the supermarket?
· What is an Event-Driven Architecture?
∘ Publish subscribe pattern
· Our Python implementation
∘ Our architecture
∘ Technical infrastructure
∘ Topic structure
· Message Mediator Broker
∘ Docker Configuration
∘ Key Components
· Gateway Guardian Service
∘ Service Code Breakdown
∘ Key Components
∘ Creating Docker Images for Each Service: The Gateway Guardian Service Example
∘ Docker Compose Configuration for Gateway Guardian Service
· Hello Helper Service
∘ Code Breakdown
· Gate-exit Guardian Service
∘ Code Breakdown
· Inventory Intel Service Overview
∘ Code Breakdown
· Fastlane Finale Service Overview
∘ Code Breakdown
· Putting it all together
∘ Starting the EDA
∘ Building Docker images
· What is missing?
∘ No Silver Bullet
∘ MQTT and Its Alternatives
∘ Message Delivery
∘ Security
∘ Message Format
∘ Alarming
· Conclusion
What is happening behind the scene of the supermarket?

Before we delve into Event-Driven Architecture (EDA) specifics, let’s examine the underlying technology in Dave’s supermarket scenario.
EDA is a software design pattern where events like user actions, sensor outputs, or other programs’ messages determine the program’s flow. Its key benefits include real-time responses, scalability, and loose coupling of services, as you’ll see in the following examples.
Dave had a supermarket loyalty card in his wallet with an RFID tag. Upon entering the supermarket, the entry gates, operated by the Entry Service, scanned his card and ‘published’ or sent out a ‘Customer Entered’ event containing Dave’s unique ID. ‘Publishing’ sends out an event to which other parts of the system can respond.
The Greeting Service, operating on the display near the entrance, was ‘subscribed’ to or set to respond to the ‘Customer Entered’ event. ‘Subscribing’ is listening for a specific event, so the system can respond when that event occurs. Upon detecting Dave’s arrival, it captured his ID and swiftly retrieved his last name from its local database, displaying a customized greeting: ‘Welcome, Dave.’
As Dave’s shopping journey continued, different services in the supermarket’s integrated system responded to other events, all working together to provide a personalized, efficient shopping experience.
When Dave selected his items, the Recommendation Service kicked into action. This service was subscribed to the ‘Items Selected’ event, and using Dave’s shopping history from the supermarket’s database, it noticed that he usually bought parmesan cheese when buying pasta and sauce. It, therefore, sent a friendly reminder to Dave’s phone.
The Checkout Service automatically tallied Dave’s total as he added items to his basket. When he exited the supermarket and a ‘Customer Exited’ event was published, it deducted the cost from his bank account.
Simultaneously, the Inventory Management Service subscribed to the ‘Item Taken from Cabinet’ event and sent a signal to restock the milk, resulting in a milk truck arriving at the supermarket’s loading dock.
In this scenario, various interconnected services worked together, subscribing to relevant events and responding in real-time, showcasing the power, efficiency, and scalability of event-driven architectures.
By using EDA, the supermarket’s system was able to provide personalized experiences, streamline the shopping process, and maintain optimal inventory levels.
What is an Event-Driven Architecture?
Did you notice something intriguing in our futuristic supermarket example from the introduction? The various services within the scenario were generating ‘events,’ but more importantly, they did not communicate with each other directly. This unique aspect brings numerous benefits to such a system.
In the context of Event-Driven Architecture (EDA), an ‘event’ refers to a significant change in state that triggers specific actions. For example, ‘Dave entering the supermarket’ and ‘Dave taking the last milk container’ are both events.
This fundamental characteristic is the cornerstone of EDA. In this type of architecture, all components that make up the system are considered ‘loosely coupled.’ Loosely coupled means they are largely unaware of the specifics of other components in the system. Instead, they ‘listen’ for specific events that matter to them and ‘publish’ or send out events when necessary.
This approach offers greater flexibility and scalability since each component operates independently and focuses on its responsibilities. This results in a more efficient system in which the individual parts are easier to debug and maintain and are capable of real-time responses. For example, in our supermarket scenario, the Inventory Management Service responds in real time to the event of the last milk container being taken.
Furthermore, because each component is independent, EDA systems can handle high-volume, high-speed data without slowing down the entire system. This makes EDA particularly useful in applications like real-time analytics, adaptive system behavior (like recommendation systems), and complex event processing.
Publish subscribe pattern
The ‘publish-subscribe’ or ‘pub-sub’ pattern establishes this loose coupling in EDA.
In this pattern, system components interact indirectly through a messaging queue or event bus. The ‘publishers’ produce events and send them to the event bus without knowing or caring about who will eventually consume these events.
Conversely, the ‘subscribers’ express interest in certain types of events and receive them from the event bus when they occur.
The event bus acts as an intermediary, ensuring that publishers and subscribers remain decoupled and independent. This way, publishers do not need to directly trigger actions in other components — they just broadcast their events.
Similarly, subscribers don’t need to be aware of which component generated an event — they react to the events they’re interested in.
This architecture allows for a dynamic and flexible system where new components can be added, or existing ones can be modified without disrupting the overall functionality.
In our supermarket example, the Checkout Service could publish an event when a customer completes a purchase, and the Inventory Management Service could be a subscriber to these events, updating the stock levels accordingly.
Our Python implementation
We must set up several key components to construct an Event-Driven Architecture (EDA) in Python. Firstly, we require services that can act as both publishers and subscribers of events. Secondly, we need a message protocol and an event bus to handle the dispatch and receipt of events.
Let’s start with the services. We will create standard Python scripts that can be executed in the terminal. These scripts will define the functionality of our services, allowing them to publish events when certain conditions are met and react to subscribed events as they occur.
Next, we need a way to manage the distribution and receipt of these events. For this, we will use the MQTT protocol with an MQTT broker. MQTT, which stands for Message Queuing Telemetry Transport, is a lightweight messaging protocol that uses a publish-subscribe model.
This makes it a natural fit for our EDA, as it allows our services to publish messages (events) to the broker and for the broker to then distribute these messages to any services that have subscribed to them.
We will use Docker in combination with Docker Compose to make our system more manageable.
Docker is a platform that allows us to containerize our services and the MQTT broker. This means we can create isolated environments for them to run in, which reduces conflicts and makes our system easier to deploy and scale.
On the other hand, Docker Compose is a tool that allows us to define and control multi-container Docker applications. By using Docker Compose, we can quickly start, stop, and manage all of our services and the MQTT broker with a single command, streamlining the operation of our EDA.
Our architecture
This section will explore a simplified Event-Driven Architecture (EDA) for a futuristic supermarket.
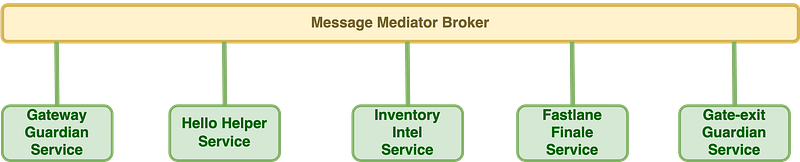
Our architecture comprises five services, all interacting through an MQTT Broker, depicted as a message bus.
- Gateway Guardian Service: This service is tied to a sensor at the supermarket’s entrance. When a customer enters, and their loyalty card is scanned, the service publishes a ‘CustomerArrival’ event, including the identification from the customer’s loyalty card.
- Hello Helper Service: This service is linked to a large display at the supermarket’s entrance. It subscribes to the ‘CustomerArrival’ events. Upon receiving one, it fetches relevant information from its local database using the customer identification received. It then displays a personalized welcome message on the screen.
- Gate-exit Guardian Service: Acting as the supermarket’s cash register, this service triggers when a customer passes through the checkout’s detection gates. It automatically scans all items in the customer’s bag and publishes a message on the customer-departed topic, including identifying the purchased items.
- Inventory Intel Service: This service subscribes to the topic
customer-departedevents, adjusting its database to reflect current stock levels. If the stock of a particular item falls below a defined threshold, it triggers a ‘RestockNeeded’ event. This event is sent to an external message bus connected to the supermarket’s logistics department, alerting them to replenish the stock. - Fastlane Finale Service: It acts as a financial liaison in our system. It listens to events on the
customer-departedtopic, calculates the total price of the customer’s shopping using its knowledge of product prices, and subsequently publishes a message on thepayment-duetopic containing the customer’s ID and total price.
The ‘Message Mediator Broker,’ our MQTT broker, is the crucial message bus component. It ensures each event is accurately received and routed to the appropriate services. This architecture fosters a seamless and real-time responsive supermarket environment, enhancing the shopping experience for customers.
Technical infrastructure
Under the hood, our architecture relies on Mosquitto as our MQTT Broker. Mosquitto is an open-source message broker that implements the MQTT protocol, known for its lightweight footprint and high performance.
We’ll use Paho, widely regarded as one of the best Python MQTT clients for our services. Paho is an Eclipse project that provides robust MQTT clients for multiple programming languages. Its Python client is particularly popular due to its ease of use and comprehensive feature set, making it an excellent choice for our services.
The MQTT protocol is a lightweight publish-subscribe messaging protocol designed specifically for situations where network bandwidth may be limited. It’s perfect for our scenario, as it allows our services to communicate efficiently without overwhelming our network resources.
Topic structure
One of the defining features of MQTT is its topic structure, which enables precise subscriptions and efficient message routing. In MQTT, messages are published on ‘topics’ that services can subscribe to, thereby receiving any messages broadcast on these topics. These topics are arranged hierarchically, similar to the structure of a filesystem, with each level delineated by a slash (/).
In the context of our supermarket example, we’ll adopt the following topic structure: spectrum-grocers/fresh-frontier/customer-arrival. Here, the first part of the topic, spectrum-grocers, signifies the supermarket chain. This is followed by fresh-frontier, the specific supermarket’s name, and then the event type, customer-arrival.
For instance, consider a topic like spectrum-grocers/fresh-frontier/customer-arrival. This structure allows services to subscribing either to a particular topic (such as spectrum-grocers/fresh-frontier/customer-arrival) or to a broader range of topics (like spectrum-grocers/fresh-frontier/#, where the # acts as a wildcard, matching all subtopics).
The following sections will look at how each service is configured and implemented.
Message Mediator Broker
Our message broker, dubbed the “Message Mediator Broker”, plays a crucial role in our setup. We use the open-source MQTT broker, Mosquitto, to manage our messages. This system will be executed within a Docker environment, leveraging Docker Compose for service orchestration.
Docker Configuration
We are using the latest official Mosquitto Docker image (version 2.0.15 as of the time of writing) from Docker Hub. The “Message Mediator Broker service” is set up in our docker-compose.yaml file as follows:
version: '3.7'
services:
  message-mediator-broker:
    container_name: message-mediator-broker-container
    image: eclipse-mosquitto:2.0.15
    volumes:
      - ./message-mediator-broker/mosquitto.conf:/mosquitto/config/mosquitto.conf
    ports:
      - 1883:1883
    networks:
      - fresh-frontier-network
Key Components
- Service name and Container: We define the service as
message-mediator-broker, and the Docker container is namedmessage-mediator-broker-container. - Image: The Docker image used is
eclipse-mosquitto:2.0.15. - Volumes: The
mosquitto.conffile is mounted to the container's configuration directory, enabling us to modify the default Mosquitto configuration. - Ports: Port 1883 is exposed, allowing other services to connect to the broker.
- Networks: We’ve defined a network named
fresh-frontier-networkfor all our services to ensure they can communicate effectively.
By default, Mosquitto does not allow external connections, so configuration adjustments are necessary to facilitate the interaction between the broker and the other services.
Gateway Guardian Service
The Gateway Guardian Service is designed to simulate and signal the arrival of customers at the supermarket. This event triggers each time a customer passes through the entrance sensors.
Service Code Breakdown
Below is the detailed code for this service:
broker = os.getenv('BROKER_ADDRESS', 'localhost')
port = 1883
client_id = "gateway-guardian-service"
running = Event()  # Event object to replace the running flag


def connect_mqtt():
    def on_connect(client, userdata, flags, rc):
        if rc == 0:
            print("Connected to MQTT Broker!")
        else:
            print("Failed to connect, return code %d\n", rc)

    client = mqtt_client.Client(client_id)
    client.on_connect = on_connect
    client.connect(broker, port)
    return client


def publish(client):
    topic_helper = MqttTopicHelper("spectrum-grocers", "fresh-frontier")
    message_helper = MessageHelper()

    while not running.is_set():  # Check the Event object instead of the flag
        customer_id = random.randint(1, 10)
        topic = topic_helper.customer_arrival()
        message = message_helper.customer_arrival(customer_id)

        logger.info(f"Pub to {topic}: {message}")
        client.publish(topic, message)

        # Wait for a random interval between 2 and 20 seconds
        running.wait(random.randint(2, 20))  # Use the Event's wait() method

    client.disconnect()  # disconnect here when the loop is broken


def handle_signal(signum, frame):
    running.set()  # Set the Event object when a signal is caught
    print("Gracefully shutting down...")


signal.signal(signal.SIGINT, handle_signal)
signal.signal(signal.SIGTERM, handle_signal)

if __name__ == "__main__":
    client = connect_mqtt()
    client.loop_start()
    publish(client)
Key Components
- Broker Connection: The service connects with the message broker using the Paho MQTT client in the
connect_mqttfunction. It retrieves the broker's host address from theBROKER_ADDRESSenvironment variable. - Customer Arrival Simulation: The service mimics the activity of customers entering the supermarket. It publishes a message on the customer arrival topic every 2 to 20 seconds, selecting a random customer ID between 1 and 10 for each event.
- MqttTopicHelper & MessageHelper: These helper classes simplify creating the topic string and constructing the JSON message to be sent.
- Signal Handling: Signal handlers for
SIGINTandSIGTERMensure a graceful shutdown when Docker issues a stop signal. - Event Object: An Event object (
running) replaces a simple running flag for better thread safety.
Creating Docker Images for Each Service: The Gateway Guardian Service Example
For every service in our system, including the Gateway Guardian Service, we create a separate Docker image. The Dockerfile for the Gateway Guardian Service incorporates several best practices for creating efficient and secure images.
Here are the key considerations:
- Using a small official Docker base image: We opt for a compact base image to minimize the footprint of our Docker container. This practice leads to faster build times and reduces the surface area for potential security vulnerabilities.
- Implementing multi-stage builds: Our Dockerfile leverages multi-stage builds to optimize the size of the resulting image. By doing so, we only retain the essentials in the final image, discarding unnecessary build-time dependencies and intermediate layers for running the service.
- Running as a non-root user: To enhance the security of our Docker container, we configure our service to run as a non-root user. Running applications as non-root users within the container reduces the risk of potential security breaches.
FROM python:3.11-alpine as requirements-stage

ENV VERSION 1.0.0

WORKDIR /tmp

RUN apk add --no-cache gcc musl-dev libffi-dev openssl-dev && \
    pip install poetry && \
    poetry config virtualenvs.create false

COPY ./pyproject.toml ./poetry.lock* /tmp/

RUN poetry export -f requirements.txt --output requirements.txt --without-hashes

FROM python:3.11-alpine

# Create a non-root user
RUN adduser --disabled-password --gecos '' appuser

WORKDIR /

COPY --from=requirements-stage /tmp/requirements.txt /app/requirements.txt

RUN apk add --no-cache libffi openssl && \
    pip install --no-cache-dir --upgrade -r /app/requirements.txt && \
    rm -rf /root/.cache && \
    rm -rf /var/cache/apk/*

COPY ./app /app/

# Change ownership of the app directory to the non-root user
RUN chown -R appuser:appuser /app

USER appuser

WORKDIR /app

# Expose the port the app runs in
EXPOSE 1883

# During debugging, this entry point will be overridden.
CMD ["python", "main.py"]
Docker Compose Configuration for Gateway Guardian Service
Docker Compose allows us to define and run multi-container Docker applications. It configures the application's services using a YAML file (often named docker-compose.yml). Here's a breakdown of the Docker Compose configuration for the Gateway Guardian Service:
gateway-guardian-service:
    container_name: gateway-guardian-service-container
    image: pkalkman/gateway-guardian-service:0.0.9
    depends_on:
      - message-mediator-broker
    environment:
      - BROKER_ADDRESS=message-mediator-broker
    networks:
- fresh-frontier-networkgateway-guardian-service: This is the name of the service, as it will be identified within the Docker Compose configuration. You'll also use the name to reference this service in Docker Compose commands.container_name: This field sets the container's name when it is created. In this case, the container will be calledgateway-guardian-service-container.image: This is the Docker image that will be used to create the container. We're using a specific version (0.0.9) of thegateway-guardian-serviceimage from the Docker userpkalkman.depends_on: This field defines the services this service depends on. Thegateway-guardian-servicedepends on themessage-mediator-brokerservice. Docker Compose will start themessage-mediator-brokerservice before it starts thegateway-guardian-service.environment: This section allows you to set environment variables inside the container. Here, we're settingBROKER_ADDRESStomessage-mediator-broker, which is the hostname of the broker service in the Docker network.networks: This field specifies the networks the service should be connected to. Here, we connect to thefresh-frontier-network. This allows the Gateway Guardian Service to communicate with other services on the same network, such as the Message Mediator Broker.
This Docker Compose configuration, when combined with others for different services, allows for an orchestrated startup and teardown of the supermarket application, taking into account dependencies and network configurations for seamless inter-service communication.
Hello Helper Service
The Hello Helper Service is a unique feature in our supermarket system that enhances the shopping experience. It operates a large display at the supermarket’s entrance and interacts with customers by displaying personalized welcome messages.
The service is designed to subscribe to ‘CustomerArrival’ events. When a customer enters the supermarket, the Gateway Guardian Service publishes a ‘CustomerArrival’ event, including the customer’s unique identification.
Upon receiving this event, the Hello Helper Service fetches the corresponding customer information from its local database using the customer ID. It then formulates a personalized welcome message and displays it on the screen.
Code Breakdown
The Hello Helper Service's code structure shares many similarities with the Gateway Guardian Service, especially in its setup with the MQTT client. However, its function primarily involves listening to incoming messages rather than publishing them.
def main():
    global client
    client = mqtt.Client(client_id="hello-helper-service")
    client.on_connect = on_connect
    client.on_message = on_message

def on_connect(client, userdata, flags, rc):
    logger.info(f"Connected with result code: {rc}")
    topic_helper = MqttTopicHelper('spectrum-grocers', 'fresh-frontier')
    client.subscribe(topic_helper.customer_arrival())

def on_message(client, userdata, msg):
    parser = MessageParser()
    customer_id = parser.get_customer_id(msg.payload)
    customer_name = CustomerNameDb().get_name(customer_id)
    logger.info(f"Welcome, {customer_name}")
Here’s a detailed look at the different parts of the Hello Helper Service code:
- The
main()function initializes the MQTT client with a unique client ID and defines two key callback functions:on_connectandon_message. - The
on_connect()function is called when the client successfully connects to the broker. It logs the result code of the connection attempt and subscribes to theCustomerArrivaltopic using theMqttTopicHelper. - The
on_message()function is triggered when the client receives a message on a subscribed topic. It extracts the customer ID from the incoming message using theMessageParser, then retrieves the customer's name from the local database using theCustomerNameDb. Finally, it logs a welcome message, simulating the display of this message on the supermarket's entrance screen.
As with all the services also, the Hello Helper Service is added to the docker-compose.yaml file.
hello-helper-service:
    container_name: hello-helper-service-container
    image: pkalkman/hello-helper-service:0.0.1
    depends_on:
      - message-mediator-broker
    environment:
      - BROKER_ADDRESS=message-mediator-broker
    networks:
      - fresh-frontier-network
Gate-exit Guardian Service
The Gate-exit Guardian Service plays a crucial role in our supermarket system by monitoring the supermarket’s exit. It is linked to the sensors positioned at the exit point.
When a customer is ready to leave the supermarket with their selected products, the sensors scan all the products in their bag and read the customer’s loyalty card.
Upon successful scanning, the service publishes a message on the customer-departure topic. This message includes key information such as the customer’s ID and the IDs of the products they are leaving with.
Code Breakdown
The structure of the Gate-exit Guardian Service code shares many similarities with the other services we have discussed. However, its primary role is to simulate customers departing from the supermarket and to publish the corresponding departure messages.
def publish(client):
    while True:
        time.sleep(random.randint(2, 20))
        customer_id = random.randint(1, 10)
        product_ids = [random.randint(1, 100) for _ in range(random.randint(1, 10))]
        message = message_helper.customer_departure(customer_id, product_ids)
        result = client.publish(exit_topic, message)
        status = result[0]
        if status == 0:
            logger.info(f"Published message to topic {exit_topic}")
        else:
            logger.info(f"Failed to publish message to topic {exit_topic}")
Here’s a detailed analysis of the publish function of the Gate-exit Guardian Service:
- The function enters an infinite loop, waiting for a random duration between 2 and 20 seconds. This simulates varying times between customers’ departures.
- It then generates a random customer ID and a list of random product IDs. The number of product IDs is also chosen randomly, reflecting that customers may purchase different numbers of products.
- The
message_helper.customer_departurefunction generates the departure message, including the customer ID and the product IDs. - The client then attempts to publish the message to the
customer-departedtopic. The result of the publishing attempt is checked and logged. A successful publication will return a result of 0.
As with the other services, the Gate-exit Guardian Service is added to the docker-compose.yaml file.
gateexit-guardian-service:
    container_name: gateexit-guardian-service-container
    image: pkalkman/gateexit-guardian-service:0.0.2
    depends_on:
      - message-mediator-broker
    environment:
      - BROKER_ADDRESS=message-mediator-broker
    networks:
      - fresh-frontier-network
Inventory Intel Service Overview
The Inventory Intel Service plays a crucial role in maintaining an up-to-date inventory of products in the supermarket. This service operates by subscribing to the customer-departed topic, keeping track of the products customers take with them as they leave the supermarket.
Code Breakdown
The primary functions of the Inventory Intel Service are on_connect and on_message:
def on_connect(client, userdata, flags, rc):
    logger.info(f"Connected to MQTT Broker: {message_broker_host} with result code: {rc}")
    client.subscribe(mqtt_helper.customer_departure())


def on_message(client, userdata, msg):
    message = message_parser.customer_departure(msg.payload)
    customer_id = message['customer_id']
    product_ids = message['product_ids']
    for product_id in product_ids:
        inventory.inventory[product_id]['stock'] -= 1
logger.info(f"Inventory updated for customer {customer_id}.")on_connect: This function is triggered when the service connects to the MQTT Broker. It logs the connection status and subscribes to thecustomer-departedtopic. This subscription allows the service to receive updates whenever a customer leaves the supermarket.on_message: This function is called whenever a new message is received on thecustomer-departedtopic. It starts by parsing the message to extract thecustomer_idand the list ofproduct_ids. Eachproduct_idrepresents a product that the customer has taken from the supermarket.- For each product taken by the customer, the service reduces the stock count of that product in its inventory by 1. This adjustment reflects that the product has left the supermarket.
- After all the adjustments have been made, the service logs that the inventory has been updated for the particular customer.
In summary, the Inventory Intel Service performs a crucial task in the supermarket system by updating the inventory in real-time based on the products that customers purchase. This service ensures that the supermarket has an accurate and current understanding of its stock levels, which is essential for inventory management and replenishment.
Fastlane Finale Service Overview
The Fastlane Finale Service is pivotal in the supermarket ecosystem by facilitating the transition from a customer’s shopping experience to the payment process. This service accomplishes this by transforming the ‘CustomerDeparted’ messages into ‘PaymentDue’ messages, which are then processed by a separate Payment Service.
Code Breakdown
The main function of the Fastlane Finale Service is subscribe. Inside this function, we define an on_message function:
def subscribe(client):
    def on_message(client, userdata, msg):
        customer_departure = message_parser.customer_departure(msg.payload)
        total_price = 0
        for product_id in customer_departure['product_ids']:
            total_price += product_pricing.get_price(product_id)
        payment_message = message_helper.payment_due(customer_departure['customer_id'],
                                                     total_price)
        client.publish(topic_helper.payment_due(), payment_message)

        logger.info(f"Payment due for customer {customer_departure['customer_id']}:" +
                    f" ${total_price:.2f}")

    client.subscribe(topic_helper.customer_departure())
client.on_message = on_messageon_message: This function is triggered whenever a new 'CustomerDeparted' message is received. The process starts by parsing the message to extract the customer departure data. It then calculates the total price of the products the customer has purchased.- For each product ID in the customer’s list of purchased products, the service retrieves the price of the product and adds it to the total cost.
- After calculating the total price, the service constructs a message for the
payment-duetopic, containing the customer ID and the full price. This message is then published for the Payment Service to process. - Finally, the function logs the information about the payment due for the customer, including the customer ID and the total price (formatted with two decimal places).
In summary, the Fastlane Finale Service is an intermediary between the shopping and payment processes. It interprets the messages on the customer-departed topic to calculate the total price of the products purchased by a customer. Then it creates messages on the payment-due topic to initiate the payment process. While another service handles the payment process, the Fastlane Finale Service is instrumental in linking the shopping experience with the payment procedure.
Putting it all together
The complete source code for our system is conveniently hosted in a single GitHub repository. Each service has a dedicated subfolder containing its respective source code and a Dockerfile for building the container image. The root directory of the repository houses the docker-compose.yaml file, which can be used to launch all the services simultaneously efficiently.

Starting the EDA
Initiating the services and the Event-Driven Architecture is as simple as executing the command docker compose up in your terminal. This command will fetch all necessary images from Docker Hub and activate all the services. The output will show you a stream of log messages, each preceded by the name of the associated service.
You’ll be able to observe the simulation in action. Random customers will enter the supermarket, and each will receive a personalized welcome from the Hello Helper Service. As customers exit the supermarket, messages will be published on the payment-due topic, indicating the completion of their shopping experience.

By pressing ctrl-c in the terminal, docker compose will terminate all the services. Because all our services respond to the SIGINT and SIGTERM signals, they will quickly stop.
Building Docker images
The Dockerization process for each service involves using the Dockerfile found within the corresponding service’s folder. Accompanying each Dockerfile is a shell script named build-docker-image.sh. This script simplifies building the Docker image for that specific service.
Here’s a brief look at the script:
#!/bin/bash
VERSION="0.0.10"
APP="fastlane-finale-service"
ACCOUNT="pkalkman"
docker buildx build --platform linux/amd64,linux/arm64 -f ./Dockerfile -t $ACCOUNT/$APP:$VERSION --push .
This script leverages docker buildx, a Docker CLI plugin that enhances build capabilities with BuildKit. One of its standout features is its ability to build Docker images for different architectures beyond the one you're currently working on. In this case, it's configured to build images for linux/amd64 and linux/arm64 platforms.
Once built, the script pushes the image to a Docker Hub account. The images are pushed to the ‘pkalkman’ account in this example. If you want to push the images to a different account, modify the ACCOUNT variable to match your Docker Hub account name.

The GitHub repository features a GitHub Action that automates the Docker image-building process. This action triggers whenever there are changes made to the repository.
It constructs Docker images for all services, similar to the shell script we discussed earlier. However, there’s a key difference: this action is set to build images only for the linux/amd64 platform. This configuration is generally sufficient for verifying changes and ensuring the codebase remains functional.
What is missing?
While this article is comprehensive, some elements still need to be discussed. As such, a few warnings and points of consideration are appropriate.
No Silver Bullet
Like all IT solutions, patterns, or architectures, Event-Driven Architecture is not a panacea. It’s crucial to understand that Event-Driven Architecture comes with specific challenges.
One such challenge is traceability. With services subscribing to and publishing messages in real-time, forming a comprehensive picture of system activity can be tricky. You would need to aggregate all log messages from all services to understand what transpired within the system.
Nevertheless, an option is to integrate a logging service into the architecture. This logging service could subscribe to all topics using MQTT wildcards, receiving all messages for storage and subsequent inspection.
MQTT and Its Alternatives
We use MQTT as the communication protocol and an MQTT broker as the message bus. However, several alternatives exist, such as RabbitMQ, REST, XMPP, Google Cloud Messaging, and Kafka.
Message Delivery
We have yet to discuss MQTT QOS or how confident we are that a message is delivered, especially important in the context of payment messages.
MQTT provides what’s known as Quality of Service (QOS) levels. This agreement between the sender and receiver of a message defines the guarantee of delivery for a specific message.
Security
When examining the configuration of our MQTT broker, you’ll notice that we allow clients to connect anonymously. This practice is not recommended, even if we are operating within the Docker-compose network or Kubernetes cluster.
Fortunately, enhancing this aspect of the configuration is straightforward. Furthermore, using encrypted communication via TLS is both possible and highly recommended.
Message Format
Specific to MQTT, the message content is simply a stream of bytes. In our example, we used this to store a JSON object. The MQTT protocol does not enforce any particular message format, which might be considered a missed opportunity.
However, some initiatives, such as the Sparkplug specification, add layers on top of MQTT to fill in some gaps. For instance, Sparkplug stipulates that the MQTT message should be defined using the Google Protocol Buffer format. Tahu is an open-source implementation of MQTT Sparkplug.
Alarming
Our example architecture currently lacks any mechanism for notifying us if a service is malfunctioning or not performing as expected. Sparkplug also provides additional functionality to enable such alerts, which might be worth investigating. See the Death and Birth certificates.
Conclusion
In this article, we’ve taken an in-depth look at Event-Driven Architecture (EDA) by diving into a real-world simulation of a supermarket environment.
We’ve explored the intricate functionalities of various services like the Gateway Guardian Service, Hello Helper Service, Gate-exit Guardian Service, Inventory Intel Service, and Fastlane Finale Service. We’ve also seen how they interact through the Message Mediator Broker, facilitated by the MQTT protocol.
The publish-subscribe pattern was a cornerstone of our implementation, forming the backbone of the communication between the services. We also dove into the specifics of Docker configurations for these services, understanding the significance of creating Docker images and using Docker Compose for orchestrating our service ecosystem.
However, EDA is not a silver bullet, as with any architectural pattern. There are challenges associated with traceability, security, message delivery, and the lack of a standard message format. In the context of MQTT, we discussed its Quality of Service (QoS) levels and potential alternatives like RabbitMQ, REST, XMPP, Google Cloud Messaging, and Kafka.
In closing, it’s important to note that the event-driven paradigm represents a flexible and robust approach to building systems that need to respond to real-world events in real time. An EDA allows us to construct modular, scalable, and maintainable systems by weaving together multiple services into a coherent whole.
Despite the challenges and potential pitfalls, the benefits of adopting such an architecture can be substantial, particularly for complex, dynamic environments like a supermarket. However, when implementing an EDA, careful consideration must be given to system requirements, trade-offs, and potential challenges.
The source code for the supermarket’s Event-Driven Architecture simulation is accessible in this GitHub repository.
If your system has an up-to-date Docker version, initiating the simulation is straightforward. Navigate to the main folder of the repository and execute the command docker compose up. This will bring the application to life, initiating all the necessary services.


