Essential Tools for Improving Code Quality in Python
A developer’s guide to Pyright, Black, Flake8, isort, and Bandit

As the team gathered around for their daily standup, John couldn’t help but feel a sense of frustration. It had been a long week, and despite everyone’s best efforts, they were still behind schedule on their latest Python project.
John knew the team’s peer code review process was a big part of the problem. Whenever he submitted a new pull request, it seemed like most comments from his colleagues were about formatting, style, and other minor issues.
“Don’t get me wrong,” John said as the standup began. “I appreciate the feedback on my code. But it feels like we’re spending all our time nitpicking about stylistic issues and not focusing enough on the bigger picture.”
The rest of the team nodded in agreement. They had all felt the same way at some point but didn’t know what to do about it.
Then, their team lead, Sarah, spoke up. “I think I might have a solution,” she said. “I’ve been looking into some code quality tools that could help us catch these issues earlier in the development process.”
Sarah explained that she had been researching tools like Pyright, Black, Flake8, isort, and Bandit. These tools could automatically detect issues with code formatting, style, type checking, and even security vulnerabilities.
Using these tools during development allowed the team to catch these issues before they even got to the peer review stage.
“But that’s not all,” Sarah added. “I’ve also been looking into integrating these tools directly into our development environment and build process.”
The team was intrigued. Sarah explained they could integrate the tools into their preferred development editor, Visual Studio Code. This would allow the tools to provide instant feedback as they wrote code, making catching issues early easier and reducing the need for peer review.
Sarah also demonstrated how to incorporate these tools into their automated build procedures. This approach would enable the tools to run automatically each time the team updated their code repository, consistently maintaining the code’s high quality.
The team agreed to give it a try, and over the next few weeks, they started using Pyright, Black, Flake8, isort, and Bandit as part of their development process. They integrated the tools into Visual Studio Code, and their automatic build and DevOps processes, and it wasn’t long before they started to see the benefits.
The tools helped them catch issues earlier, reduce the number of minor comments during peer review, and ultimately speed up their development process.
As John looked back on the project, he couldn’t help but think that Sarah’s ideas had been a game changer.
By integrating these tools directly into their development environment and build process, they could redirect their energy and focus on what mattered:
Building high-quality Python code that met their project goals
In this article, we’ll explore how essential Python tools, such as Pyright, Black, Flake8, isort, and Bandit, can help you improve the quality of your code, just like they did for John and Sarah’s development team.
We’ll show you how to integrate these tools into your development process, starting with Visual Studio Code and your GitHub Actions pipeline. By the end of this guide, you’ll have the knowledge and tools necessary to produce Python code that is correct and efficient but also consistent, secure, and easy to maintain.
The examples presented in this article can be found in the accompanying GitHub repository. Additionally, the repository includes a GitHub action demonstrating how to execute all the tools described throughout the article.
Flake8
Let’s begin by exploring Flake8, a widely-used Python library that enhances code quality by examining style and syntax. Flake8 acts as a wrapper for several tools, such as pycodestyle (the official Python style guide), PyFlakes (a syntax checker), and McCabe (a complexity checker).
Pycodestyle, previously known as pep8, is a utility that checks your Python code for compliance with the PEP 8 style guidelines. These guidelines, outlined in the PEP 8 document, dictate the coding conventions for Python to ensure consistency and readability. Guido van Rossum, the creator of the Python programming language, authored the paper.
PyFlakes analyzes programs and detects various errors. It works by parsing the source file, not importing it, so it is safe to use on modules with side effects. It’s also much faster.
McCabe is a code complexity analysis tool for Python designed to assess a program’s Cyclomatic Complexity.
Developed by Thomas J. McCabe, Sr. in 1976, Cyclomatic Complexity is a metric that quantifies a program’s intricacy by tallying the number of linearly independent paths within its source code.
In essence, as you increase the nesting of loops and conditional statements, the complexity grows. McCabe will notify you if your code exceeds a specific complexity threshold, indicating that the code may be too complex.
By addressing the complexity issues highlighted by McCabe, developers can improve code readability and understandability, making it easier to maintain and troubleshoot. Keeping complexity in check helps reduce the likelihood of introducing errors and enhances overall software quality.
Flake8 command line
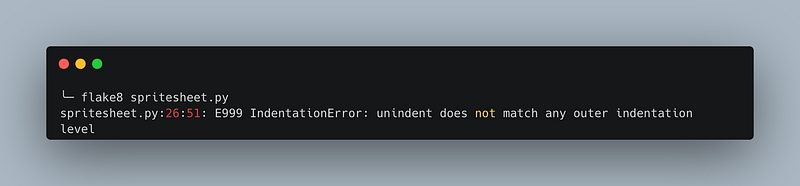
As mentioned earlier, Flake8 consolidates the functionality of these three tools into a single interface. To install Flake8, use the following command: python -m pip install flake8. Once installed, you can quickly run Flake8 from the command line to check your Python code for style, syntax, and complexity issues.
I ran Flake8 on the sprite sheet class from my earlier article about creating a game with Pygame. The results indicated that the code indentation wasn’t correct, highlighting the usefulness of Flake8 in identifying and resolving such issues.
Integrate into Visual Studio Code
We’ll explore using the command line version of Flake8 later when incorporating it into our build pipeline. In the meantime, a highly effective approach is integrating Flake8 directly into Visual Studio Code, providing real-time feedback as you write your code.
To set it up, follow these steps:
- Install the “Python” extension by Microsoft if you haven’t already. This provides enhanced support for Python in VS Code, including linting capabilities. You can find it in the Extensions view (
Ctrl+Shift+X) by searching for "Python." - Make sure Flake8 is installed in your Python environment, as mentioned in my previous response. If not, install it using
pip install flake8. - Open your VS Code settings by clicking on the gear icon in the lower-left corner and selecting “Settings” or use the shortcut
Ctrl+,. - Search for
python.linting.enabledand enable python linting. - Search for
python.linting.flake8Enabledand enable linting with flake8.
Once installed and enabled in Visual Studio Code, Flake8’s error notifications are displayed directly within the editor, as illustrated below. This real-time feedback helps you address issues as you write your code.

isort

isort’s guiding principle is to sort your imports so you don’t have to. This Python utility organizes imports alphabetically, automatically categorizing them into sections and types.
Supporting Python 3.7+ but also capable of formatting Python 2 code, isort offers a command line utility, Python library, and plugins for various editors to streamline your import sorting process.
Maintaining a clean and consistent import structure, isort enhances the readability and maintainability of your code. The tool can be effortlessly incorporated into your development workflow, whether you prefer to run it from the command line or integrate it into your favorite code editor.
Like most Python utilities, you can install isort using pip by executing the following command: pip install isort.
isort command line
To run isort on your project, use the command isort . --interactive if you prefer an interactive mode, which prompts you before making any changes to your files.
Integrate into Visual Studio Code
The easiest way to integrate isort into VS code is by installing the dedicated isort extension by Microsoft. Here’s how to set it up:
- Open the Extensions view in VS Code by clicking the square icon on the left sidebar or using the shortcut
Ctrl+Shift+X. - Search for “isort” in the Extensions view, and find the “isort — Python Import Sorter” extension by Microsoft.
- Click the Install button to add the extension to your VS Code environment.
- Ensure isort is installed in your Python environment, as mentioned in my previous responses. If not, install it using
pip install isort.
Once the isort extension is installed, you can sort imports in your Python files by:
- Right-clicking in the editor and selecting “Sort Imports” from the context menu, or
- Using the keyboard shortcut
Shift+Alt+O(by default).
Black

Black is a popular and opinionated code formatter for Python that automatically reformats your code to adhere to a consistent style.
Its primary goal is to minimize developers' time discussing or tweaking code formatting, allowing them to focus on writing better code.
Black is often called “the uncompromising code formatter” because of its strict adherence to its style rules.
Black’s formatting style is a subset of the PEP 8 guidelines, with additional modifications to maximize readability and minimize confusion between code revisions. Some of Black’s notable features include:
- Enforcing a consistent line length (default is 88 characters)
- Standardizing string quotes (using double quotes by default)
- Formatting multi-line expressions in a more compact and visually appealing way
You might have noticed Black’s unusual default line length of 88 characters per line. This choice is 10% greater than the more common 80-character limit.
The decision to use 88 characters was based on the observation that it resulted in significantly shorter files than the traditional 80-character limit or the 79-character limit used by the Python standard library.
A line length of around 90 characters is considered a sensible choice for balancing readability and compactness.
Black command line
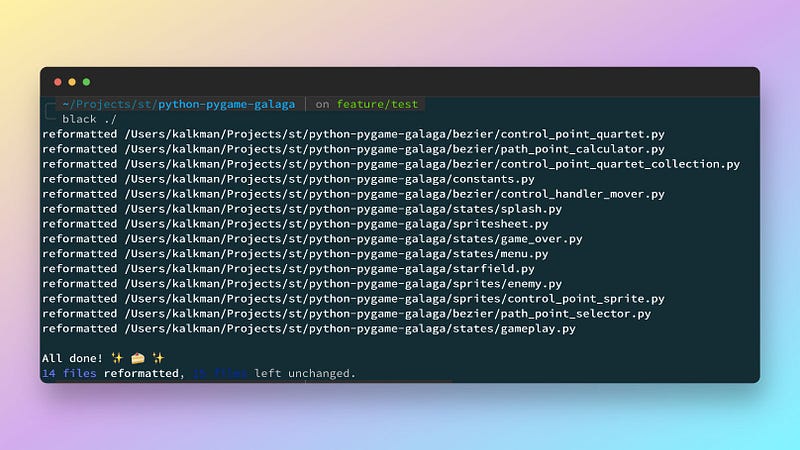
You can install Black with the command pip install black. Black prides itself on utilizing sensible defaults upon installation, so additional configuration is typically not required.
You run black by navigating to your project and running black ./This will run black on all files, as seen below.
Integrate into Visual Studio Code
To integrate Black into Visual Studio Code, follow these steps:
- Ensure you install Microsoft's “Python” extension in your VS Code. If you haven’t already, you can find it in the Extensions view (Ctrl+Shift+X) by searching for “Python” and clicking the install button.
- Install Black in your Python environment by running
pip install blackin your terminal or command prompt. - Open your VS Code settings by clicking on the gear icon in the lower-left corner and selecting “Settings” or use the shortcut Ctrl+,.
- Search for
python.formatting.providerand select "black" from the drop-down menu. - (Optional) If you’d like to customize Black’s settings, such as line length or string quote preferences, search for “python.formatting.blackArgs” in Settings and add the desired arguments as an array. For example, if you want to set the line length to 100 characters, you would add the following:
"python.formatting.blackArgs": [
    "--line-length",
    "100"
]
6. Make sure formatting is enabled in your VS Code settings. Search for editor.formatOnSave and check the box to enable it. This will automatically format your code with Black when you save the file.
Now, Black is integrated into Visual Studio Code and will automatically format your Python code according to its style rules when you save your files.
Pyright

Pyright is a fast and highly configurable type checker and language server for Python. Microsoft developed it and designed it to work well with the Python extension for Visual Studio Code. Pyright provides type checking, code completion, and other language services to improve the Python development experience in your editor.
Pyright uses type annotations, type comments, and type inference to perform type checking on your Python code. This helps identify potential issues before they become runtime errors. Developers can create more robust and reliable code by catching these issues early.
Some key features of Pyright include:
- Fast and efficient: Pyright is written in TypeScript and runs on Node.js, making it faster and more memory-efficient than other Python type checkers.
- Strict mode: Pyright offers a strict mode that performs additional checks for potential issues, such as uninitialized variables and unreachable code.
- Incremental updates: Pyright only reanalyzes changed code, making it efficient for large projects.
- Configurable: Pyright provides a configuration file,
pyrightconfig.json, which allows you to customize its behavior. You can specify include and exclude patterns, Python interpreter paths, type stub paths, and more. - Language server: Pyright can also act as a language server, providing additional language features like code completion, hover information, and document symbols.
- Integration: Pyright integrates well with Visual Studio Code through the Python extension, providing a seamless development experience.
To install Pyright, there is a community-maintained Python package by the name of “pyright” is available on pypi. This package will automatically install node (which Pyright requires) and keep Pyright updated.
pip install pyright
Pyright command line
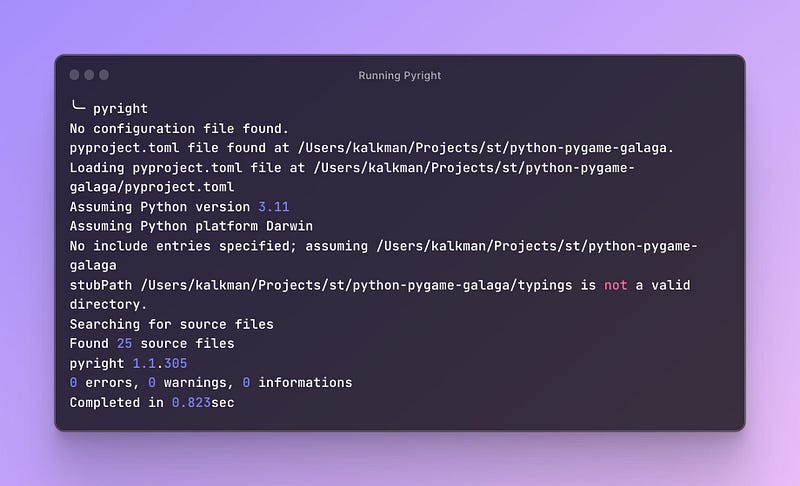
Upon installing Pyright, you can run it using the command line or terminal. Although not covered in this article, you can configure the tools using a configuration file.
Most tools, including Pyright, support the pyproject.toml file, which can store configurations for multiple tools. To see how Pyright options are configured, look at the pyproject.toml file in the accompanying GitHub repository.
Integrate into Visual Studio Code
Microsoft recommends that most Visual Studio Code users opt for the Pylance extension instead of Pyright. While Pylance includes the Pyright type checker, it also offers additional features such as semantic token highlighting and symbol indexing.
Pylance and Pyright cannot be used simultaneously. If an attempt is made to use them together, Pyright will display a notification and automatically disable itself.
To install the latest version of the Pylance extension in VS Code, open the extensions panel and search for “Pylance”
Bandit

Bandit is a security-focused static analysis tool for Python that helps you find common security vulnerabilities in your code. It scans your Python source code, looking for potential issues such as insecure function calls, weak cryptographic implementations, or unsafe libraries.
Bandit can be a valuable addition to your development workflow, as it helps you identify and address security risks before they become a problem in production.
Some of the issues Bandit can detect include:
- Insecure use of
eval() - Weak hashing algorithms like MD5 or SHA1
- Hardcoded passwords or sensitive data
- SQL injection vulnerabilities
- Insecure usage of temporary files
Bandit command line
You can install Bandit using pip, the Python package manager. Open your terminal or command prompt and run the following command pip install bandit.
Once Bandit is installed, you can analyze your Python code for security issues by running the bandit command followed by the target file or directory. For example, if we want to analyze the spritesheet.py again, we run the following command:
bandit spritesheet.pyOr, if you want to analyze a project folder recursively, you can use
bandit -r /project_folder
Integrate into Visual Studio Code
You can integrate Bandit into Visual Studio Code (VS Code) using the “Python” extension, which incorporates various linters and formatters, including Bandit. Here’s how to set it up:
- Install the Python extension for VS Code, if you haven’t already, by searching for “Python” in the Extensions view and clicking the “Install” button.
- Open your settings in VS Code by going to File > Preferences > Settings or using the keyboard shortcut
Ctrl + ,. - In the search bar, type “python.linting” to filter the relevant settings
- Find the setting “Python > Linting: Enabled” and check it.
- Find the “Python > Linting: Bandit Enabled” setting and check the box to enable Bandit as a linter.
- You may need to install Bandit in your Python environment if you haven’t already. You can do this by opening a terminal and running:
pip install bandit
After completing these steps, Bandit will be integrated into your VS Code environment, automatically checking your Python code for security issues as you write and edit it.
Integrating the tools in your build pipeline

Until now, we demonstrated how to use various Python tools via the command line and how to integrate them into the Visual Studio Code editor. Implementing these tools during development provides developers immediate feedback on style issues and errors. However, this is just the first step.
The second step is to add an additional check to validate all code committed to the central source code repository.
This ensures that errors are still caught when the code is committed to the repository, even if misconfiguration issues exist on a developer’s workstation (e.g., a developer forgot to set the maximum line length).
Typically, a single main branch holds the latest version of your source code. We configure the main branch to disallow direct commits.
Instead, a developer who wants to work on a feature creates a feature branch and commits their code to that branch. Upon completion, they create a pull request to integrate their changes from the feature branch into the main branch.
During the creation of the pull request, we automatically trigger a build of the software on the branch, including all the tools we covered in the previous sections. If the build fails, the code cannot be integrated into the main branch until the issues are resolved.
We will go through this scenario using GitHub and GitHub Actions.
Creating the build
First, we will create a build definition to run all the required tools to ensure our Python code is correct. In GitHub, you create a GitHub action using a YAML file. You place this yaml file inside a folder called .github/workflows in your repository, as seen below.

Now the yaml itself contains the instructions for each of the tools. Let's look at the yaml and discuss it line by line. It defines a continuous integration (CI) workflow for a Python project. The workflow is triggered when there’s a push or pull request to the master branch. Here's a step-by-step description of the YAML file:
name: Python CI: Defines the workflow's name as "Python CI".on: Specifies the events that trigger the workflow:jobs: Defines a single job build that consists of the following steps:
Check out code: Checks out the code from the repository using theactions/checkout@v3action.Set up Python: Sets up the specified Python version (3.11.3) using theactions/setup-python@v3action.Install dependencies: Installs the necessary dependencies, including upgrading pip and installing flake8, bandit, pyright, pytest, and the project's requirements fromrequirements.txt.Run flake8: Executes flake8 to check the code for style, syntax, and complexity issues.Run pyright: Runs the Pyright static type checker using thejakebailey/[email protected]action.Run pytest: Executes pytest to run the project's test suite.Run Bandit Report: Runs Bandit security analysis with specified flags and outputs an HTML report to./output.htmlusing thejpetrucciani/bandit-check@mainaction.Create bandit output artifact: Uploads the Bandit security report as a " bandit-security-report " artifact using theactions/upload-artifact@v3action.
name: Python CI
on:
push:
branches:
- master
pull_request:
branches:
- master
jobs:
build:
runs-on: ubuntu-latest
steps:
- name: Check out code
uses: actions/checkout@v3
- name: Set up Python
uses: actions/setup-python@v3
with:
python-version: 3.11.3
- name: Install dependencies
run: |
python3 -m pip install --upgrade pip
python3 -m pip install flake8 bandit pyright pytest
pip install -r requirements.txt
- name: Run flake8
run: |
flake8 .
- name: Run pyright
uses: jakebailey/[email protected]
- name: Run pytest
run: |
pytest
- name: Run Bandit Report
uses: jpetrucciani/bandit-check@main
with:
bandit_flags: '-r -ll -o ./output.html -f html'
- name: Create bandit output artifact
uses: actions/upload-artifact@v3
with:
name: bandit-security-report
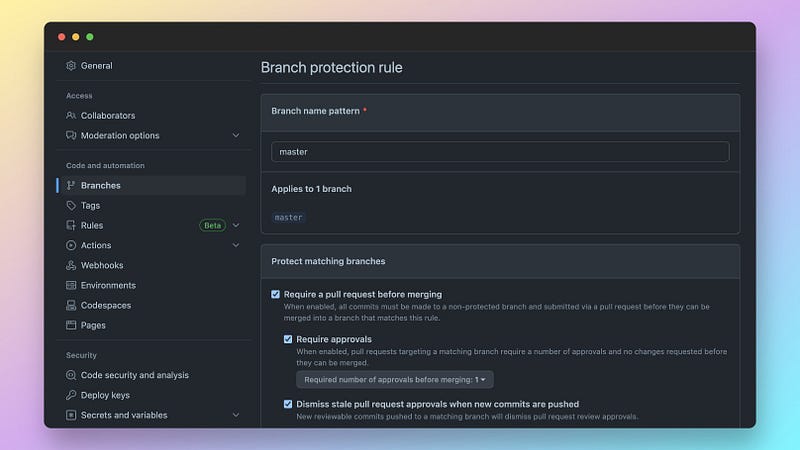
path: ./output.htmlWith this YAML configuration, we can now effectively safeguard the main branch by requiring developers to create pull requests that are successfully built and reviewed before being merged. To set up this protection, you can use the GitHub website. Refer to the screenshot below.
An effective way to enhance your project’s README is by displaying status badges that provide an overview of various aspects of your project, such as a successful build. Check out the example below.
Refer to the README.md file in this GitHub repository for guidance on including these badges to keep your project’s documentation informative and up-to-date.

Conclusion
Incorporating essential Python tools like Pyright, Black, Flake8, isort, and Bandit into your development process can significantly improve your code quality, streamline your workflow, and maintain the security of your projects.
Integrating these tools directly into your development environment and build process allows you to catch issues early, minimize time spent on peer review, and focus on delivering high-quality, maintainable code that achieves your project goals.
This comprehensive guide has shown you how to leverage these tools in your development process, starting with Visual Studio Code integration and extending to GitHub Actions pipelines.
With this newfound knowledge, you’re well-equipped to write Python code that is correct and efficient but also consistent, secure, and easy to maintain.
The examples discussed in this article are available in the linked GitHub repository. Furthermore, the repository contains a GitHub action that showcases the execution of all the tools mentioned in the article.
Feel free to create a branch of the python-pygame-galaga repository, make changes, and submit a pull request to see the GitHub action running.
Happy Coding!


