Create a Galaga Clone Using Pygame
How my game programming dream led me to recreate an arcade classic

I have a confession to make: Ever since I was able to bounce a sprite against the walls of the screen on a Commodore 64, I have wanted to become a game programmer.
Don’t get me wrong. I love my job and am proud of the projects that I finish. But there is something magical about creating a video game and making things move around the screen.
Sometimes I get an itch and try to develop a small game. This time, I tried to create a space shooter based on Galaga. Galaga is a classic arcade game created by Namco that I used to play in my teens at the local cafeteria.
The most enjoyable part of the original game was the challenging stages. You had to shoot various strings of enemies that were traveling vertically towards you. I used this as an inspiration to create a game.
Below, you can see the result. It features waves of enemies moving towards you along a Bézier curve, animated sprites, collision detection, scoring, and different game states. I even added some of the sounds from the original game.

In this article, I will show you how I created it by explaining the various parts of the game. You can find the source code for the game in this GitHub repository.

If you start developing a game, you should look at the various game engines and frameworks. Using an existing game engine saves you a ton of work.
There are a lot of game engines and frameworks available. Depending on the programming language that you use, you may have more or fewer options. Unity and Unreal Engine are well-known frameworks that work cross-platform. In the past, I have used MonoGame for a mobile game.
For this project, I decided to use Pygame, as I was planning to use Python. Pygame is an open source framework built on top of the SDL library. The Simple DirectMedia Layer (SDL) is a cross-platform library. This means that the games you develop using Pygame will work on Windows, Linux, and macOS.
Game States
One thing I learned while developing video games is that your game needs a state machine. A game can have several states. For example, it has the Playing state but also the Starting and Game Over states.
You could create this logic using if-else constructions. But believe me, your code will be much easier to structure and maintain if you use a state machine.
I modeled the state machine using Python classes. Each state is a class. So I created the types Splash, Menu, Gameplay, and GameOver. I derived each of these classes from a single base class called BaseState.
Before we can dive further into a game state, we have to talk about the main game loop. There is a single class called Game that hosts the actual game loop. Within this class, there is a method call run that you can see below.
event_loop, update, and draw are functions that call the same method on the current state. The event_loop is responsible for handling events such as timers and key presses. The update method is for controlling the game logic, such as enemy movement. The last function, draw, is responsible for drawing the parts of the game on the screen.
Now, let’s look at the first state, which is the Splash state. This state shows the splash screen of the game. It waits a couple of seconds and moves into the next state by setting the done flag to True.
The Splash state uses the font class to render text on the screen. If the splash screen has been active for more than three seconds, it flips to the next state. The next state is the Menu state, which shows a menu. Each state indicates the next one by setting the next_state member, as you can see on line 6.
Setting the done field to True indicates to the game loop that it should flip to the next state.
The most extensive state is the Gameplay state. All the game logic is handled in this state.
Sprites
Sprites are the things that are moving on the screen. Pygame has a built-in class made especially for sprites. This class called Sprite has several methods that make it easier to move things around.
Often, sprites and their animations are defined in a sprite sheet. A sprite sheet is an image that contains the graphical assets of your game, including the variations to animate the sprites.
Below, you can see the sprite sheet that I used for this game. Now I am not a graphical artist, so I downloaded this sheet from OpenGameArt.org.

To use the sprite sheet, you have to know the exact size of each sprite and the number of frames there are. Let us look at the player’s spaceship first. When we combine the six images on the third row, we get a nice animation of the player’s ship.
To load the sprite sheet, we use the SpriteSheet helper class. This class contains a method to load the sprite sheet and return an array of the individual images that make up the animation.
We load the sprite sheet by creating an instance of the SpriteSheet class and give it the location of the sprite sheet image. The code below shows the Player class. We load the six different spaceships in the images array on row 7.
The animation takes place in the get_surf method. Depending on the timer, it returns one of the images of the animation. I use the self.interval field to delay the animation.
The other sprites are implemented using different classes. There is an Enemy class, a Rocket class, and an Explosion class.
Shooting
The player is able to shoot a rocket using the space bar. What happens is that we create a rocket sprite at the location of the player. We limit the number of simultaneous rockets to two.
Below is the shoot_rocket function that creates the Rocket. The first argument on line 2 is the sprite sheet. The second and third arguments indicate the horizontal and vertical speed. We set the vertical speed to -15, which means the rocket goes straight up. The rocket is also an animated sprite.
The enemy spaceships also shoot rockets at the player. These rockets move towards the player. We use a Pygame timer to let an enemy spaceship shoot every second. When the timer is triggered, it calls the enemy_shoots function.
In the function, we first randomly select one of the enemy spaceships. Then we calculate the correct speed to send the rocket in a straight line from the enemy to the player.
We check if the rocket is not released lower than 400 pixels. Otherwise, the rocket will almost always hit the player. You could play with this value and the speed of the rocket (e.g. when changing to the next difficulty level).
Collision Detection
Pygame makes collision detection a breeze. It has a SpriteGroup class that acts as a container for sprite objects. Helper methods in Pygame can detect if the sprites in one sprite group collide with the sprites in another sprite group.
When we fire a rocket, we add the Rocket to the all_rockets sprite group. We add each enemy when entering the screen to the all_enemies sprite group. We can then determine if the rockets and the enemy collide via the groupcollide function.
The groupcollide function on row 1 gets both sprite groups as an argument and two additional booleans. These boolean arguments indicate whether the sprites should automatically be removed from the sprite group when they collide.
We also use the sprite groups to draw the sprites on the screen. When they collide, they are automatically removed from the group and therefore from the screen.
The groupcollide method returns a dictionary that contains all the sprites that collided. We iterate over all the keys and add an explosion sprite at the location of the collision.
Enemy Sprite Movement
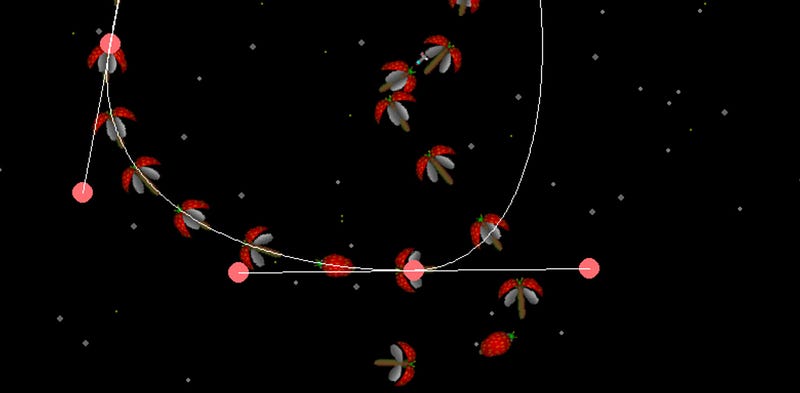
The enemy spaceships follow a path that is constructed using multiple Bézier curves. There is a game mode that shows the Bézier curve and the control points. By moving the control points, you can change the path in real-time. When you exit the game, the location of each control point is written to a file so that you can use it in the game.
You can toggle the mode to show the curve and control points by pressing the S key.

Bézier curves
We use a special type of curve called Cubic Bézier curves. Each curve is created using four points. The curve is calculated using the following formula:P(t) = (1-t)³P0 + 3(1-t)²tP1 + 3(1-t)t²P2 + t³P3
The time (t) goes from zero to one. At t=0, the path is at P0. At t=1, the path is at P3. We connect multiple curves to each other by making p0 of subsequent segments equal to p3 of the prior segment.
As you can see in the demo of the control mode, the game uses three connected Bézier curves. The points of these curves are created by the ControlPointCollectionFactory class.
The first point is moved outside the screen so that it seems as if the enemies dive in from the top.
The interesting part about these control points is that the location of the last point on row 11 is the same as the first point of the next segment on row 14. Also, the last point of the last segment on row 23 is the same as the first point on row 8. This makes sure that each curve is connected to the next.
Calculating the Bézier curve
We created a class called PathPointCalculator that is responsible for calculating the curve. The type has a function called calculate_path_point that accepts two arguments. The first argument, control_point_quartet, is a structure that contains the four points of the Bézier curve. The second one, time_to_calculate, is the time (t) from the formula.
If we want to combine multiple curves, we use the first set of points and let the time run from zero to one. Then we use the second set and again let the time run from zero to one— the same with the third set of points.
Rotation
If you paid attention, you probably saw that the sprites rotate towards their directions while moving alongside the curve. We calculate that rotation in real-time and let Pygame transform the sprite given that rotation.
The rotation is calculated via calculate_rotation, which is part of the Enemy class. It uses the previous and current x and y coordinates to calculate the angle between them.
Changing the control points in real-time
In the demo, you saw me changing the points of the Bézier curve in real-time. To move these points while keeping a smooth curve, we have to apply some simple rules.
But first, we have to distinguish between the three points that make up a single segment. We call the point in the middle the path point and the two outside points the control points.
Here’s how to keep the curves smooth while dragging a path point or control point:
- If we move a path point, we have to move the left and right control points with the same deltas.
- If we move the left control point, we have to move the right control point in the opposite direction.
- If we move the right control point, we have to move the left control point in the opposite direction.
We also have to remember that some of the control points are two points stuck together (e.g. the last point from the previous segment and the first point of the next segment). We have to move them at the same time.
This behavior is implemented in the ControlHandlerMover class, which you can see below.
The __init__ constructor of the class takes two arguments. The first is a collection of all the points of all segments. The second is a helper object determining if a point is a path point or a control point.
The move_control_handler function moves a path or control point. It receives an identification of the point and the new x and y coordinates. It then changes the related points.
Background Starfield
A space shooter cannot exist without a starfield. So, I added three layers of stars: small, medium, and large. Each layer moves at a different speed and has different sizes of stars. This creates the illusion of moving forward.

I implemented the starfield in a class called StarField, which you can see below. We have three arrays, and each has a set of stars that we randomly generate in the constructor.
The render_stars function renders the stars of a single layer. You feed it with the stars collection — the speed, size, and color of the stars.
You can change the parameters to add more stars or add additional layers to make the parallax effect even more significant.
Conclusion
I had a blast while developing this game. It took me back to my childhood days spent playing the original Galaga game at the local cafeteria. The game is far from finished, but it is playable. It will give a beginner game programmer a good start.
I like the Pygame library. It made things like collision detection and rendering simple. If you want to develop a game using Python, I invite you to check it out.
I did not talk about resolution, frames per second, game loops, music, playing sounds, or scoring. For these topics, I used the standard facilities that Pygame offers.
But you can find it all in the source code that is available in this GitHub repository.
Thank you for reading.


