Continuously Pentesting With the OWASP ZAP API and Python
Integrating OWASP ZAP into your DevOps pipeline

In my previous article, I explained why periodic pentesting alone is no longer enough to ensure the security of modern web applications.
To supplement pentesting, I recommend integrating OWASP ZAP into your development workflow.
In this article, we’ll take things one step further and show you how to automate security testing using Python and the ZAP API.
Integrating OWASP ZAP into your DevOps pipeline using the ZAP API and Python allows you to test your applications for vulnerabilities continuously.
This means you can catch potential issues before they become problematic, improving the security of your web applications.
We’ll begin by installing and configuring the solution on your local workstation and later move it to a server for a more permanent setup.
If you want to delve into the Python source code without delay, look at this GitHub repository.
Setting Up the Environment
The first step with OWASP ZAP is installing and configuring it on your local machine. You can refer to my previous article for step-by-step instructions on how to do this.
Next, as we will be controlling ZAP through Python, you’ll also need to install Python. Installing instructions for your specific environment are on the official Python webpage.
After installing ZAP and Python, we can create a Python application that connects to ZAP via its REST API. The ZAP REST API runs in the background while the application is running.
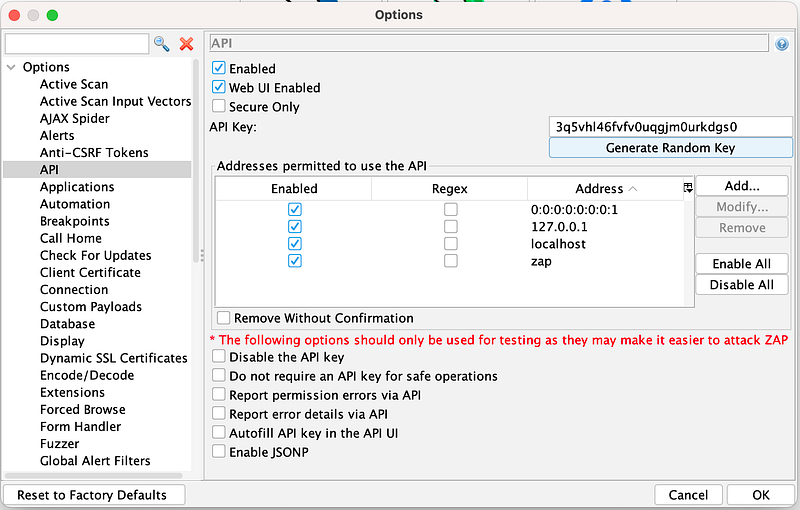
Before connecting to the ZAP API, you must create an API key. To do this, navigate to Tools -> Options -> API, and click the “Generate Random Key” button to create a new API key. Nearly all requests to the ZAP API must include this API key for authentication.
Now that you have installed ZAP and Python and generated your API key, you can use ZAP’s REST API.
Implementing the Python solution
We will design our Python application to trigger ZAP to scan our web application periodically. But, scheduling the Python application to run at specific times is not the application’s responsibility.
Instead, we will use the scaling methods provided by the operating system, such as CRON on Linux and the Task Scheduler on Windows.”
We will include some administration features to add functionality to our Python application. Specifically, after each scan is complete, the application will store relevant information, such as the time of the scan and whether any errors occurred, in a local SQLite database.
By storing the scan information in a local SQLite database, we can easily view and analyze the results of all scans that have been run.
Starting a scan using the Python app
Since we will make REST API calls in Python, we will use the requests library. This library is the most widely used package for making HTTP requests in Python.
To start using requests, you need to install it first. You can use pip to install it:
$ pip install requestsFirst, let’s look at the function to trigger a scan below. The function start_zap_scan receives three parameters. The zap_host, which in our case will be http://localhost:8080/, the zap_api_key, which we got from the settings, and the zap_context_id.
We still need to talk about the context in ZAP. A context is a way to group and manage a set of URLs related to a particular application or service. A context represents the scope of the application or service you want to test using ZAP.
Yet, for simplicity’s sake, we will use the default context when calling this function.
def start_zap_scan(zap_host, zap_api_key, zap_context_id):
    """Start a new zap scan with the given context id."""

    params = {'apikey': zap_api_key, 'contextId': zap_context_id}

    resp = requests.get(f'{zap_host}/JSON/ascan/action/scan/',
                        params=params)

    if (resp.status_code == 200):
        json_response = resp.json()
        scan_id = str(json_response["scan"])
        return scan_id
    else:
        logging.error(f'Failed to trigger scan. {str(resp.status_code)}')
        return None
In this function, we validate the HTTP response code and log an error if the response is not HTTP_OK. If the response is successful, we parse the JSON response to retrieve and return the unique scan ID.
It’s worth noting that the REST call to start the scan on ZAP initiates the scan and returns immediately. The response includes the scan ID, which we can then use to query the status and progress of the scan via the API.
Getting the status and progress of the scan
Once you’ve successfully started a scan and obtained the scan ID, you can use another Python function we’ve created to request the scan progress. This function is called get_zap_scan_progress.
The get_zap_scan_progress function is similar in structure to the previous function, but it takes an additional zap_scan_id parameter, which should be set to the scan id obtained from trigger_zap_scan function.
The get_zap_scan_progress function returns the current status of the scan as a percentage of completion. When the scan is complete, it returns a status of 100.
def get_zap_scan_progress(zap_host, zap_api_key, zap_scan_id):
    """Get the progress of an existing new zap scan."""
    params = {'apikey': zap_api_key, 'scanId': zap_scan_id}

    resp = requests.get(f'{zap_host}/JSON/ascan/view/status/',
                        params=params)

    if (resp.status_code == 200):
        json_response = resp.json()
        return json_response["status"]
    else:
        logging.error(f'Failed to get the status. {str(resp.status_code)}')
        return None
Getting the result of the scan
After the scanning (Active/Passive) completes, ZAP provides the security vulnerabilities through alerts. The alerts are categorized into high-priority, medium-priority, low-priority, and informational-priority risks.
You can retrieve the results via the ZAP API using another Python function we’ve created called get_zap_scan_result_summary.
The function, as seen below, summarizes the number of alerts detected in various categories.
def get_zap_scan_result_summary(zap_host, zap_api_key):
    """Get the a summary of the zap scan."""
    params = {'apikey': zap_api_key}

    resp = requests.get(f'{zap_host}/JSON/alert/view/alertsSummary/',
                        params=params)

    if (resp.status_code == 200):
        json_response = resp.json()
        print(type(json_response))
        return json_response["alertsSummary"]
    else:
        logging.error(f'Failed to get the summary. {str(resp.status_code)}')
        return None
The get_zap_scan_result_summary function returns the contents of the alertSummary object as a Python dictionary, which includes a count of the number of alerts detected in each category. The values next to each category represent the number of alerts detected in that category during the scan.
{
  "High": 0,
  "Low": 45,
  "Medium": 8,
  "Informational": 14
}
Generating an HTML report of the result
The final function that interacts with the ZAP API generates an HTML report of a scan result.
Suppose the summary indicates that the scan has detected a high-severity alert. You can obtain additional information about the alerts by examining the report's contents.
Below is the get_zap_scan_report function, which generates an HTML report of the scan results. This function includes two additional parameters, report_directory and report_name, which specify the directory and file name to use when saving the report.
def generate_zap_scan_report(zap_host, zap_api_key, report_dir, report_name):
    """Generate a zap scan report and store it on the file system."""
    params = {'apikey': zap_api_key}

    resp = requests.get(f'{zap_host}/OTHER/core/other/htmlreport/',
                        params=params)

    if (resp.status_code == 200):
        report_handle = open(f'{report_dir}//{report_name}', 'w')
        report_handle.write(resp.content.decode('utf-8'))
        report_handle.close()

    else:
        logging.error(f'Failed to create report. {str(resp.status_code)}')
Storing the result of the scan
To keep track of the state of scans, we use a local SQLite database with the following structure, which is managed by the previous functions we discussed.
The columns in the table include the scan ID, the date and time when the scan was created, the date and time when the scan was last updated, the scan’s progress, and the number of alerts of different severity levels.
Additionally, the table includes a column to store the location of the scan report, which is generated if the scan detects high-severity alerts.
We have a single Python function for creating the database and the scan table if it doesn’t exist.
To create or update a new scan record, a single function exists called insert_or_update_scan. See below.
The function first performs a query to detect if the scan record exists to determine whether to execute an insert or update query.
def insert_or_update_scan(scan_id, progress, high_alerts,
                          medium_alerts, low_alerts, info_alerts, report):
    """Insert or update a scan record with the given parameters."""
    conn = sqlite3.connect('./db/scan_db.sqlite')

    cursor = conn.cursor()
    cursor.execute('SELECT scan_id FROM scan WHERE scan_id = ?', (scan_id,))
    exists_row = cursor.fetchone()

    created_str = datetime.now().strftime('%Y-%m-%d %H:%M:%S')

    if exists_row is None:
        conn.execute('''
            INSERT INTO scan (scan_id, created, updated, progress, high_alerts,
            medium_alerts, low_alerts, info_alerts, report)
            VALUES (?, ?, ?, ?, ?, ?, ?, ?, ?)
        ''', (scan_id, created_str, created_str, progress, high_alerts,
              medium_alerts, low_alerts, info_alerts, report))
    else:
        conn.execute('''
            UPDATE scan
            SET updated = ?, progress = ?, high_alerts = ?,
                medium_alerts = ?, low_alerts = ?, info_alerts = ?, report = ?
            WHERE scan_id = ?
        ''', (created_str, progress, high_alerts, medium_alerts, low_alerts,
              info_alerts, report, scan_id))

    conn.commit()
    conn.close()
By defining the insert_or_update_scan function, we have all the necessary tools to automate the ZAP scan process. In the next chapter, we will combine all the pieces and show you how to automate the ZAP scan process using Python.
Putting it all together, the scan process
As we prepare to automate the ZAP scan process, we must address one crucial question: where do we store the API key?
It is important to emphasize that storing the API key in a source code repository, whether private or public, is a significant security risk. Numerous high-profile security breaches resulted from the exposure of API keys through developer mistakes.
So, we strongly recommend against storing API keys in source code repositories to avoid this risk. Instead, we recommend keeping the API key as an environment variable.
You can use the getenv function from the os module to retrieve an environment variable in Python.
import os

api_key = os.getenv('ZAP_API_KEY')
print(api_key)
The scan process
The scan process can be divided into five main steps:
- Starting the scan using
start_zap_scan - Inserting the scan ID in the database
using insert_or_update_scan - Polling the progress of the scan every minute until it is finished using
get_zap_scan_progress - Getting the scan summary and storing it in the database using
get_zap_scan_result_summary - Generating the report, storing it on the file system, and storing the report’s location in the scan record using
generate_zap_scan_report
This all results in the following Python function.
def start_and_process_scan(zap_host, zap_api_key, zap_context_id):
    create_scan_table()

    logging.info('Starting zap scan.')
    scan_id = start_zap_scan(zap_host, zap_api_key, zap_context_id)
    insert_or_update_scan(scan_id, 0, 0, 0, 0, 0, '')

    scan_progress = get_zap_scan_progress(zap_host, zap_api_key, scan_id)
    while scan_progress < 100:
        logging.info(f'Scan progress: {scan_progress}')
        time.sleep(60)
        scan_progress = get_zap_scan_progress(zap_host, zap_api_key, scan_id)
        insert_or_update_scan(scan_id, scan_progress, 0, 0, 0, 0, '')

    summary = get_zap_scan_result_summary(zap_host, zap_api_key)
    report = generate_zap_scan_report(zap_host, zap_api_key)

    high_alerts = summary['High']
    medium_alerts = summary['Medium']
    low_alerts = summary['Low']
    info_alerts = summary['Informational']

    insert_or_update_scan(scan_id, scan_progress, high_alerts, medium_alerts,
                          low_alerts, info_alerts, 0, report)

    logging.info('Scan completed.')
Now starting the scan becomes as simple as.
api_key = os.getenv('ZAP_API_KEY')
zap_host = 'http://localhost:8082'
zap_context_id = 1  # 1 is the default context id

start_and_process_scan(zap_host, api_key, zap_context_id)
Now that we have set up the Python application to trigger the OWASP ZAP scan via the API, we can schedule the scan to run periodically using either cron (on Linux) or the Task Scheduler (on Windows). This allows for continuous and automated testing of your web application’s security.
Take a look at the complete Python script in this GitHub repository.
Configure the desired time interval for the scans, and let the application handle the rest.
Integrating ZAP into the DevOps Pipeline
With the knowledge gained from previous chapters, you now have everything you need to automate your ZAP scans. Let’s look at how you can integrate this into your DevOps pipeline.
The context diagram illustrates the required infrastructure. You have the machine that runs OWASP ZAP, the webserver that runs the latest version of your web application, and finally, the machine that runs the Python script.

You don’t necessarily need three distinct machines, as executing all three components on a single virtual machine is possible. It all depends on the scale you need.
By bringing all of these components together, you can continuously test your web application for vulnerabilities, catch potential issues before they become problematic, and improve the overall security of your application.
To integrate ZAP scans into your DevOps pipeline. First, your DevOps pipeline will build your software and create a release. Next, it will install the release on the webserver.
Finally, it will start the Python script to trigger and process the ZAP scan.
This will continuously test your application for vulnerabilities, storing the results in the scan database and reports.
Conclusion
We showed you how to use Python and the OWASP ZAP API to automate security testing and integrate it into your DevOps pipeline. You can find the Python scripts in this GitHub repository.
Continuously testing your web applications for vulnerabilities can help identify potential issues before they become problematic. This improves the security of your application.
We created a solution to trigger, watch, and report security scans with the ZAP API and Python. You can customize and scale this solution to meet your specific needs.
It’s important to remember that no single solution can guarantee the security of your web applications.
A comprehensive security strategy involves implementing various tools, processes, and best practices.
OWASP ZAP and Python are a strong foundation for automating security testing, but it’s your responsibility to check and improve your applications’ security.
More content at PlainEnglish.io.
Sign up for our free weekly newsletter. Follow us on Twitter, LinkedIn, YouTube, and Discord.
Interested in scaling your software startup? Check out Circuit.


