Blast Off With Pygame — Crafting a Thrilling Galaga-Inspired Game
Unleash your inner game developer and conquer the cosmos with Python and Pygame
Ever since my first experience bouncing a sprite off the walls of a screen on a Commodore 64, I’ve been captivated by the dream of becoming a game programmer.
While I work as an IT developer and take great pride in my projects, there’s something uniquely captivating about crafting video games. As someone who enjoys bringing imaginative concepts to life through code, game development provides a perfect outlet to set virtual objects in motion and create engaging experiences for players.
Occasionally, I can’t resist the itch to develop a small game. Recently, I embarked on a quest to create a space shooter inspired by Galaga, using the powerful combination of Python and Pygame.
As a classic arcade game developed by Namco, Galaga holds a special place in my heart from the countless hours spent playing it in my teenage years at the local cafeteria.

What made the original game truly captivating were its challenging stages. Players had to strategically shoot down waves of enemies as they charged vertically toward the screen.
This thrilling gameplay served as the foundation for my Galaga-inspired creation, harnessing the potential of Python’s simplicity and Pygame’s versatility to bring the excitement of this retro classic to a modern audience.
You can get the final source code of the game from this GitHub repository.
Presenting the Final Creation
Before diving into the tutorial, I want to give you a sneak peek of the exciting game we’ll build in this article. Below, you’ll find an animated gif showcasing the end result.
Our Galaga-inspired space shooter features dynamic waves of enemies advancing toward you along a Bézier curve, lively animated sprites, precise collision detection, a robust scoring system, and distinct game states. To top it off, I’ve even incorporated some nostalgic sounds from the original game.
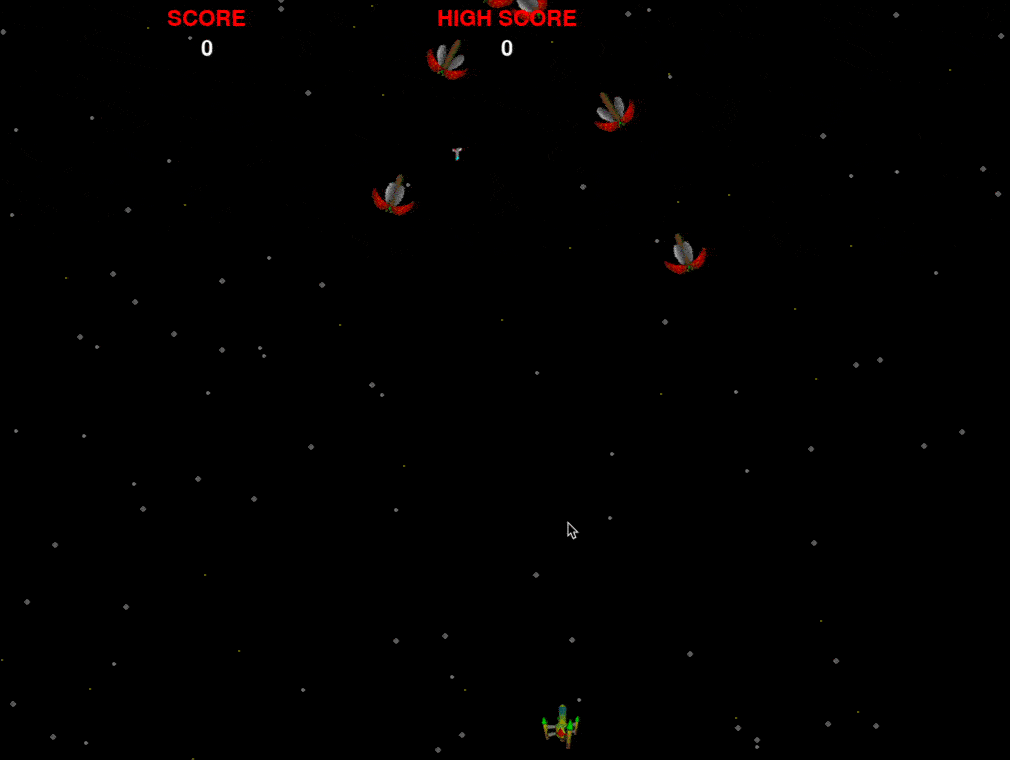
Additionally, the game includes a unique mode tailored for game designers, where you can customize the enemy spaceships’ paths. These paths are constructed using multiple Bézier curves, and the game mode displays the curves and their control points.
You can modify the path in real-time by adjusting the control points. When you exit the game, the location of each control point is saved to a file, allowing you to integrate your custom path into the game.

Press the ‘S’ key during gameplay to activate this special mode and reveal the curve and control points.
PyGame
PyGame is a widely popular open-source library that allows developers to create exciting and engaging 2D games using Python.
It provides a powerful set of modules for handling graphics, sound, and input, making it an ideal choice for game development enthusiasts looking to bring their ideas to life.
This article will explore how to craft a thrilling Galaga-inspired game using PyGame. By harnessing the power of PyGame’s feature-rich toolkit, we’ll be able to develop a captivating space shooter that will have players eager to blast off into a world of interstellar combat.
If you’re new to game development or Python, don’t worry! We’ll guide you through the process, explaining key concepts and techniques.
So, buckle up and prepare to embark on an exciting journey through the cosmos as we delve into the world of PyGame!
Game States
One crucial lesson I’ve learned while developing these small games is the importance of incorporating a state machine into your game. A game typically consists of several states, such as Playing, Starting, and Game Over.
While it’s possible to manage these states using if-else constructions, implementing a state machine significantly improves the structure and maintainability of your code.
I utilized Python classes to model the state machine, representing each state as a separate class. Thus, I created the classes Splash, Menu, Gameplay, and Game Over, all derived from a single base class called BaseState.
The next_state attribute is set upon initializing each state, ensuring the transition to subsequent states is seamless and well-defined.
This approach allows for a more organized and easily navigable codebase, ultimately enhancing game development.
class BaseState:
    def __init__(self) -> None:
        self.done: bool = False
        self.quit: bool = False
        self.next_state: str | None = None
        self.screen_rect: Rect = pygame.display.get_surface().get_rect()
        self.font: pygame.font.Font = pygame.font.Font(None, 32)

    def startup(self) -> None:
        pass

    def get_event(self, event: pygame.event.Event) -> None:
        pass

    def update(self, dt: float) -> None:
        pass

    def draw(self, surface: Surface) -> None:
        pass
Before we delve deeper into game states, it’s crucial to discuss the core concept that drives our game: the main game loop.
At the heart of our game lies a single class named Game, which contains the actual game loop responsible for managing the game's flow. This class features a method called run, illustrated below, which is the engine that powers our game's progression.
By understanding the structure and function of the main game loop, we can effectively control the game’s various states and transitions, creating a seamless and engaging gameplay experience.
def run(self) -> None:
    while not self.done:
        dt: int = self.clock.tick(self.fps)
        self.event_loop()
        self.update(dt)
        self.draw()
        pygame.display.update()
The event_loop, update, and draw functions are designed to invoke the corresponding methods on the current game state.
The event_loop function manages events such as timers and key presses, while the update method controls the game's core logic, including aspects like enemy movement. Lastly, the draw function renders game elements onto the screen.
With this understanding, let’s examine the first game state: the Splash state. This state is responsible for displaying the game’s splash screen. After waiting for a few seconds, it transitions to the next state by setting the done flag to True.
class Splash(BaseState):
    def __init__(self) -> None:
        super(Splash, self).__init__()
        self.title: Surface = self.font.render(
            "Galaga", True, pygame.Color("blue")
        )
        self.title_rect: Rect = self.title.get_rect(
            center=self.screen_rect.center
        )
        self.next_state = "MENU"
        self.time_active: float = 0

    def update(self, dt: float) -> None:
        self.time_active += dt
        if self.time_active >= 2000:
            self.done = True

    def draw(self, surface: Surface) -> None:
        surface.fill(pygame.Color("black"))
        surface.blit(self.title, self.title_rect)
The Splash state employs the font class to display text on the screen. After being active for over three seconds, it transitions to the subsequent state. The following state, the Menu state, presents a menu for players to interact with. Each state specifies the next by setting the next_state attribute, as demonstrated.
By setting the done field to True, the game loop receives an indication to transition to the next state, ensuring a smooth progression between different game states.
Among all the states, the Gameplay state is the most comprehensive one, as it encompasses the entire game logic.
Sprites and Animation
Sprites represent the dynamic objects that move on the screen in a game. Pygame provides a built-in class specifically for handling sprites called Sprite. This class offers several methods that simplify moving and animating objects.
Typically, sprites and their associated animations are defined within a sprite sheet. A sprite sheet is a single image file containing all the graphical assets for your game, including the various frames required to animate the sprites.
The sprite sheet used for this game is shown below. As I am not a graphic artist, I obtained this sheet from OpenGameArt.org, a valuable resource for game assets.
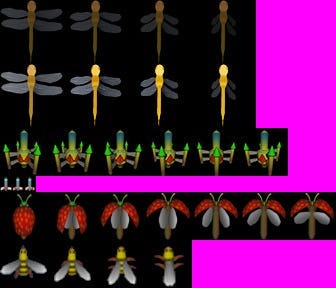
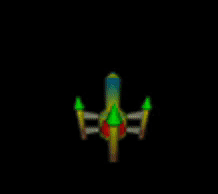
To effectively use a sprite sheet, you need to know the precise dimensions of each sprite and the total number of frames involved. Let’s examine the player’s spaceship as an example. Combining the six images in the third row creates a smooth animation for the player’s ship.
To load the sprite sheet, we utilize the SpriteSheet helper class. This class contains a method that loads the sprite sheet and returns a list of individual images composing the animation.
To load the sprite sheet, create an instance of the SpriteSheet class and provide the file path of the sprite sheet image. The code snippet below demonstrates the Player class. We load the six spaceship variations into the images array.
The animation is handled in the get_surf method. Depending on the timer, it returns one of the images for the animation. The self.interval field is used to control the pace of the animation by adding a delay between frames.
class Player(pygame.sprite.Sprite):
    def __init__(self, sprites: SpriteSheet, x: int, y: int) -> None:
        super().__init__()
        self.timer: int = 0
        self.interval: int = 2
        self.number_of_images: int = 6
        rect1: Tuple[int, int, int, int] = (0, 130, 48, 45)
        self.images: List[pygame.Surface] = sprites.load_strip(
            rect1, self.number_of_images, -1
        )
        self.surf: pygame.Surface = self.images[0]
        self.rect: pygame.Rect = self.surf.get_rect(
            center=(constants.SCREEN_WIDTH / 2, constants.SCREEN_HEIGHT - 40)
        )
        self.image_index: int = 0

    def get_event(self, event: pygame.event.Event) -> None:
        pass

    def update(self, *args: Any, **kwargs: Any) -> None:
        self.timer += 1

        pressed_keys: Tuple[bool, ...] = pygame.key.get_pressed()

        if pressed_keys[K_LEFT]:
            self.rect.move_ip(-5, 0)
        if pressed_keys[K_RIGHT]:
            self.rect.move_ip(5, 0)

        if self.rect.left < 0:
            self.rect.left = 0
        if self.rect.right > constants.SCREEN_WIDTH:
            self.rect.right = constants.SCREEN_WIDTH

    def get_surf(self) -> pygame.Surface:
        if self.timer % self.interval == 0:
            self.image_index += 1
            if self.image_index >= self.number_of_images:
                self.image_index = 0
        return self.images[self.image_index]
The various game elements, such as enemies, rockets, and explosions, are each represented by distinct classes. Specifically, we have the Enemy class, the Rocket class, and the Explosion class.
By using separate classes for each element, we can maintain a clear and organized structure in our code, making it easier to manage and update as the game evolves.
Shooting Mechanics
The game allows players to shoot rockets by pressing the space bar. When the space bar is triggered, a rocket sprite is created at the player’s location. The game limits the number of simultaneous rockets to two to maintain balance.
The shoot_rocket function, presented below, creates the Rocket instance. The first argument on the first line of the function refers to the sprite sheet used for the rocket. The second and third arguments specify the horizontal and vertical speeds, respectively.
We set the vertical speed to -15, causing the rocket to travel straight upward. Additionally, the rocket is an animated sprite, enhancing the visual appeal of the shooting mechanics.
def shoot_rocket(self) -> None:
    rocket = Rocket(self.sprites, 0, -15)
    rocket.rect.centerx = self.player.rect.centerx
    self.all_rockets.add(rocket)
    self.all_sprites.add(rocket)
    self.shoot_sound.play()
Enemy spaceships also fire rockets aimed at the player. These rockets travel in the player’s direction, creating a more challenging gameplay experience. We utilize a Pygame timer to enable an enemy spaceship to shoot every second. When the timer is triggered, it calls the enemy_shoots function.
Within this function, we first randomly select one of the enemy spaceships. We then calculate the appropriate rocket speed from the enemy toward the player.
To ensure fair gameplay, we verify that the rocket is not released below 400 pixels in height. This prevents the rocket from almost always hitting the player.
You can experiment with this value and the rocket’s speed (e.g., when transitioning to the next difficulty level) to fine-tune the gameplay experience.
def enemy_shoots(self) -> None:
    nr_of_enemies: int = len(self.all_enemies)
    if nr_of_enemies > 0:
        enemy_index: int = random.randint(0, nr_of_enemies - 1)
        start_rocket: Tuple[int, int] | None = None
        for index, enemy in enumerate(self.all_enemies):
            if index == enemy_index:
                start_rocket = enemy.rect.center

        if start_rocket is not None and start_rocket[1] < 400:
            ySpeed = 7
            dx: int = self.player.rect.centerx - start_rocket[0]
            dy: int = self.player.rect.centery - start_rocket[1]

            number_of_steps: float = dy / ySpeed
            xSpeed: int = int(dx / number_of_steps)

            rocket = Rocket(self.sprites, xSpeed, ySpeed)
            rocket.rect.centerx = start_rocket[0]
            rocket.rect.centery = start_rocket[1]

            self.enemy_rockets.add(rocket)
            self.all_sprites.add(rocket)
Collision Detection
Pygame simplifies collision detection through its SpriteGroup class, which serves as a container for sprite objects. Pygame provides helper methods that can detect whether sprites within one sprite group collide with sprites in another group.
When a rocket is fired, we add the Rocket instance to the all_rockets sprite group. Similarly, as they enter the screen, we add each enemy to the all_enemies sprite group.
By employing the groupcollide function, we can easily determine if any rockets collide with the enemies, streamlining the collision detection process in our game.
result: Dict[Any, List[Any]] = pygame.sprite.groupcollide(
    self.all_rockets, self.all_enemies, True, True
)

if result:
    for key in result:
        self.score += 120
        if self.score > self.high_score:
            self.high_score = self.score
        self.all_sprites.add(
            Explosion(self.explosion_sprites, key.rect[0], key.rect[1])
        )
        self.kill_sound.play()
The groupcollide function in the first row takes both sprite groups as arguments and two additional boolean values. These boolean arguments determine if the sprites should automatically be removed from their respective sprite groups upon collision.
Sprite groups are also utilized to draw sprites on the screen. When two sprites collide, they are automatically removed from their respective groups and subsequently removed from the display.
The groupcollide method returns a dictionary containing all the colliding sprites. By iterating over all the keys in the dictionary, we can add an explosion sprite at the exact location of each collision. This enhances the visual effects and overall gameplay experience.
Enemy Sprite Movement
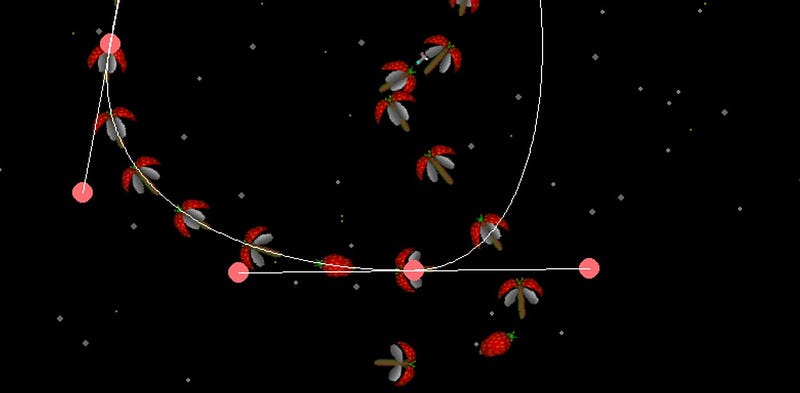
Enemy spaceships move along a path created using multiple Bézier curves. A game mode displays the Bézier curve and its control points. Adjusting the control points allows you to modify the path in real-time.
Upon exiting the game, the locations of each control point are saved to a file, allowing you to utilize the customized path in subsequent gameplay.
To toggle the display of the curve and control points, press the ‘S’ key. This feature offers a unique and interactive way to shape the movement of enemy spaceships within the game.
Bézier Curves
Cubic Bézier curves create smooth and customizable paths for enemy spaceships. Each curve is defined by four control points and calculated using the formula:
P(t) = (1-t)³P0 + 3(1-t)²tP1 + 3(1-t)t²P2 + t³P3
The time variable (t) ranges from 0 to 1. At t=0, the path starts at P0; at t=1, the path reaches P3. Multiple curves are connected by setting the first point (P0) of the subsequent segment equal to the previous segment's last point (P3).
In the control mode demo, the game features three connected Bézier curves. These curves are generated by the ControlPointCollectionFactory class. The first point is placed outside the visible screen to create a sense of enemies diving in from the top.
The connection between curve segments is achieved by making the last point of one segment (501, 648) the same as the first point of the next segment. Additionally, the last point of the final segment (513, -15) is the same as the first point, ensuring a seamless connection between curves.
class ControlPointCollectionFactory:
    @staticmethod
    def create_collection1() -> ControlPointQuartetCollection:
        control_point_quartet_collection = ControlPointQuartetCollection()

        control_point_quartet_collection.add(
            ControlPointQuartet(513, -15, 700, 151, 888, 650, 501, 648)
        )

        control_point_quartet_collection.add(
            ControlPointQuartet(501, 648, 114, 646, 208, 488, 235, 343)
        )

        control_point_quartet_collection.add(
            ControlPointQuartet(235, 343, 262, 198, 326, -181, 513, -15)
        )

        return control_point_quartet_collection
Calculating the Bézier curve
We have developed a class named PathPointCalculator, tasked with computing the curve. This class features a method called calculate_path_point, which takes in two parameters.
The initial parameter, control_point_quartet, is a structure encompassing the four points that define a Bézier curve. Meanwhile, the second parameter, time_to_calculate, represents the time variable (t) used in the curve formula.
class PathPointCalculator:
    @staticmethod
    def calculate_path_point(
        cpq: ControlPointQuartet, time_to_calculate: float
    ) -> PathPoint:
        time: float = time_to_calculate - int(time_to_calculate)

        cx: float = 3.0 * (cpq.get_point(1).x - cpq.get_point(0).x)
        cy: float = 3.0 * (cpq.get_point(1).y - cpq.get_point(0).y)

        bx: float = 3.0 * (cpq.get_point(2).x - cpq.get_point(1).x) - cx
        by: float = 3.0 * (cpq.get_point(2).y - cpq.get_point(1).y) - cy

        ax: float = cpq.get_point(3).x - cpq.get_point(0).x - cx - bx
        ay: float = cpq.get_point(3).y - cpq.get_point(0).y - cy - by

        cube: float = time * time * time
        square: float = time * time

        resx: float = (
            (ax * cube) + (bx * square) + (cx * time) + cpq.get_point(0).x
        )
        resy: float = (
            (ay * cube) + (by * square) + (cy * time) + cpq.get_point(0).y
        )

        return PathPoint(resx, resy)
To combine multiple curves, we follow a sequential process. First, we utilize the initial set of points and allow the time variable to range from zero to one.
Next, we apply the same approach to the second set of points, again allowing the time variable to span from zero to one. This procedure is repeated for the third set of points, ensuring a seamless combination of the curves.
Rotation
You may have noticed that the sprites dynamically rotate in the direction of their movement as they travel along the curve. We compute this rotation in real-time, allowing Pygame to transform the sprite based on the calculated rotation.
The calculate_rotation method, part of the Enemy class, determines the rotation. The previous and current x and y coordinates calculate the angle between these positions to achieve the desired rotation.
def calculate_rotation(
        self, previous_point: PathPoint, current_point: PathPoint
    ) -> float:
        dx: float = current_point.xpos - previous_point.xpos
        dy: float = current_point.ypos - previous_point.ypos

        return math.degrees(math.atan2(dx, dy)) + 180
Real-time Control Point Modifications
As illustrated in the earlier animated gif demo, you can adjust the control points of the Bézier curve in real time. To maintain a smooth curve while making these adjustments, it’s crucial to follow some straightforward principles.
Initially, it’s important to distinguish the three points that constitute a single curve segment. We identify the middle point as the path point and the two outer points as the control points.
To preserve the smoothness of the curves while adjusting a path point or control point, adhere to the following guidelines:
- When moving a path point, ensure the left and right control points are moved with the same deltas.
- When moving the left control point, move the right control point in the opposite direction.
- When moving the right control point, move the left control point in the opposite direction.
- Remember that some control points are conjoined (e.g., the previous segment's last point and the next segment's first point). Move them simultaneously.
These behaviors are implemented in the ControlHandlerMover class, as outlined below.
The class’s __init__ constructor accepts two arguments. The first is a collection containing all the points from all segments. The second is a helper object that determines whether a point is a path or a control point.
The move_control_handler function is responsible for moving a path or control point. It inputs the point's identifier and the new x and y coordinates.
The function then adjusts the associated points accordingly.
class ControlHandlerMover:
    def __init__(
        self,
        control_point_quartet_collection: ControlPointQuartetCollection,
        path_point_selector: PathPointSelector,
    ) -> None:
        self.cpqc: ControlPointQuartetCollection = (
            control_point_quartet_collection
        )
        self.path_point_selector: PathPointSelector = path_point_selector

    def move_control_handler(
        self, control_point_handler: ControlPointHandler, x: int, y: int
    ) -> None:
        dx: float = self.cpqc.get_control_point(control_point_handler).x - x
        dy: float = self.cpqc.get_control_point(control_point_handler).y - y

        self.cpqc.get_control_point(control_point_handler).x = x
        self.cpqc.get_control_point(control_point_handler).y = y

        if self.path_point_selector.is_path_point(control_point_handler):
            related_path_point: ControlPointHandler = (
                self.path_point_selector.find_related_path_point(
                    control_point_handler
                )
            )
            self.cpqc.get_control_point(related_path_point).x = x
            self.cpqc.get_control_point(related_path_point).y = y

            related_control_points: list[
                ControlPointHandler
            ] = self.path_point_selector.find_control_points_of_path_point(
                control_point_handler
            )
            self.cpqc.get_control_point(related_control_points[0]).x -= dx
            self.cpqc.get_control_point(related_control_points[0]).y -= dy
            self.cpqc.get_control_point(related_control_points[1]).x -= dx
            self.cpqc.get_control_point(related_control_points[1]).y -= dy

        else:  # It is a control point
            related_control_point: ControlPointHandler = (
                self.path_point_selector.find_related_control_point(
                    control_point_handler
                )
            )
            related_path_point = (
                self.path_point_selector.find_path_point_of_control_point(
                    control_point_handler
                )
            )

            xDistance: float = (
                self.cpqc.get_control_point(related_path_point).x - x
            )
            yDistance: float = (
                self.cpqc.get_control_point(related_path_point).y - y
            )

            self.cpqc.get_control_point(related_control_point).x = (
                self.cpqc.get_control_point(related_path_point).x + xDistance
            )
            self.cpqc.get_control_point(related_control_point).y = (
                self.cpqc.get_control_point(related_path_point).y + yDistance
            )
Background starfield
No space shooter is complete without a starfield. Therefore, I incorporated three layers of stars: small, medium, and large. Each layer features stars of varying sizes and moves at distinct speeds, creating an illusion of forward motion for a more immersive experience.

I developed the starfield using a class called StarField, as detailed below. This class contains three arrays, each holding a set of randomly generated stars created during the constructor's initialization.
The render_stars function is responsible for rendering a single layer of stars. It takes in the star collection, along with the stars' speed, size, and color as inputs.
Modifying the parameters can increase the number of stars or add more layers to enhance the parallax effect for a more striking visual experience.
class StarField:
    LIGHTGREY: Tuple[int, int, int] = (120, 120, 120)
    DARKGREY: Tuple[int, int, int] = (100, 100, 100)
    YELLOW: Tuple[int, int, int] = (120, 120, 0)

    def __init__(self) -> None:
        self.star_field_slow: List[Tuple[int, int]] = self._create_stars(50)
        self.star_field_medium: List[Tuple[int, int]] = self._create_stars(35)
        self.star_field_fast: List[Tuple[int, int]] = self._create_stars(30)

    def _create_stars(self, number_of_stars: int) -> List[Tuple[int, int]]:
        stars: List[Tuple[int, int]] = []
        for _ in range(number_of_stars):
            star_loc_x: int = random.randrange(0, constants.SCREEN_WIDTH)
            star_loc_y: int = random.randrange(0, constants.SCREEN_HEIGHT)
            stars.append((star_loc_x, star_loc_y))
        return stars

    def _render_star_layer(
        self,
        screen: pygame.Surface,
        star_collection: List[Tuple[int, int]],
        speed: int,
        size: int,
        color: Tuple[int, int, int],
    ) -> None:
        for i, star in enumerate(star_collection):
            new_y: int = star[1] + speed
            if new_y > constants.SCREEN_HEIGHT:
                star_x: int = random.randrange(0, constants.SCREEN_WIDTH)
                star_y: int = random.randrange(-20, -5)
                star = (star_x, star_y)
            else:
                star = (star[0], new_y)
            star_collection[i] = star
            pygame.draw.circle(screen, color, star, size)

    def render(self, screen: pygame.Surface) -> None:
        self._render_star_layer(
            screen, self.star_field_slow, 1, 3, self.DARKGREY
        )
        self._render_star_layer(
            screen, self.star_field_medium, 4, 2, self.LIGHTGREY
        )
        self._render_star_layer(
            screen, self.star_field_fast, 8, 1, self.YELLOW
        )
Conclusion
Developing this game was an incredibly enjoyable experience that took me down memory lane, back to my childhood playing the original Galaga at the local cafeteria. While the game is not yet complete, it is playable and is an excellent starting point for beginner programmers.
The Pygame library proved to be a valuable asset, simplifying tasks like collision detection and rendering. If you want to create a game using Python, I highly recommend exploring Pygame.
I didn’t delve into topics like resolution, frames per second, game loops, music, sound effects, or scoring systems in this article. However, these aspects were implemented using standard Pygame functionalities.
You can find all the details in the source code in this GitHub repository.
If you’re seeking additional examples, check out the Pygame website, where you’ll find numerous open-source game examples to explore and learn from.
Thank you for reading, and I hope you enjoyed this journey into game development as much as I did.
Happy coding!


