Beyond Brittle: Building Resilient UI Testing
How we combined Playwright, OmniParser, and the OpenAI Agents SDK to end our maintenance nightmares
Tuesday, 3:14 a.m.
Our build monitor looked like a crime‑scene strobe, with forty‑seven UI tests suddenly bleeding red.
Our Slack channel erupted, QA was asleep, and somewhere in that avalanche of false failures hid a real bug that could nuke tomorrow’s release.
We weren’t debugging software anymore, we were playing Minesweeper blindfolded. This was the heart of our maintenance nightmares.
How did we get here?
Simple, we built our house on sand, brittle Selenium scripts, pixel‑perfect CSS selectors. Our UI tests were failing because they depended on brittle selectors that broke with every DOM change.
Exactly one wizard knew which magic kept the whole thing upright. Then the wizard quit. Maintenance shifted to us, the dev team, and every DOM tweak turned into a landslide.
We burned 32 dev-hours a week chasing phantom regressions. “why is the button‑that‑still‑exists suddenly ‘missing’?” Meanwhile, deadlines didn’t care.
About five weeks later, we decided to stop. We killed a tool that had once caught production‑level grenades because we couldn’t stomach the upkeep.
It felt like bashing the smoke alarm simply because its low-battery chirp got on my nerves.
We needed tests that understood our UI’s purpose, not just its structure.
Enter our rough prototype.
We built a system that recognizes UI elements visually, the way humans do: by what they look like and what they do, not by their DOM position.
An AI agent that uses OmniParser to visually understand the page, figures out what’s what, and logs in without a single hard-coded selector.
We shuffled labels, swapped IDs, and even buried the password field under an extra div. While our old tests would have triggered many failures, our new system adapted instantly.
It’s still a prototype, but it already shrugs off the DOM chaos that nuked Selenium. Here’s how we taught a bot to ignore the sand and march straight through a shifting UI.
Tests that think like humans, not machines
Imagine if your tests could see your app the way your users do.
That’s the game-changer here. Instead of hunting for #login-btn-container > div.wrapper > button.primary, our system looks for “something that looks like a login button.” Just like you would.
So, how did we pull this off? We combined three powerful tools that work together like your brain, eyes, and hands:
- Playwright: Think of this as your test’s hands and eyes. It clicks, types, and navigates through your app just like a real user would. Nothing revolutionary here yet.
- OmniParser: This is the secret sauce. It’s the visual cortex that looks at a screen and says, “That’s a login form with username and password fields.” No DOM-diving required.
- OpenAI Agents SDK: Your test’s problem-solving brain. The LLM connects the visual information with action. It understands what to do next.
Here’s where you’ll feel the difference: Your designer moves a button from the header to the sidebar during a UI refresh.
With traditional tests? Everything breaks, your Slack blows up, and you spend your Friday night updating selectors.
With our approach? The test just… works. It sees the button in its new location and carries on testing. No code changes, no emergency fixes, no late nights.
Wouldn’t that be refreshing?
How it actually works
Now let’s see exactly how this approach eliminates those Slack alerts and keeps your tests running smoothly.
The architecture
Our system’s power comes from how these components work together, each handling the part of testing it does best.
Here’s how these components connect:

Login website
The login website serves as our test subject. It is simple enough to understand quickly, but with all the elements that typically break tests: form fields, validation, and state changes after submission.
If you enter the credentials correctly, you will see a different screen telling you you are authenticated successfully.

OmniParser
If Playwright takes the screenshot (acting like a camera connected to the eyes), then OmniParser is the visual cortex that processes the image from the eyes.
This visual understanding is what allows tests to keep working even when designers rearrange the entire UI.
OmniParser is open source, but uses different licenses for its components make sure that you understand them.
The Icon Detection Model is under the AGPL license, which it inherits from the original YOLO model it’s built upon. The Icon Caption Models (both BLIP2 and Florence versions) are under the MIT license.
We run OmiParser locally on a CUDA-enabled desktop with a FastAPI service (it is possible to run it on a CPU, but it is slower).
Playwright is used to navigate to the login page and to take a screenshot. We then sent this screenshot to OmniParser.
OmniParser returns a result that includes the original image, together with annotations, as you can see below.
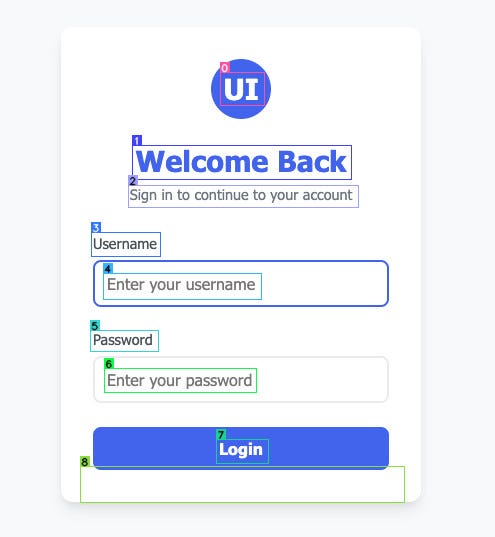
In addition to the annotated image, it also returns a JSON structure of the elements in the image. This is where it gets interesting for our use case: It also returns the exact coordinates of the various elements in the image or page.
Automatic UI test agent
The Automatic UI Test Agent is basically the manager who runs our testing scenarios. We give the agent the test cases (just one in our case) to execute and validate.
We use the OpenAI Agents SDK and their GPT-4o mini model to understand what needs to be done.
We tell our agent to try logging in to our login page with a certain set of credentials. The Agent uses the tools we supplied to perform the task.
Tools
Tools are various Python functions that we give to our AI Agent to perform its tasks. We implemented the following four tools.
- Screenshot tool — This function uses Playwright to navigate to a website and make a screenshot.
- Analyze image with OmniParser tool — This function takes a screenshot and sends it to the local FastAPI endpoint for analysis.
- Interact with elements tool — This function gets a sequence of actions to perform on a website. PlayWright performs these actions. Instead of selecting element using CSS selectors it uses the precise coordinates of the element to click or interact with them.
- Validate element exists—This simple tool validates whether a certain element exists as a result of the OmniParser parsing step.
Enough with the theory. Let’s see the actual code that makes this magic happen. After all, diagrams are nice, but the real power is in the implementation.
What follows is the surprisingly simple code that turned our maintenance nightmare into a resilient testing dream.
Technical implementation details
The complete code is available on GitHub, so you can try this approach yourself after seeing the implementation.
I simplified the functions here for better readability. Links to each function are added to show you the complete implementation.
The OmniParser client
The interaction with our local OmniParser instance is handled by the OmniParserClient helper class, which handles communication with the OmniParser service.
It does some post-processing of the response for convenient processing by the tools.
async def process_image(self, image_data: bytes = None, image_path: str = None):
  # Prepare the image data
  files = {"image_file": image_data}

  # Send to OmniParser service
  response = await self.client.post(f"{self.base_url}/process_image", params=params, files=files)

  # Clean response for processing
  cleaned_response_text = re.sub(r"np\.float32\(([^)]+)\)", r"\1", response_text)
  parsed_result = ast.literal_eval(cleaned_response_text)

  return parsed_result
Screenshot tool
The screenshot tool navigates to a website and captures its current state via a screenshot.
async def _take_screenshot_core(url: str, output_file: str, wait_time: int):
  async with async_playwright() as p:
    browser = await p.chromium.launch(headless=True)
    page = await browser.new_page(viewport={"width": 1280, "height": 720})

    await page.goto(url, wait_until="networkidle", timeout=30000)
    await page.screenshot(path=output_file, full_page=True)

   return ScreenshotResultOutput(success=True, file_path=os.path.abspath(output_file), url=url)
OmniParser analysis tool
The OmniParser tool sends screenshots to OmniParser and processes the results:
async def _analyze_image_with_omniparser_core(image_path: str, box_threshold: float, iou_threshold: float):
  # Load image data from path
  with open(image_path, "rb") as f:
    image_data = f.read()

  # Send to OmniParser service
  omniparser_client = OmniParserClient(base_url="http://192.168.1.28:7860")
  result = await omniparser_client.process_image(image_data=image_data)

  # Remove large base64 image data before returning to the LLM
  if "image" in result:
    del result["image"]

  return result
Element interaction tool
This is where a lot of magic happens. Instead of hardcoded selectors, we use normalized coordinates to interact with elements.
The normalization is necessary because OmniParser returns a float between 0 and 1 to indicate a coordinate.
async def _interact_with_element_sequence_core(interactions, browser_state, take_screenshots):
  async with async_playwright() as p:
    browser = await p.chromium.launch(headless=False)
    page = await browser.new_page(viewport={"width": 1280, "height": 720})

    for interaction in interactions:
      # Get normalized coordinates (0-1 range)
      normalized_x, normalized_y = interaction.element.position.x, interaction.element.position.y

      # Scale to pixel coordinates based on current viewport
      pixel_x = int(normalized_x * viewport_size["width"])
      pixel_y = int(normalized_y * viewport_size["height"])

      # Perform actions based on coordinates, not selectors
      if action == "click":
        await page.mouse.click(pixel_x, pixel_y)
      elif action == "type":
        await page.mouse.click(pixel_x, pixel_y)
        await page.keyboard.type(text_to_type)
This is crucial, we’re using visual coordinates rather than brittle selectors, making our tests resilient to DOM changes.
Element validation tool
Finally, we have a tool to check if specific text exists in the parsed content.
def _validate_element_exists_core(analysis_result, element_description):
  parsed_text_content = analysis_result.data.parsed_content_list

  # Perform case-insensitive search
  if element_description.lower() in parsed_text_content.lower():
    return {"success": True, "element_exists": True}
  else:
    return {"success": True, "element_exists": False}
AI Agent orchestration
The UI Test Agent orchestrates these tools with precise instructions. The agent receives detailed instructions that describe each step of the testing process, from capturing the initial state to validating the success message after login.
agent = Agent(
    name="UITestAgent",
    instructions=(
        "You are a meticulous UI testing agent. Your primary goal is to verify the login functionality..."
        "1. Use `take_screenshot` to capture the initial state of the login page..."
        "2. Use `analyze_image_with_omniparser` with the `file_path` from step 1..."
        # More detailed instructions
    ),
    tools=UITEST_TOOLS,
    model="gpt-4o-mini",
)
OpenAI tracing for debugging
One of our favorite features is the built-in tracing functionality from the OpenAI Agents SDK. In our main.py file, we wrap the agent execution in a trace context.
async def main():
  # Wrap agent execution in a trace context
  with trace("Running UI test agent..."):
    result = await Runner.run(
        agent,
        "Test the login flow for the application at http://192.168.1.28:3000. "
        "Use username 'demo' and password 'password123'..."
    )
    print(result.final_output)
This simple addition gives us incredible visibility into our agents’ activities.
The trace records every tool call, the agent’s thinking process, and the results of each action in a visual timeline accessible through the OpenAI developer console.

The trace view lets us see exactly:
- When each tool was called, and with what parameters
- How long did each step take to execute
- The full JSON responses from each tool
- The agent’s reasoning about what to do next
This has been invaluable for debugging. When tests fail, we don’t have to guess what went wrong, we can see exactly where things broke down in the agent’s decision-making process.
Of course, building this prototype wasn’t all smooth sailing. Let’s look at where we stumbled and what we learned along the way.
9 Hard lessons we learned building AI-powered tests
Building this system taught us as much through failure as through success. Here are the roadblocks that almost derailed our project. We also show how you can avoid them when building your resilient tests.
1. The “Just throw a bigger model at it” Fallacy
Our first instinct? Feed screenshots to a jumbo multimodal model (hello, Gemini Pro) and let it spit out element coordinates.
It kind of worked, if “kind of” means coordinates so wrong they could have been for a different planet. Bigger wasn’t better, it was just blinder and pricier.
Lesson learned: Smart heuristics beat brute-force horsepower.
2. Bloated messages, sluggish agent
OmniParser returns a lovely base-64 annotated image. Lovely… and gigantic. Piping that straight into the LLM turned prompt completion into glacial karaoke.
We axed the image, kept the JSON, and response times improved.
3. Fast vision, slow brains
OmniParser on an RTX 3090 clocks ~50 ms per image, lightning. The lag lives in GPT-4o mini orchestrating the dance.
Translation: Vision is not our bottleneck; deliberation is. If we want “CI-speed” runs, we need clever caching or lighter and faster reasoning models.
4. The Docker quirk
Our FastAPI OmniParser container (courtesy of Addy Bhatia) stores every output using the same image name.
Parallel runs? They step on each other’s toes. A tiny config tweak fixes it, but it’s still on the to-do board.
5. LLMs are moody
Ask the agent to click a button twice, and sometimes it obliges, sometimes it freestyle-jazzes the step order. Determinism and stochastic text predictors are frenemies.
Until we strap on tighter guardrails, flaky selectors risk being replaced by flaky reasoning.
6. One-scenario syndrome
All this brilliance is proven on exactly one flow: logging in. Real test suites consist of many tests and tests of edge cases.
We need a declarative way to describe these test scenarios and separate “run the test” from “judge the outcome.”
Right now, the system prompt is wearing too many hats.
7. OpenAI Agents SDK love notes
The OpenAI Agents SDK makes tool wrapping a joy, and the built-in tracing is basically CCTV for your agent. No real gripe here, just a reminder that developer happiness counts.
8. Going local (Eventually)
Yes, we defaulted to GPT-4o mini for speed of experimentation.
Swapping in a local Ollama-hosted Llama 3.2 is doable and would free us from API toll booths. We still need an on-prem trace alternative, which is an open issue.
9. Pass/Fail Isn’t enough
Currently, the agent burps out “PASS” or “FAIL”. Useful? Barely.
We need structured JSON so a dashboard can scream the why and where of every failure, not just the fact that one occurred.
Bottom line
These challenges taught us that building AI-powered testing isn’t just about clever code. It is also about pragmatic engineering that balances the ideal solution with real-world constraints.
Keep these lessons in mind, and your implementation will go much smoother than ours did.
Your roadmap to self-healing tests
We’ve got a working prototype, but how do we turn this into something that handles real-world complexity?
Here’s our battle plan for transforming brittle tests into adaptive ones that actually make your life easier, not harder.
Train the agent on a zoo, not a goldfish
Login works, whoop-dee-do. Real apps juggle uploads, modals, and third-party widgets that would give Indiana Jones pause.
We’ll pump the framework with dozens of user journeys so it learns to swing past cobras and still grab the idol.
Evict CSS selector madness
Every brittle div:nth-child(42) we rip out is one less “Why did QA wake me up at 2 a.m.?” Slack ping.
Screenshots + OmniParser landmarks let the agent spot buttons the way you and I spot a giant red stop sign, no DOM archaeology required.
Slap guardrails on the agent’s improv
LLMs adore jazz solos. Test runners do not. We’ll inject step-tracking, idempotent clicks, and retry logic so the bot hits the right note every time, not just when it feels like it.
Make latency cry uncle
Caching parsed screens, trimming prompt fat, and experimenting with smaller local models (hello, Llama 3.2 on Ollama) should turn those multi-second waits into blink-and-you-miss-it responses.
Fix the Docker doppelgänger bug
One container, one filename, many overwrites, yeah, no. A tiny config tweak will stop parallel runs from stomping on each other like toddlers fighting over the last cookie.
Build a real verdict ledger
“PASS/FAIL” is caveman telemetry. We’ll emit structured JSON: what failed, why, and a breadcrumb trail of screenshots so debugging feels like sleuthing, not spelunking.
Dashboards will finally have something interesting to shout about.
Ship it, monitor it, break it, repeat
Once the basics hum, we’ll dog-food the framework in staging, crank up traffic, and log every hiccup. Nothing exposes edge cases faster than letting real users (or GitHub Actions) take a joyride.
Why should you care?
Let me guess. You’re spending Friday afternoons debugging test failures instead of winding down for the weekend.
You’re tired of DOM changes breaking perfectly good tests. Every UI tweak feels like defusing a bomb. Been there.
That’s exactly why this matters.
Think about it. What if your tests understood your app the way humans do? What if they looked for “the login button” instead of “div:nth-child(42)”?
That’s the shift we’re making. Our combo of OmniParser + AI Agent turns brittle tests into resilient ones. Your maintenance burden drops from weekly headaches to quarterly check-ins.
Suddenly, those 2 AM Slack alerts become rare exceptions, not Tuesday traditions.
Sure, we’ve only tackled a login form so far. It’s a small first step.
But even this modest victory has shown us a future where you spend your time building features users love, not babysitting test suites.
The ROI is clear: less maintenance, fewer false alarms, more sleep, happier developers.
Isn’t that worth exploring?
Resources
Ready to build your own self-healing tests? Here’s everything you need to get started:
Core technologies
- OmniParser & OmniTool — The visual understanding engine that powers our approach. Think of it as the “eyes” that see and understand your UI.
- OmniParser API — A simple REST API wrapper around OmniParser that makes integration super smooth. We used Addy Bhatia’s Docker container for quick setup.
- Playwright — The automation framework that handles the clicking, typing, and navigating. Way more reliable than old-school Selenium.
- OpenAI Agents SDK — The orchestration layer that ties everything together with that sweet, sweet tracing functionality. Makes debugging feel like watching a movie of your tests.
Learn more
- The Complete Agentic AI Engineering Course (2025) — Ed Donner’s fantastic Udemy course that helped us understand how to structure AI agents effectively. Worth every penny if you’re serious about this approach.
- Our GitHub Repo — See our complete implementation, including all the code snippets from this article, plus the full working prototype. Star it if you find it useful!
Have questions or want to share your own experiments with self-healing tests? Drop a comment below. I’d love to see what you build!


