Affordable KubeWhisper: Simple Voice Control for Kubernetes Clusters
Local speech-to-text meets DeepSeek V3 for cost-effective Kubernetes voice

Remember staring at your terminal, fingers hovering, trying to recall that exact kubectl command? It was frustrating, right?
In my last article, I introduced KubeWhisper — a voice-activated AI assistant for Kubernetes. It was pretty amazing to talk to your cluster. But there was a catch: using the OpenAI Realtime API for everything can get expensive, fast.

And that got me thinking… what if we could make KubeWhisper more affordable without sacrificing its magic?
Well, I’m excited to share that we did it. This new version of KubeWhisper uses a hybrid approach, combining a local speech-to-text engine, a budget-friendly online LLM (DeepSeek V3), and ElevenLabs for voice output. You’ll get the same seamless voice control but with a drastic cut in costs.
Watch the hybrid solution of KubeWhisper in action below.
In this article, I’ll walk you through exactly how this new version works. I’ll cover the architecture, the security, the commands, and how to set it up yourself.
You’ll learn how to make voice control of your Kubernetes cluster a reality without breaking the bank. Ready to dive in?
As always, all the code and documentation are available in this GitHub repository.
The problem with OpenAI Realtime API
Okay, let’s be real: if money were no object, the OpenAI Realtime API is the gold standard. Building a voice-controlled Kubernetes assistant with it is super easy. It’s the easiest way to get started.
But, and this is a big but, those costs can add up fast. In my last post, I mentioned I burned through $10 in a matter of hours just testing KubeWhisper. And that was just me messing around!
Think how quickly those costs would add up if you use it every day for actual work. You’d be looking at a big cloud bill in no time.
That’s where the need for a more affordable option comes in. The ideal solution would be fully local, but we know moving everything there would be complex and would demand significant compute resources on your local machine.
So I tried a ‘hybrid’ approach, a local speech-to-text component along with a much cheaper Cloud LLM for command recognition and an online API for text-to-voice. In the next section, we’ll see how that works.
The Hybrid KubeWhisper
So, what does ‘hybrid’ mean in this case? We combine the best of both worlds: some parts of KubeWhisper run on your machine, and some use cloud services. We can cut costs without sacrificing the core user experience.
To make this happen, I picked these three components:
1. Local speech-to-text with mlx-whisper
The first piece of the puzzle is getting your voice into the system. Instead of using a cloud service, we do that on your machine with mlx-whisper.
This is a version of OpenAI’s powerful Whisper open-source speech recognition model, but adapted to run super fast on Apple’s M-series chips.
Why does this matter?
Because we can transcribe your voice into text without sending your audio to the cloud — saving time, improving privacy, and cutting cost
2. DeepSeek V3 for smart command processing
Once we have the text of your command, we need KubeWhisper to understand what you want. For that, I chose DeepSeek V3 chat LLM through their online API.
Now I know what you’re thinking: an online API? Didn’t you say we were trying to cut costs? Yes, but compared to similar LLMs like GPT-4o, DeepSeek V3 is over ten times cheaper. It’s an outstanding balance of cost and quality.
The only issue with DeepSeek V3 is that it currently doesn’t have native support for “function calling” that we’ve used before. But with some clever prompting techniques, I’ll show you later, I could get it working reliably and accurately.
3. High-quality voice output with ElevenLabs text-to-speech
Finally, when KubeWhisper responds to you, it’s got to do it in a natural and pleasant way. That’s why I chose ElevenLabs TTS, another online API.
Their free tier is very generous, with 10 minutes of ultra-high quality text-to-speech per month (and a very affordable paid tier for those who need more).
So KubeWhisper sounds excellent and is also cheap.
The new KubeWhisper architecture
While this looks similar, there have been some changes under the hood. We’ve moved away from the WebSocket connections of the previous version and now use standard HTTP(s) calls to talk to the DeepSeek and ElevenLabs APIs.
This makes things much simpler and more robust. Now, let’s go through the two steps in the diagram below.
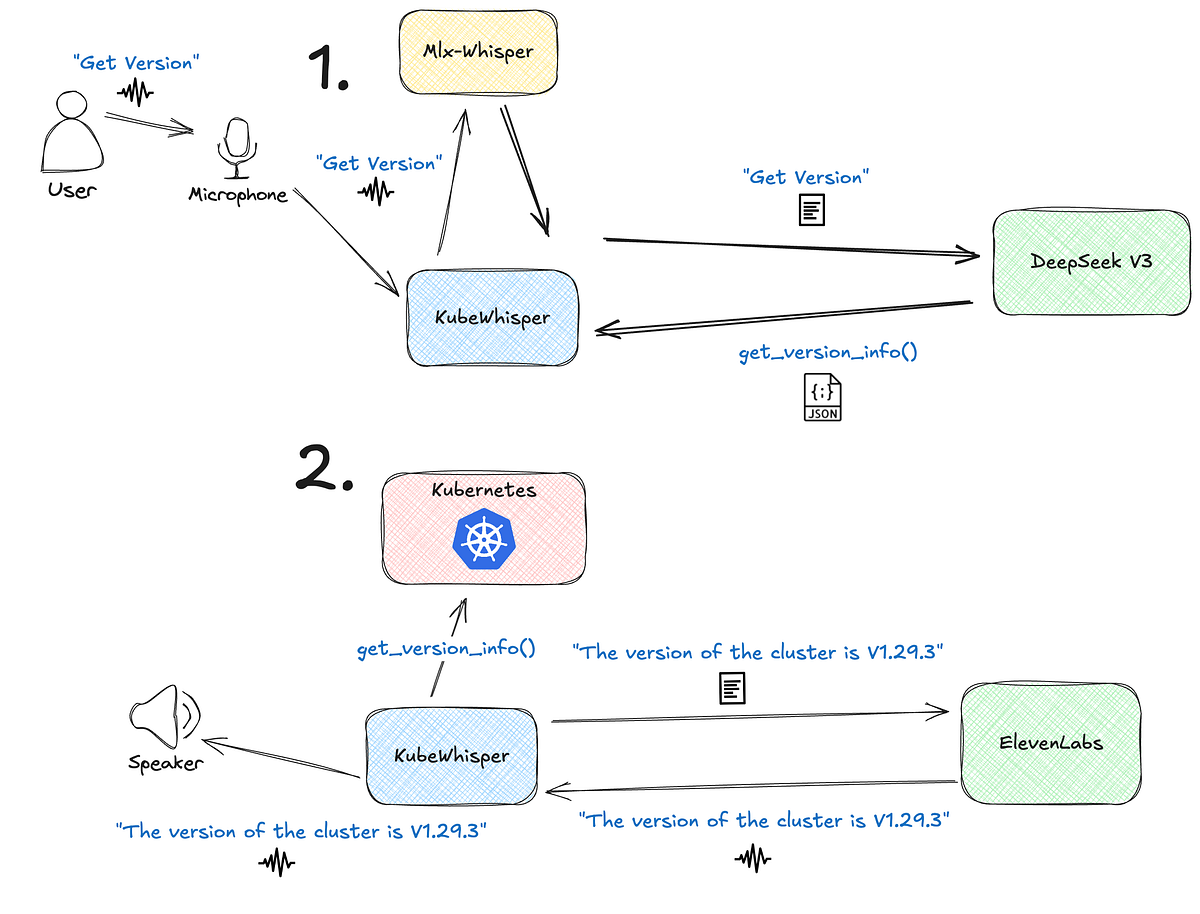
Step 1: Voice command processing and function identification
This step shows KubeWhisper starting the command execution. It all starts with you, the user, saying “Get Kubernetes Version” into your microphone.
First, KubeWhisper records your voice and immediately uses mlx-whisper to transcribe it into a text string on your local machine. The system then sends this transcribed text to the DeepSeek V3 model.
The model then determines what command you’re asking for and what function to execute, and returns a structured JSON response with the action and any optional parameters.
Step 2: Kubernetes interaction & response delivery
In this step, KubeWhisper takes the structured information from the DeepSeek API and talks to your Kubernetes cluster.
KubeWhisper then takes this structured information from the get_version_info function and, importantly, constructs a natural-sounding response sentence locally using the response_template included in the function’s metadata.
For example, the response_template of the function get_kubernetes_latest_version_information is “Latest Kubernetes stable version is {latest_stable_version}”. We avoid sending all the information to the LLM for response generation.
We send this text to ElevenLabs via their API for conversion into high-quality audio.
That’s it. KubeWhisper sends the audio stream to your speaker, and you’ll hear the version of your Kubernetes cluster. It's all done locally and only using the cloud when needed.
I know this looks like a lot of stuff, and it is! But here’s the thing: we’re using the best of both worlds.
Want to see how we did this? Let’s go into the Python code.
Implementation details
Now, let’s dive deeper into KubeWhisper’s hybrid architecture. The diagram below shows the core modules and how they interact to enable the voice-controlled experience.
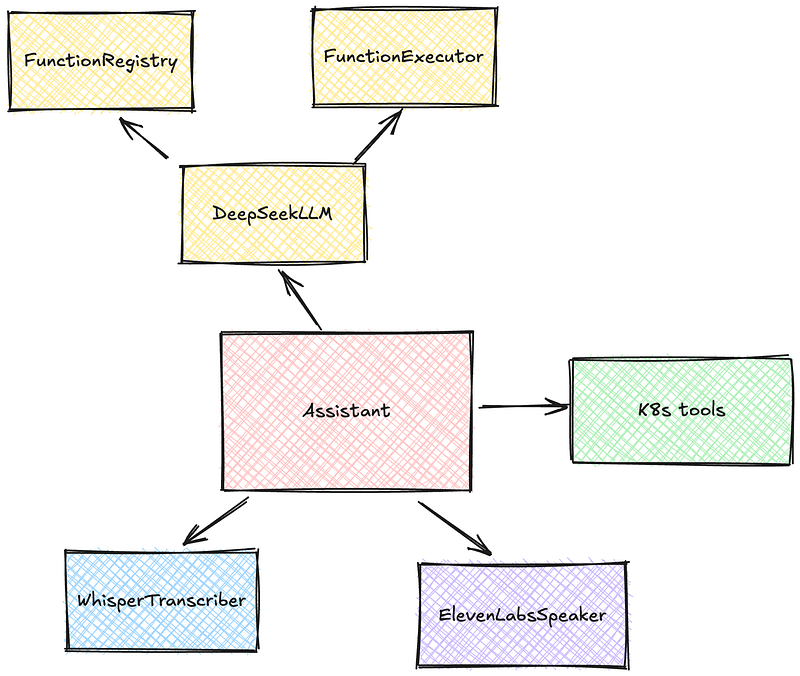
To truly understand how the new KubeWhisper works, let’s walk through the implementation details of each core module:
Assistant
At the heart of KubeWhisper is the Assistant class. This module is the central orchestrator, managing all the other components and ensuring they work smoothly. It initializes all the modules and manages the user interaction via its process_query and process_speech methods.
It contains various parameters that can change the behavior of the assistant.
# Initialize assistant
assistant = Assistant(
    model_path=args.model,
    input_device=args.device,
    recording_duration=args.duration,
    output_mode=args.output,
    elevenlabs_api_key=args.elevenlabs_key
)
WhisperTranscriber
The WhisperTranscriber class converts your voice into text on your local machine. It uses mlx-whisper and manages the recording process via the keyboard input. It exposes methods to manage the recording and transcription process.
DeepSeekLLM
So, how does KubeWhisper figure out what you want? That’s where the DeepSeekLLM class comes in. It’s like the brain of the operation, taking the text from your voice and figuring out the correct Kubernetes command.
Now, here’s the thing: I mentioned earlier that DeepSeek V3 doesn’t have built-in support for “function calling” — a feature where the LLM directly tells the system which function to use.
Instead of relying on native function calling, we use a carefully crafted prompt that guides DeepSeek V3. Think of it like giving it a concrete instruction manual.
We designed this prompt to:
- Show tools: It first gives DeepSeek V3 a list of all the functions KubeWhisper can use (like “get pod logs” or “get cluster version”).
- Provide simple instructions: It tells the LLM that if your question matches one function, it should return a special JSON object with the function’s name and any parameters needed.
- Offer examples: It includes examples that show how to format a function call JSON, making it even easier for the LLM to understand the task.
Here’s the exact prompt we’re using and send to the LLM with each question:
Available functions for data queries:
{tools_formatted}

Instructions:
1. If the question asks for data that can be retrieved using one of the functions,
return a function call JSON without backticks or formatting.
2. If it's a general question, conversation, or opinion, return a normal text response.
3. If unsure, attempt to provide a helpful text response.

Example function calls:
Weather query: "What's the temperature in Paris?"
{{
   "type": "function",
   "name": "get_current_weather",
   "parameters": {{
       "location": "Paris",
       "unit": "celsius"
   }}
}}

Air quality query: "How's the air in Beijing?"
{{
   "type": "function",
   "name": "get_air_quality",
   "parameters": {{
       "location": "Beijing",
       "index": "aqi"
   }}
}}

Example text responses:
- "What's the history of Amsterdam?" -> Historical information about Amsterdam...
- "Should I visit Amsterdam?" -> Travel advice about Amsterdam...

Question: {question}
As you can see, we’re providing detailed instructions and examples to guide the LLM. We’re also passing along the tools in JSON format that list each of the functions in our registry.
Here’s a sneak peek at how the ask_question method uses this prompt and talks to the DeepSeek API:
async def ask_question(self, question: str, **kwargs) -> Dict[str, Any]:
    """Send the question to the LLM and process the response."""
    tools = self.get_tools()
    prompt = self.generate_prompt(question, tools)

    if kwargs:
        params_json = json.dumps(kwargs, indent=2)
        prompt += f"\n\nParameters for the function call:\n{params_json}"

    try:
        response = await self.llm.ainvoke(prompt)
        content = response.content.strip()

        if content.startswith("{"):
            try:
                parsed_response = json.loads(content)
                self.validate_response(parsed_response, tools)
                return parsed_response
            except (json.JSONDecodeError, ValueError) as e:
                return {"error": f"Validation error: {str(e)}"}
        else:
            return {"response": content}

    except Exception as e:
        return {"error": f"Unexpected error: {str(e)}"}
Notice how, after sending the prompt, we check if the response is a JSON object? If it is, we know DeepSeek V3 has identified a function. It’s a simple yet effective way to work around the lack of native function calling.
This prompt, combined with the FunctionRegistry, is how we can understand your commands, even without the native function calling feature.
FunctionRegistry
The FunctionRegistry is a core part of KubeWhisper because it enables the dynamic and automatic management of the functions. It uses a decorator that simplifies adding new functions and keeps all related metadata together.
This decorator not only registers each function but also includes important information, such as a description for the LLM and a response_template for generating output.
Here’s how the register decorator works:
@classmethod
def register(
    cls,
    description: str,
    response_template: str,
    parameters: Optional[Dict[str, Any]] = None,
):
  """Decorator to register a function with the registry."""

  def decorator(func: Callable):
    # Attach metadata to the function
    func.metadata = {
        "description": description,
        "response_template": response_template,
        "parameters": parameters,
    }
    cls.functions.append(func)
    return func

  return decorator
And here’s how we use it to register a function with its metadata:
@FunctionRegistry.register(
  description="Retrieve the latest stable version information from the Kubernetes GitHub repository.",
  response_template="Latest Kubernetes stable version is {latest_stable_version}.",
)
async def get_kubernetes_latest_version_information() -> Dict[str, Any]:
  """Get the latest stable Kubernetes version from GitHub."""
  url = "https://raw.githubusercontent.com/kubernetes/kubernetes/master/CHANGELOG/CHANGELOG-1.28.md"

  async with aiohttp.ClientSession() as session:
      async with session.get(url) as response:
          content = await response.text()

  # Extract version using regex
  version_match = re.search(r"# v1\.28\.(\d+)", content)
  if version_match:
      latest_version = f"1.28.{version_match.group(1)}"
  else:
      latest_version = "Unknown"

  return {"latest_stable_version": latest_version}
FunctionExecutor
The FunctionExecutor class executes the function selected by DeepSeekLLM. It retrieves the function from the FunctionRegistry and the metadata, such as the response template.
It then constructs a text response from the result of executing the function with the data from the JSON that comes back from DeepSeekLLM.
ElevenLabsSpeaker
The ElevenLabsSpeaker class manages the text-to-speech conversion and uses the ElevenLabs API to do it.
K8s tools
Finally, the k8s tools module contains all the functions KubeWhisper uses to interact with your Kubernetes cluster. These functions use the Kubernetes client library to retrieve data from the cluster and use the FunctionRegistry decorator.
Security in the hybrid KubeWhisper
I can almost hear you wondering: “Wait a minute… am I just letting an AI loose on my Kubernetes cluster? That sounds… risky.”
And you’re right to think about security. It’s crucial to understand that KubeWhisper, whether in its original or the new hybrid form, isn’t some rogue AI that can do anything it wants. It’s more like a specific remote control with a pre-defined set of buttons.
Let’s explore how we maintain a tight security model.
Function-based access
The foundation of KubeWhisper’s security is the concept of function-based access control. Remember how we use the FunctionRegistry to define and register functions?
These registered functions, along with their metadata such as description and response_template, act as our security boundary. KubeWhisper can only execute the functions defined in the registry, nothing else.
Even if someone asks, “Hey, delete all my pods!” (please don’t!), the assistant can’t do it because no such function is registered.
Here’s a glimpse at a basic function definition:
@FunctionRegistry.register(
  description="Retrieve the latest stable version information from the Kubernetes GitHub repository.",
  response_template="Latest Kubernetes stable version is {latest_stable_version}.",
)
async def get_kubernetes_latest_version_information() -> Dict[str, Any]:
  """Get the latest stable Kubernetes version from GitHub."""
  url = "https://raw.githubusercontent.com/kubernetes/kubernetes/master/CHANGELOG/CHANGELOG-1.28.md"

  async with aiohttp.ClientSession() as session:
      async with session.get(url) as response:
          content = await response.text()

  # Extract version using regex
  version_match = re.search(r"# v1\.(\d+)\.(\d+)", content)
  if version_match:
      latest_version = f"1.(\d+).{version_match.group(1)}"
  else:
      latest_version = "Unknown"

  return {"latest_stable_version": latest_version}
You can see the functions, what they do, the input they require, and the output format defined within the code. This is the security boundary of the tool. It cannot be executed if you do not specify a function, even if the LLM would like to call that function.
Using your existing Kubernetes credentials
When KubeWhisper executes one of its allowed functions, it’s using the same Kubernetes credentials you’ve already set up with kubectl.
This is a key part of the design. All the standard Kubernetes RBAC (Role-Based Access Control) rules still apply. KubeWhisper doesn’t bypass any of the permissions you’ve configured.
If you can’t do something with your current Kubernetes permissions, neither can KubeWhisper.
Addressing concerns
We introduced a local speech-to-text component using mlx-whisper in the new hybrid approach. You might wonder if this adds any additional security risks. Here’s the good news:
- Local Processing: The audio is processed entirely on your machine when using mlx-whisper. It never leaves your local environment, avoiding the risk of your voice data being exposed during transcription.
- No User Data Collection: mlx-whisper and KubeWhisper are not collecting or sending personally identifiable information. This is a tool that you control and use locally.
Key differences from the previous version
In the previous version, we were using cloud services for voice transcription, which had their own security measures and data handling policies.
Our new approach uses a local STT setup with mlx-whisper, giving you more control over your data and privacy since it remains on your local device.
Combined with only using cloud APIs when necessary, this provides much better security control than the previous implementation.
The hybrid KubeWhisper maintains the core security principles of function-based access and RBAC compliance while enhancing data privacy because of the local STT component.
You get the convenience of voice control without compromising the security of your Kubernetes environment.
Real-world usage and costs
Let’s talk about the real-world impact: how much does the hybrid KubeWhisper cost, and how does it compare to the previous version?
A tale of two approaches
In the previous version of KubeWhisper, which relied on the OpenAI Realtime API for both speech-to-text and text-to-speech, I saw costs escalate pretty quickly during development.
I quickly burned through $10 in just a few hours by testing different prompts and functionalities. And remember, that was just me testing; imagine the cost of continuous, daily use.
With the new hybrid approach, we’ve decimated these costs by shifting the heavy lifting of speech-to-text to local processing with mlx-whisper.
The local STT component has significantly brought the costs down because this has moved the most expensive component of the overall solution to your device.
This leaves us with a low-cost online LLM and the ElevenLabs API for text-to-speech, which has a generous free tier.
Here’s a rough comparison based on my usage:
- Previous (OpenAI Realtime API for all): Estimated $10 — $20 for a few hours of development and testing per day, depending on usage.
- New (Hybrid): Roughly 1.50 per day for the online LLM if you use it throughout the day, plus Elevenlabs, which can be completely free based on your needs.
Important note: These are approximate costs based on my use case. Your actual expenses may vary depending on the usage level and which functions you use most often.
Adding your own commands
The pre-built commands are helpful, but the real magic of KubeWhisper is in its customization. You can add your commands to suit your needs.
In the previous version of KubeWhisper, adding a new command required managing two separate lists. Now, we have a decorator that simplifies adding a new command.
It’s just one step.
Define the function in k8s_tools.py
You define a function that interacts with your Kubernetes cluster, just like any other function in Python.
Remember, for this function to be recognized by the DeepSeekLLM you must decorate the function with the @FunctionRegistry.register decorator. This decorator requires a description to tell the LLM what this function does and a response_template.
This is the main difference from the previous version. There is a response_template that you must define to tell KubeWhisper how to create the final text response to the user. You will need to include the fields of the returned JSON in this response_template so KubeWhisper can construct a string.
Here’s a complete example of a function that retrieves pod logs:
@FunctionRegistry.register(
    description="Get the logs from a specified pod for the last hour.",
    response_template="The logs from pod {pod} in namespace {namespace} are: {logs} (time range {time_range})",
    parameters={
        "type": "object",
        "properties": {
            "pod_name": {
                "type": "string",
                "description": "Name of the pod"
            },
            "namespace": {
                "type": "string",
                "description": "Namespace of the pod",
                "default": "default"
            }
        },
        "required": ["pod_name"]
    },
)
async def get_recent_pod_logs(pod_name: str, namespace: str = "default") -> Dict[str, Any]:
  """Get the logs from a pod for the last hour."""
  try:
    # Load kube config
    config.load_kube_config()
    v1 = client.CoreV1Api()

    # Calculate timestamp for one hour ago
    one_hour_ago = datetime.datetime.now(datetime.timezone.utc) - datetime.timedelta(hours=1)

    # Get logs
    logs = v1.read_namespaced_pod_log(
        name=pod_name,
        namespace=namespace,
        since_seconds=3600,  # Last hour
        timestamps=True
    )

    return {
        "logs": logs,
        "pod": pod_name,
        "namespace": namespace,
        "time_range": f"Last hour (since {one_hour_ago.isoformat()})"
    }
  except Exception as e:
      return {"error": f"Failed to get logs: {str(e)}"}
Here you can see it’s decorated with the @FunctionRegistry.register decorator, with the description and response_template. The response_template has the return JSON fields in curly brackets so KubeWhisper can generate a response from those fields.
That’s all you need to define a new command. The FunctionRegistry decorator tells KubeWhisper that a new function is available, using the description to find the correct function and the parameters.
The metadata in the decorator is available to the DeepSeekLLM to find the function and parameters and to KubeWhisper to generate a response to the user.
Setting up your environment
Want the simplest setup possible? Let me show you how UV makes this easy.
Here’s what you need:
- Python 3.11 or higher
- A working Kubernetes cluster with kubectl configured
- A DeepSeek API key
- An ElevenLabs API key
- A decent microphone (your future self will thank you)
Installation is a breeze:
# 1. Install UV (if you don't have it already)
curl -LsSf https://astral.sh/uv/install.sh | sh

# 2. Clone the repository and navigate into it
git clone https://github.com/PatrickKalkman/kube-whisper-hybrid.git
cd kube-whisper-hybrid

# 3. Set your API keys as environment variables (replace with your actual keys)
export DEEPSEEK_API_KEY='your-deepseek-api-key-here'
export ELEVENLABS_API_KEY='your-elevenlabs-api-key-here'

# That's it for setup!

# 4. Run the assistant in different modes:
# Text mode (ask a question directly):
uv run kubewhisper -t "show me all pods in the default namespace"

# Voice mode (start listening):
uv run kubewhisper --voice

# Voice mode with specific input device (find device index with: python -m sounddevice):
uv run kubewhisper --voice --device <device_index>

# Voice mode with voice output
uv run kubewhisper --voice --output voice

# Text output
uv run kubewhisper -t "show me all my namespaces" --output text

# Verbose output (for more details)
uv run kubewhisper -v --text "show all my services in the kube-system namespace"

# Change whisper model
uv run kubewhisper --voice --model "openai/whisper-small"
Try these commands yourself, or go directly to the GitHub repository.
What’s next?
You know what’s cool? This hybrid version of KubeWhisper is just the beginning of voice-controlled kubernetes for everyone.
But I’ve noticed something lately — and you might have too. DeepSeek V3’s popularity has gone through the roof, which is incredible! But it also means the platform is getting a bit slow. While combining local speech-to-text with a budget-friendly LLM has been a massive win for cost and privacy, those response times are creeping up.
That’s why I’m working on what I think could be a game changer: running everything locally on your machine. No cloud services. No latency issues. Just you talking directly to your cluster.
And between you and me? I’m already deep into experimenting with local LLMs to make this happen.
Here’s what I’m looking into:
Fully local LLM
I’m experimenting with making the LLM component entirely local using alternatives like DeepSeek-R1-Distill-Qwen-7B or other open-source LLMs you can run locally.
Fine-tuning for function calling
I am working on a project where I will fine-tune a smaller model to do function calling. This is one of the core parts of the new KubeWhisper, and getting rid of the external API here would make the solution entirely local.
Community input
Community input will be key to this project, so please share your experiences with KubeWhisper or local models that can help the project.
This is all about making powerful tools available to everyone. So try KubeWhisper, share what you like, and let me know what you want next.


