4 Best Practices To Create Command-Line Interfaces in Python
Real-world examples that show how to implement command-line interfaces in Python
If you are like me, you probably have many Python scripts lying around that automate the boring tasks. Most of my scripts use hard-coded paths and options. If I need them, I open them in my code editor and make the necessary changes.
However, there is a better way. By investing a bit more time to parameterize these scripts, you can reuse them without having to change them every time.
We are going to parameterize these scripts by adding a command-line interface.
We are going to discuss and build the following four options:
- Parse and process command-line arguments manually
- Use argparse, an internal Python library
- Use Click, an external Python library
- Use Typer, another external Python library
You can find the source files for these solutions in this Github repository.
The Script, Generating a Software License
Instead of using another hello world demo, we will make it more interesting. We are going to use a real-world example. We are going to create a script that you can use to create a software license.
You can use a software license to protect the use or redistribution of software. A software license can take many forms. We are going to use a file that you must distribute next to the software that uses it.
There are two parts. First, there is the application that generates a software license. Secondly, there is the application that only functions if it has access to the software license.
In this article, we are talking about the first part: the Python script that generates the file that contains the software license.
The program needs the following information to generate a software license.
- MAC address — The MAC address of the machine that is running the program
- Start date — From which date the license is valid
- End date — Until which date the license is valid
- Features — A list of features that the customer can use
- Version — The version of the application that uses this license
- System Id — An identification of the system
The license file stores this information encrypted. The encryption key is a combination of the MAC address and a fixed password.
When the application starts, it gets the MAC address of the system and decrypts the license. It then validates the information, such as the start and end date.
The implementation of the script
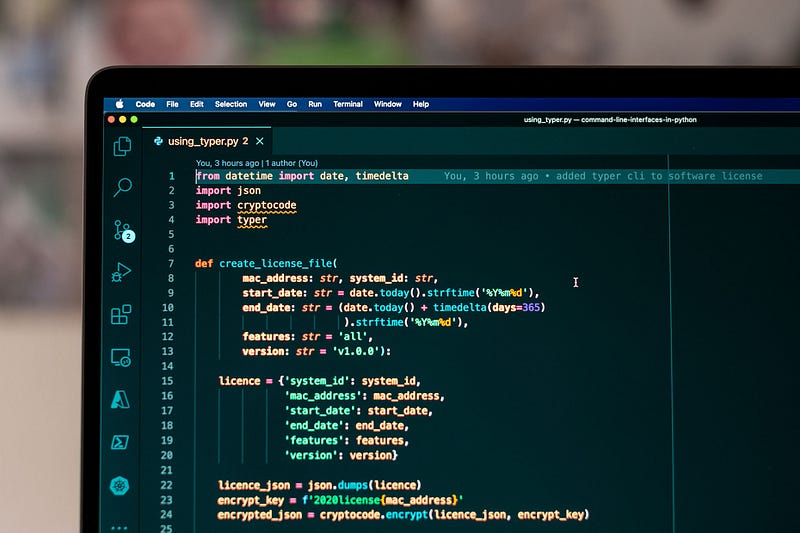
The first implementation of the script does not have a command-line interface. If you want to create a license, change the parameters of create_license_file and run the script.
The script creates a dictionary on line 7 that contains the necessary information. We then translate this dictionary into JSON.
The application encrypts the JSON using an encryption key, consisting of the MAC address and a fixed token. Finally, we write the encrypted string to the license file:
Manually Parsing and Processing Command-Line Arguments
The first command-line interface we are going to build won’t use any external modules; we will do the parsing and validation ourselves.
Before we can start, we first have to talk a bit about sys.argv. This global variable contains the list of command-line arguments passed to your Python script. The first item at index 0, sys.argv[0], contains the name of your script.
Let’s look at a small example. We iterate over sys.argv like any other list in Python and print each item.
When we run this program, we get the following result. You see that the first item in sys.argv is the name of the script itself. Following are the passed arguments.

One thing to remember is that sys.argv is global. A good practice is to make a copy of it before changing it.
The structure of the command-line interface
Before we can start parsing and validating the command-line arguments, we must think about the structure. What parameters do we need and how are we going to name them? Instead of coming up with our own version, we will use best practices.
We are going to use the structure as described in Command Line Interface Guidelines. This is an open source guide to help write better command-line programs.
Some of the guidelines that the guide describes.
Basic guidelines
Your script should return a zero exit code on success. If it fails it should return a non-zero exit code.
You should send all primary output to stdout. Log messages and errors should be sent to stderr.
Displaying help
Another thing that the CLI guidelines state is that your program should display help text when no options are passed or the -h or --help flag is used.

Parsing command-line arguments and respecting the guidelines
Now it is time to implement parsing the arguments and apply the guidelines.
Below you see the method that accepts sys.argv and returns a LicenseInformation class. This class has members with all the information that the program stores in a license file.
If you provide no arguments, the function prints the help string and exits the program with exit code 0.
If there are arguments, we usecollection.deque. Deque is a double-ended queue. Double-ended means that you can pop items from either side of the queue. In our case, we want to start from the left, so we use popleft. Here’s the code:
We use the class that parse returns to create the actual license file.
Only the system id and the MAC address are required. The other arguments will get a default value. The defaults are added to the constructor of the LicenseInformation class. Here’s the code:
Validation
Until now, we haven’t validated the given arguments. We could, for example, validate if the user provided the two required arguments — system id and MAC address. We could also make sure that the MAC address has the correct format.
Also, we could make sure that the start and end dates are in the correct format — and that the end date comes after the start date.
I won’t add these validations because, as you can see, the amount of source code quickly adds up. Adding validation will make the code even more complicated.
We will save the validation for the next examples, where we will use the Python modules. This makes life much easier.
Using argparse, an Internal Python Library
Python introduced the argparse module in v3.2. It is an internal module that makes it easy to write user-friendly command-line interfaces.
You have to perform the following steps to use it:
- Import the Python
argparselibrary - Create the parser
- Add optional and positional arguments to the parser
- Execute
.parse_args()
Let’s see how we use argparse to create the command-line interface for the software license program.
First, we create an instance of argparse.ArgumentParser giving the usage and the description. Then, we add all the arguments one by one by calling add_argument on the parser. We tell it the type of argument and if it is required or not. Here’s the code:
The object that parse_args returns can be used to get the values of the parsed arguments. We pass this args object to the create_license function. We then get the individual arguments by specifying fields such as args.m.
Now, when we run the program without arguments, we get the following output. It shows the usage information, and it shows an error message that states that not all the required arguments are given.

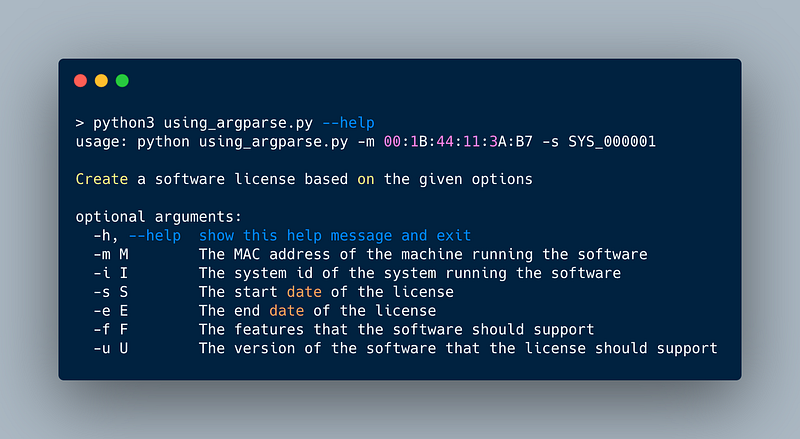
This is quite an improvement from our manual parser. The program is much easier to extend and change. It uses the arguments you give to add_argument to perform validation automatically
Using Click, an External Python Library
While argparse is an internal library, Click is a Python package that you will have to install using pip. This is one of the disadvantages when using an external library.
Click is a package that helps you create beautiful command-line interfaces with as little code as necessary. It is one of the packages that the Command Line Interface Guidelines recommends for use with Python.
Click uses decorators to define the command and parameters. Therefore, we changed the create_license_file and added the decorators to the function.
We added the required=True to the MAC address and the System Id to ensure that these parameters are required. The code is below:
When we execute the script without any arguments or --help, we get the following result. Click reports the missing arguments and shows a help console when asked.
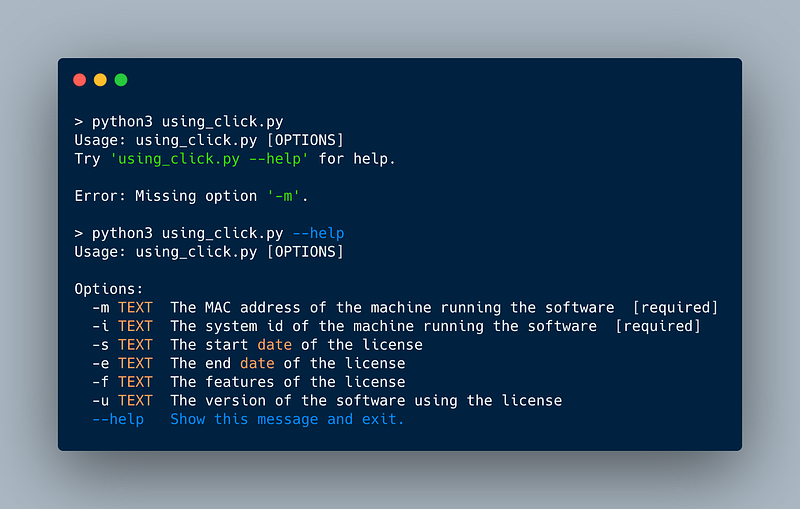
If we compared the number of lines of code of the Click implementation (34) versus manual implementation (90), we see that we reduced it to half — quite an improvement.
Using Typer, an External Python Library
Another external library that the command-line interface guidelines recommend for usage with Python is Typer. What is interesting is that Typer builds upon Click.
Below you will see a simple example. The difference between Click and Typer is that Typer uses type hints. So, you have to add the type of the parameter. You can seee the str type of the name argument on row 3:
Converting the software license script using Typer
Below is the complete script to create a software license with Typer. I changed the parameter names of create_license_file to make them more descriptive. Typer uses these names as parameters on the command line. The code is as follows:
Now, this is the only thing you need to change to create a command-line interface with Typer. If we run the script without any arguments, we get the following result.

If you don’t provide a default for a parameter, Typer assumes that they are required. You don’t need any option on the command line. Typer assumes that the first argument is the MAC address and the second is the system id.
Typer also generates a nice usage/help screen when we use --help as you can see below.

Conclusion
This article showed you how to transform the scripts that you use to automate the boring tasks into excellent full-featured programs with a mature and user-friendly command-line interface.
If you don’t want to add an external dependency to your script, you should use argparse. This internal Python library makes it easy to add a command-line interface to your scripts.
If you don’t mind having an external dependency, the Click package is an excellent choice. By adding decorators to your functions, you can quickly add a user-friendly command-line interface to your script.
We showed Typer last. Typer is also an external library. It is based on Click and uses typings to create a command-line interface even easier.
You can find the source code for these examples in this Github repository.
Thank you for reading.


